- Thread starter
- #221
Airframes
Benevolens Magister
Well here's a bit more then Daniel!
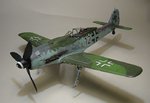
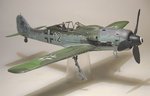
I've got the main undercarriage legs and the tail wheel in place. A word of caution to those of you building this kit; the main gear legs are not a positive fit, and it might appear that you have them in the right way, at the right angle.
Check them!
I rested the model on my cutting mat, when the legs were almost set, to check the angles etc. I lined up the centre of the fuselage with one of the vertical grid lines, and aligned each main axle along a horizontal grid line. Considering the initial alignment had been done by eye, I was pleased to see that the angles were correct. However, when I measured the heights of each wingtip, there was a 7mm difference! That's 336mm, or approx 13.5 inches at full scale! A little gentle manipulation managed to bring the legs into line, and got rid of the lopsided look.
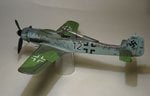
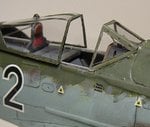
Having been prompted by the photo on the front of the instruction sheet, the canopy was test-fitted, to check for any gaps, a common fault on most '190 kits. Sure enough, light could bee seen between the cockpit sill and the bottom frame of the canopy, so I made some canopy runners from stretched sprue, and cemented them in place, from the bottom edge of the windscreen, to a point roughly aligned with the centre point of the baggage hatch cover. On the 'real thing', the canopy frame is not totally rigid, and flexes to follow the line of the runners, so there shouldn't be a gap beneath the frame.
Getting the canopy to sit square and stay cemented in place took a bit of patience, but it seems to have bedded down nicely, and the internal part of the antenna wire stayed put, thankfully!
All that's needed now in this area, is a tiny bit more sealant at the base of the windscreen, and a bit of touch up, after removing any excess Kristal Klear, some of which is visible in the final picture.
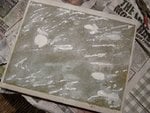
With the prop in place, the 'Dora' is starting to look the part, but there's still quite a bit to do in the way of detail work, including the antenna wire, which will be the last item to be fitted. Meanwhile, the base is coming along, with the streaks of snow having received their first coat of paint, ready for glazing and detailing. The circular patches visible on the base will eventually be ice-covered puddles, and the whole lot will be darkened slightly, and given a cold, wet look.
I'll post some more shots when a bit more progress has been made.
I've got the main undercarriage legs and the tail wheel in place. A word of caution to those of you building this kit; the main gear legs are not a positive fit, and it might appear that you have them in the right way, at the right angle.
Check them!
I rested the model on my cutting mat, when the legs were almost set, to check the angles etc. I lined up the centre of the fuselage with one of the vertical grid lines, and aligned each main axle along a horizontal grid line. Considering the initial alignment had been done by eye, I was pleased to see that the angles were correct. However, when I measured the heights of each wingtip, there was a 7mm difference! That's 336mm, or approx 13.5 inches at full scale! A little gentle manipulation managed to bring the legs into line, and got rid of the lopsided look.
Having been prompted by the photo on the front of the instruction sheet, the canopy was test-fitted, to check for any gaps, a common fault on most '190 kits. Sure enough, light could bee seen between the cockpit sill and the bottom frame of the canopy, so I made some canopy runners from stretched sprue, and cemented them in place, from the bottom edge of the windscreen, to a point roughly aligned with the centre point of the baggage hatch cover. On the 'real thing', the canopy frame is not totally rigid, and flexes to follow the line of the runners, so there shouldn't be a gap beneath the frame.
Getting the canopy to sit square and stay cemented in place took a bit of patience, but it seems to have bedded down nicely, and the internal part of the antenna wire stayed put, thankfully!
All that's needed now in this area, is a tiny bit more sealant at the base of the windscreen, and a bit of touch up, after removing any excess Kristal Klear, some of which is visible in the final picture.
With the prop in place, the 'Dora' is starting to look the part, but there's still quite a bit to do in the way of detail work, including the antenna wire, which will be the last item to be fitted. Meanwhile, the base is coming along, with the streaks of snow having received their first coat of paint, ready for glazing and detailing. The circular patches visible on the base will eventually be ice-covered puddles, and the whole lot will be darkened slightly, and given a cold, wet look.
I'll post some more shots when a bit more progress has been made.