Done : Major Tratt's Me410A-1/U2/R4: Gruppe Build

Ad: This forum contains affiliate links to products on Amazon and eBay. More information in Terms and rules

UPDATE:

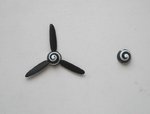
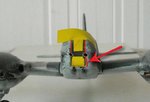
No pics just yet as they wouldn't be much different than those already posted. After 3 days of messing with the spirals, I was able to get a decal on one. Settled in with Microsol - didn't play too much as they would tear - and when dry gave a quick coat of gloss to hold it. Yeah, right. While test fitting the propellor, bits and peices of the decal came off!! Apparently I hadn't the spiral exactly flat so my fingers just broke off the now brittle pieces. Not too bad as most of the spiral was still there and I just had to touch up with white and a little Gr/Blk paint. But now I'm wondering whether to try another decal on the other or say the 'ell with it and brush it on. hmmmmmm.....

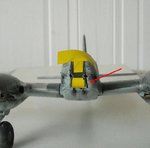
Tailwheel is done and attached and the rocket tubes are together and painted. I may attach them tonight.

My 3 worrisome areas were the spirals, the canopy and the antenna wire. I'm attacking the spirals and I've done canopys, just got to take it slow but the wire I've never done before. I have to admit I've been a half-@ssed builder so some things I just never bothered with. But I feel I'm in the spotlight here so I'm gonna try and I found a novel way that just might work and possibly get a laugh outta you guys. :)

Any major changes and will post some more pics.
 
Do You Know Your Decals?

Can you tell which one is the Pro-Modellor decal? Only choose one!
 

Attachments

  • bits001.jpg
    bits001.jpg
    29.6 KB · Views: 78
If you choose the one on the left, you win an all exspense paid trip to a New Jersey landfill!!!!

If you choose the one on the right, you get to publish your own Model Magazine because you can tell a good decal from a rotten, sorry excuse for markings!

Some pics of the canopy. As you can see its in several parts including a split down the middle! Wonderful! The second pic shows what I'm using to mask off the canopy. I have no idea wher I got the masking for a 1/32 Storch (?) but I'm using it. Its one way that I do canopys.

The one problem now is that the front piece when test fit has a huge gap on one side. Trying to figure out how to fill without clouding the clear plastic.
 

Attachments

  • bits002.jpg
    bits002.jpg
    25.6 KB · Views: 60
  • bits003.jpg
    bits003.jpg
    43.3 KB · Views: 81
Here ya go Wurger.

Its not glued in. The yellow tape is holding it in place. As you can see I have a bad fit and line-up problem.
 

Attachments

  • nose100a.JPG
    nose100a.JPG
    55.6 KB · Views: 80
Ouch! I wouldn't like to have to fix that. Build is looking great so far! :thumbleft:
 
Well either I pull to the side where the gun troughs line up and fill the opposite gap and re-drill a new trough or....jeez, who knows. My problem, really, is finding some type of gap filler that won't cloud the clear plastic. Other than that I'm ok. I can fix. I can fix. I can.......

About the props. The one on the left is the one that came with the kit. Horrendeous! The other I paint a white circle on the tip then used a decal spiral from a Bf 109 and laid it!
 
Great work Chris. I didn't even attempt to use some of the 'Pro Modeller' stencil decals, especially those for the drop tanks, as I knew they'd break-up as soon as I looked at them!
Regarding that nasty gap, see my reply to your question in the other thread, the one about 'putty, gaps' I think(!). Now that I've seen the problem, my response stands, but you can then finish-off with a talc and varnish mix, over the PVA, to achieve an even smoother, flat finish. OK, it won't centralise the transparency, but once painted, it should look fine.
EDIT. Nearly forgot, you might need to trim off a TINY bit at the bottom of the transparent part, and treat this area also, in order to get the gun openings lined up. These, once the part has set, can be drilled-out a little if required.
 
Now I can see that problem. I think there are a few ways to correct it but one of easier methods can be the gap filling with pieces of thin plastic.It can be transparent or non transparent, it is up to you only which kind you will use.You should glue these pieces to the fuselage then paint them with camo paints.Also you can make your own "galss" for the area.
But the best way here can be the Clearfix using I think.
 

Attachments

  • nose100a1.jpg
    nose100a1.jpg
    49.1 KB · Views: 89
I got ya!!

Pack it out with some strips and then attach. Make the opening smaller! I'm not so worried about the gun holes. The only actual clear part will be where I taped in yellow. All the rest are braces and need painting so making a hole won't be a problem.

Now to think this through! Thanks guys!!

Do you guys see the difference between those spinners. The one on the right is the made up one I did and sits nicely. The other is the crap decal and wrinkled and out of thickness. Needs work.
 
Agree with all. You've done a good job on those spinners mate. Until you mentioned them, I hadn't noticed anything amiss, and even then, it's minimal - nice one!
 
I'm pleased to report that the operation was a success! I followed Wurger's sugestion and found thin strips and packed the sides. Wasn't much room to play with and it took me all morning but its done. I also added a strip across the bottom that had a gap begin to show. That brought the left gun hole in line and the one on the right I can re-drill. Glued it with some white glue, filled some small gaps and waiting to dry so I can drill. I'm actually happy!

No pics yet as I was concentrating so much I didn't bother but will soon. Also started painting the canopy and when that front glass is set and I'm ready for the canopy then to complete the cockpit assembly. There are gun sights and such that I left off until this point. The Finish Line is near!!!
 

Users who are viewing this thread

Back