lesofprimus
Brigadier General
WOW!!!
Went slightly heavy Harrison.... I may have missed the pic of that particular joint, but the only real reason to lay it on so heavy would be if the two pieces going together didnt match up correctly....
Lemme see if I have a pic of how I did it....
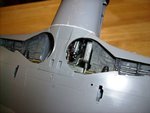
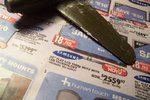
OK, first pic shows the bottom of my Dora-9 and the seam... There was no sanding for this seam... As u can see, there is very little extra putty laying about......
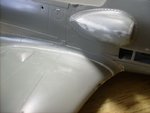
Second pic shows the wingroot and the intake... The intake was sanded down, but the wingroot putty was not...
What kind of tool/item did u use to apply the putty H??? Did u miss where I said I used a toothpick??? Alittle bit of putty goes a looooonnnng way man... If we're trying to fill up a gap/hole where there shouldnt be one, just fill in the gap with as minimal amount of "extra" that u gotta get rid of...
What I do, and u may be able to do it as well for ur next seam, is to apply the smmmmaaaaallll amount of putty with a toothpick right into the gap, kinda pack it in there alittle bit with the tip of the toothpick.... Then, if u have some around, get some nail polish remover and a Q-Tip... Dip the tip into the remover and blot it off some, on ur skin or a napkin or cloth.... Then lightly wipe down the seam and putty.... I would wait just a couple of minutes for it to set up and then do it.... Dont wait for it to harden or cure....
We're just tryin to fill in a gap right??? Also, the tape idea that Dirk posted is the right way to go about it, but keep the tape edge right on the seam line ur tryin to fill in.... Real small gap in the tape, just slightly wider than what the seam/gap is....
Any questions???
Went slightly heavy Harrison.... I may have missed the pic of that particular joint, but the only real reason to lay it on so heavy would be if the two pieces going together didnt match up correctly....
Lemme see if I have a pic of how I did it....
OK, first pic shows the bottom of my Dora-9 and the seam... There was no sanding for this seam... As u can see, there is very little extra putty laying about......
Second pic shows the wingroot and the intake... The intake was sanded down, but the wingroot putty was not...
What kind of tool/item did u use to apply the putty H??? Did u miss where I said I used a toothpick??? Alittle bit of putty goes a looooonnnng way man... If we're trying to fill up a gap/hole where there shouldnt be one, just fill in the gap with as minimal amount of "extra" that u gotta get rid of...
What I do, and u may be able to do it as well for ur next seam, is to apply the smmmmaaaaallll amount of putty with a toothpick right into the gap, kinda pack it in there alittle bit with the tip of the toothpick.... Then, if u have some around, get some nail polish remover and a Q-Tip... Dip the tip into the remover and blot it off some, on ur skin or a napkin or cloth.... Then lightly wipe down the seam and putty.... I would wait just a couple of minutes for it to set up and then do it.... Dont wait for it to harden or cure....
We're just tryin to fill in a gap right??? Also, the tape idea that Dirk posted is the right way to go about it, but keep the tape edge right on the seam line ur tryin to fill in.... Real small gap in the tape, just slightly wider than what the seam/gap is....
Any questions???