**** DONE: Revell P-61A 1/48 scale, Nocturnal Nemesis, Night Fighter GB.

Ad: This forum contains affiliate links to products on Amazon and eBay. More information in Terms and rules

Thank you... I painted up the ladder assembly and with a few changes in lighting, you can now see it better and in color. Although, I still have some learning to do in the area of photography. :) 
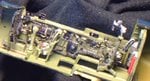
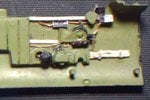
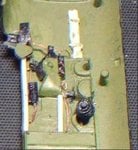
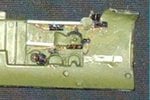
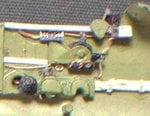
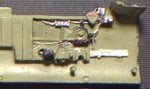
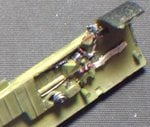
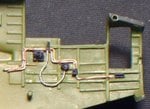
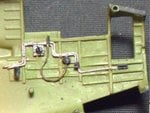
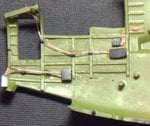
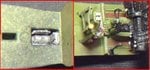
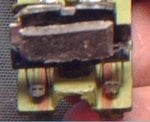
Taking pictures through a magnifying glass is not easy. I have to keep thinking about focal distance. The last photo is to show that there is room for the pilot. :)
 

Attachments

  • cockpit 016.jpg
    cockpit 016.jpg
    10.8 KB · Views: 144
  • cockpit 015.jpg
    cockpit 015.jpg
    70.6 KB · Views: 154
Looking great Bill.
Have you checked the minimum focal distance of your camera? Even with an older, basic digital camera, if it doesn't have a macro setting, I would guess the minimal focusing distance would be around two feet, or less. It might be worth taking some pics at the minimum distance, and then cropping the desired area and re-sizing as required, in a photo-editing programme such as Irfanview.
It might not work, but it could give some reasonable results, depending on the resolution the camera is capable of, and worth a try.
 
You're doing great work here Bill and that's good advice from Terry re the pictures, it's the way I do much of mine and that IrfanView is a great tool.
 
Well my son has gone back to his home, my wife is visiting her parents, and my daughter is going back to work. I've got free time for the rest of this week. Let's see if I can do anything with it. :) Now for the photographs. I'm working with a HP 317 camera with a top of 5MP. I took a series of photos, all with macro's on and edited the pictures with MSPaint which is the only photo software I have without running it through my laptop first. My laptop has another program that does light balances and the like. I took the first series of photos using my magnifying glass and the last series using varying distances. I even took one using 5MP instead of my usual 3MP setting just to have something to compare to. The photos I've posted today are the best from the different configurations and distances I've tested. The best picture was taken through the magnifying glass with overhead light and the camera set to 3MP. The next was taken at a slightly further distance away from the magnifying glass and with an overhead light on. All photos using ambient light were slightly fuzzy so I didn't use them. Third photo was without the magnifying glass and at a distance of two feet with flash. Last photo was taken through magnifying glass at 5MP using the same setup as the first photo. With all the data in, I think I'll stick to 3MP and my magnifying glass. I'll tinker with the photos as I can using the MSPaint program but this is really the best I can do at the moment unless I borrow another camera better than what I have.

Now for what I've done. Over Christmas... Merry Christmas everyone... :) I was able to do a few odds and ends to just about finish the left front side. Still need to do some painting. I installed six control levers with an additional two further down the side. That took some experimenting but I was successful in the end. :) I also added some wiring and tubing. The white bundle of wires at the bottom right are the high power cables going to the radar unit in the nose. The black circles on the bottom left are the trim tab control wheels for Aileron, Elevator, and Rudder. All the other switches are for fuel, propeller control, flap position warning lights and emergency airbrake lever. I hope you like them.
 

Attachments

  • leftside 001.jpg
    leftside 001.jpg
    32.5 KB · Views: 136
  • leftside 002.jpg
    leftside 002.jpg
    18.6 KB · Views: 125
  • leftside 003.jpg
    leftside 003.jpg
    21 KB · Views: 108
  • leftside.jpg
    leftside.jpg
    26.6 KB · Views: 114
Great work Bill. Your attention to detail is admirable.

I've tried shooting pictures through a magnifying glass too but with much less success than you. Ended up buying a macro lens for my Canon SLR a year ago and it made a world of difference.
 
Thanks Andy, when I use a magnifying glass, I turn off the flash on the camera and just use the light that is a part of the glass. I'll take a picture of it later to show what I'm working with. Usually I just hold the cameral steady right on top of the glass,then cut and resize the pictures so they are easier to post. My connection is a dial-up.. Lets face it,this is low tech... :|

I just painted the left side area. I just need to work on the side areas in the RO compartment and I can then start looking at putting the two halves together. :)
 

Attachments

  • leftside 006.jpg
    leftside 006.jpg
    33.2 KB · Views: 113
  • leftside 007.jpg
    leftside 007.jpg
    42 KB · Views: 112
Certainly is, great work Bill! If your camera has a Macro setting, you shouldn't need to use the magnifying glass. It's the focal distance which is the important factor, and most Macro settings work from around 4 inches to 18 inches, with 'Super Macro' getting in close to about one inch or less. Given that the camera is on auto speed setting, and you can have even a desk lamp as the primary light source, you should be able to get sharp pics with good resolution from around 12 inches, give or take a couple of inches. The required area of the oic can then be selected, cropped and re-sized quite easily, in 'Irfanview'. This is a free download programme - just Google Irfanview and you'll find it - and much easier and quicker to use than Corel or Windows Paint.
Most of my pics don't even use the macro setting, unless extreme close-up, and are all hand held, under 50w halogen desk lamps, then edited as above.
 
Thanks guys, I've tried shots from different distances and different levels of light. My Macros focal point seems to be around 2 1/2 feet. Even so it's still not good enough to show the details I want to show. Perhaps when I start doing shots that don't require the real close up view I can attempt better shots... :|.

Well I've now built up the right side of the R/O's station. Put in the air lines and hoses. Will paint it next. I also added that long lever that sits just to the front right of the pilot. Pictures to follow soon. I also added more weight to the front by glueing a lead fish plant weight to the back of the control panel. Seems to be a bit of room there so may add more before I seal this up. I will also put more weight just behind the panel that sits behind the gunner. The trick with the weights is to have them in front of the rear wheels.

The first picture is the magnifying glass I use for taking pictures. The second is some of what I've done on the back right side. :)
 

Attachments

  • leftside 008.jpg
    leftside 008.jpg
    24 KB · Views: 149
  • leftside 010.jpg
    leftside 010.jpg
    40 KB · Views: 143
Great job on the wiring Bill, and that's some magnifying glass! I'd had an impression of some small, normal glass, such as found on the 'Helping Hands' clamp stand, but that's the Radio Telescope of glasses - brilliant! (Thinks - must find something like that, rather than bend over the tiny stupid thing on the 'Helping Hands', whilst straining the old eyes.)
 
Thanks guys. :) the magnifying glass is great because it helps to keep my camera still while taking pictures. I like it. Generally you would find something like this at an electronics store although this one is pretty old. anyhow... now for another adventure through the looking glass. :)

I painted up the back right side and built up the back left side. It took me awhile to figure out what some of the wiring was for but after checking several photos, I learned that the upper wire goes to the long wave antenna hence its path. The other goes to some rectangular box that sits just above the button that opens the back door. I'm not sure what it does because of the ceramic insulators that carry the conductor to the box. My guess is it would be part of a hydraulic switch for raising and lowering the ladder.

Included in the pictures are a couple of shots of the lever for the pilot and where I put a couple a weights. I will add more weights, as I mentioned before, behind the gunner's seat. I've decided not to do to much detail on the gun bay as time will not allow me to go too far. I've still two nacelles to build and then I have to figure out the right way to paint it to achieve the effects I want. :)
 

Attachments

  • leftside 012.jpg
    leftside 012.jpg
    39.8 KB · Views: 139
  • leftside 011.jpg
    leftside 011.jpg
    44.3 KB · Views: 146
  • leftside 013.jpg
    leftside 013.jpg
    14.8 KB · Views: 155
  • leftside 014.jpg
    leftside 014.jpg
    33.9 KB · Views: 130
  • leftside 015.jpg
    leftside 015.jpg
    11.6 KB · Views: 147

Users who are viewing this thread

Back