**** DONE: Spitfire MkVIII, 136 Squadron RAF, Burma, 1944, Commonwealth GB.

Ad: This forum contains affiliate links to products on Amazon and eBay. More information in Terms and rules

Thanks Karl.
Yes Wojtek, once the old glue was removed, the decal film was perfect. Worth remembering for future, if old decals have to be used and cause what appears at first to be silvering. It looks a bit tedious and tricky to do, but it wasn't actually too difficult - just takes a bit of time, patience, and care.
 
That's true. But it is interesting I have encountered the problem with old decals of "Western" manufacturers so far. Matchbox, Frog etc.... These ones of Polish or Eastern decal makers are with a different kind of a glue I think.
 
Yep, and these are around 20 years old, and showing their age by the appearance of the sheet. They were all I could find in the way of SEAC roundels the correct size, and were 'discovered' by Hannant's in their stock somewhere!
By the look of the glue, it looked very like the old-fashioned 'cow heel' gum, or maybe gum arabic, and felt like it when dry, if rolled between finger and thumb.
 
Seems it's been one of those nights for dropping things!
First was a full mug of coffee, fortunately on the kitchen floor, not on the lounge carpet - and it bounced!
Second was a scalpel, which took the shortest vertical route to my right foot. So, after stopping to wipe up a bit of blood, I eventually got back to working on the prop!
Then the third thing was dropping the spinner back-plate, and spending half an hour looking for it! Little blighter was hiding behind a table leg!
Anyway, like Andy, I wasn't that happy with the shape of the kit supplied prop blades, which I think have been modelled off a modern-day Hoffman prop. So I sourced an old Otaki kit prop from the spares box, and altered it to fit the back plate and spinner of the ICM kit.
Easy, thought I.
No it isn't, replied the prop!
Not including the hunt for the elusive back plate, to file down the prop hub, drill out the centre, make a new prop shaft and get the whole lot together, plus sanding the spinner joint and simulating the latch holes for the spinner fasteners, took another three hours!
But it's done now, and has had the first stage of painting completed.
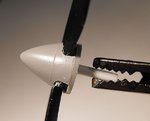
PIC 1 Shows the spinner to back plate joint filed and sanded flush, and the tiny indentations countersunk for the latch holes, as well as the new prop shaft. Note that the paint on the prop blades has been there over 25 years, and it will be re-painted!
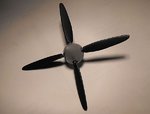
PIC 2 Just visible here is another tiny indentation in the spinner tip, countersunk with a drill bit, simulating the end cap fastening screw.
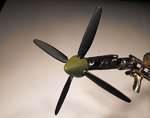
PIC 3. The spinner has been painted in a shade of green which I think might be representative of that used by 'The Woodpeckers', just going off tones in some photos, and will have a little weathering added later. The prop blades will be re-painted, and the kit datum decals added, and some other stencil details lightly hand-painted, to simulate dirt and wear.
Thanks again for your interest and compliments, and the next update should show the landing gear and canopy - I hope!
 

Attachments

  • Bob Cross build 216.jpg
    Bob Cross build 216.jpg
    38.2 KB · Views: 127
  • Bob Cross build 217.jpg
    Bob Cross build 217.jpg
    32.8 KB · Views: 111
  • Bob Cross build 218.jpg
    Bob Cross build 218.jpg
    37.7 KB · Views: 114
That turned out nice, Mr. Gumby....er, Terry!

I find it odd that ICM made a raised line on the spinner when they made such nice recessed panel lines on the rest of the kit. I likely won't get the resin prop when I do my VIII and might look at sanding the spinner down and scribing a new joint. But I don't look forward to reshaping 4 prop blades! Good thing you had those old ones which look pretty good.
 
Thanks Andy. I must admit, I pondered for some time on whether to sand down the joint on the spinner, but decided to leave it. Once it's had another coat of paint, and then a clear coat, I think it'll look OK, and that's also where some weathering will be done, simulating wash-back of dirt etc from the joint.
The Otaki prop was a one-piece affair, and made from armour-plated plastic I think - what a sod to try to file down the hub! I wanted to use the Otaki spinner too, but no longer had the back plate, and the diameter is a tad bigger than the ICM part.
re-shaping the ICM blades shouldn't be too bad - getting them all the same profile is a different story!
 
Oh, don't get me wrong, I think it looks fine on your model, especially with the green paint.

I agree the challenge on skinnying the blades will be getting the all the same.
 
Very nice work Terry! I wish I had a dollar for every part I've dropped under the work bench. Dropped a landing gear leg a few months ago and couldn't find it. Spent a couple of hours scratch-building another one then found the original in the living room - three rooms away. Must have gotten stuck on the bottom of my shoe. :oops: :lol:
 
Thanks very much guys. I've just checked the spinner, and the bl**dy Humbrol paint is still sticky, after 18 hours ! (the base colour green is one I've had problems with before, not drying.)
So, I'm going to remove it, and re-paint with a mix using a different tin, and see what happens. I've also decided to very lightly sand down the moulded joint line, as even under the paint, it looks a bit too prominent after all.
 
The still sticky green paint has now been removed form the spinner, and virtually fell off - a sure indication that the carrier had separated from the pigment.
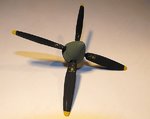
The spinner has now been re-painted, using Humbrol Dark Green No.30 mixed with yellow, and the prop blades are painted, and the yellow tips done. The data stencils have been hand-painted, and will be toned down later, after adding the 'Rotol' logos, again painted. The joint line on the spinner was very lightly sanded back before painting, and then some very light staining and paint wear applied, which was also added to the retaining bolt in the tip.
The canopy and windscreen have been roughly masked, as a guide for brush painting later, and a notch filed into the rear of the canopy frame, where it 'sits' around the antenna mast when fully open. The jettison cables have also been added to the lower canopy frame.
PIC 1. How the prop and spinner look so far. A clear coat has yet to be applied.
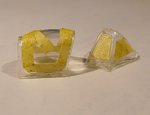
PIC 2. The windscreen and canopy, roughly masked ready for brush-painting the frames.
The horizontal frames moulded at the top of the windscreen are a bit over scale, and I'm considering sanding these down and re-polishing before painting. Just visible on the lower frame of the canopy, is one of the 'jettison cables', made from very fine stretched sprue, and attached with PVA. When the rubber ball fitted to the top front of the canopy was pulled, it pulled a set of steel cables out of pins set each side of the lower frame, which in turn detached the cover plates over the runners, and then the slipstream blew the canopy away. The crow bar mounted on the cockpit flap was to assist this action, if the canopy jammed or air pressure kept it in place.
The canopy locking latch and 'rubber' ball will be made and fitted just before fitting the canopy to the model.
Once the canopy is done, then the landing gear will be finished and painted, ready for fitting after the model has had the matt clear coat applied.
That's all for now folks, and thanks again for your interest.
 

Attachments

  • Bob Cross build 228.jpg
    Bob Cross build 228.jpg
    33.3 KB · Views: 82
  • Bob Cross build 223.jpg
    Bob Cross build 223.jpg
    38 KB · Views: 90
Sounds like you're a bit accident prone at the moment Mr Hoppy.............must be something in the air as I fractured a component on the Cat today and then spent a good panicky hour looking for a lost step gun, that....................................................WASN'T LOST.............it was all in my imagination, the offending gun was still safely attached to the Blue-Tac on its spraying stick. :oops: :oops: :oops:

So despite all the hiccups and c0ck-up's, you did a great job on the decals Mr T and the prop turned out just great.
 
Thanks very much guys. I'm attempting to correct the windscreen frame at the moment, then it's on to the landing gear. More pics later, all being well.
 

Users who are viewing this thread

Back