Revell 1/32 Spitfire MK1 #4555

Ad: This forum contains affiliate links to products on Amazon and eBay. More information in Terms and rules

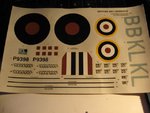
I agree - and for a first effort, it's well done. Take your time with the decals, ensuring there's no silvering, and it should turn out well.
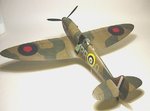
Here's a bit of inspiration and motivation for you. This is a 1/32nd scale Mk1, converted from the Hasegawa MkV many years ago, and is brush painted, including the code letters and matt clear coat.
 

Attachments

  • Gallery models 109.jpg
    Gallery models 109.jpg
    27.7 KB · Views: 92
  • Gallery models 116.jpg
    Gallery models 116.jpg
    26 KB · Views: 90
I need your help with this.I was thinking of masking out the plane for decals #s 12-14 and painting the black lines and then cutting out the lettering and applying them. I seem to have a hard time with the thin lines.Well? And one other thing when this is done I think I will build the 1/32 109 from the same series as the MK1. Seems like the proper way to go,but I like the yellow nose paint scheme better.
 

Attachments

  • decals 001.JPG
    decals 001.JPG
    56.2 KB · Views: 80
  • decals 002.JPG
    decals 002.JPG
    47.1 KB · Views: 91
  • next 001.JPG
    next 001.JPG
    65.7 KB · Views: 83
  • next 002.JPG
    next 002.JPG
    75.7 KB · Views: 83
As always, research, research, research! You are doing fine, Terry has given some of the best advice for brush painting there is. As far as the long decals are concerned, trim close, soak in warm water and use a soft brush to slide the decal on to the model. When it is in place, you can use a setting solution, but then leave it alone. You would probably be better to use the decals on this one, but if you want to try painting the stripes there is an easy method. Start by cutting a strip the width and length of the stripe from masking tape and place it in the position that you want the stripe. Then place other pieces of tape carefully on either sides of the stripe. Pull up the stripe piece and paint. This is a tried and true method of ship modelers to do the "Boot topping", that is, the black stripe between the red lead of the underside of the hull and the top color.
 
I agree with Paul, and that's basically how I did it on the model shown. Like you, I dislike using long, stripe decals, and even when they don't break up, they can be tricky to lay down in a straight line.
If you feel up to it, then have a go at the masking and painting - thin the black paint a touch to ease application and prevent, or at least reduce, the chances of a 'ridge' on the stripe edges. It's good experience and, given it works first time (and there's no reason why it shouldn't) then you'll get real satisfaction from knowing that you have done that, plus adding to skills and experience.
That Bf109 kit is not particularly accurate, but that doesn't really matter. Just bear in mind it's a 'late war' variant, so, as Paul mentioned, a bit of research should provide a host of colour schemes, some of which, depending on period and location, will at least have a yellow lower nose panel.
Revell's new Bf109G-6 is due for release in December, at a very reasonable price, and should be excellent - so even more to go at!
Hope this helps.
 
The gloss coat looks like it went on just right too, those decals look a little suspect to me probably wouldn't hurt to give them an overspray of gloss to ensure they don't crack up and fall to pieces once they go into the water, try the gloss on one of the small decals first to check...
 
As soon as the 1st decals hit the water it was game over. Too old and dry. The long striped one on top of the wing with the lettering....walk outboard.. just broke up like a Hollywood marriage.Now I am Fn pissed. It's like driving 10000 miles just to get in an accident as you pull into your driveway. Help
 
OK. It's been less than 3 hours since you posted saying that you would spray the decals with a gloss coat so I suspect you did not wait long enough for the clear coat to dry. Make sure you have a good, even coat on the decals and wait at least overnight. 24 hours in a warm area would be even better.
 
I hope this works, To replace these decals costs more that I paid for the model. If anyone out there has a spare set I have a spare set from 1/32 Revell mk22/24 for trade
 
Well, I tried what you suggested Wayne,but they are way too brittle to even handle. I guess this build has come to an end for the time being.I am so disappointed at this outcome. I really wanted to see if it looked good all done. Oh well,Up on the shelf you go. On to 1/32 Revell Me109G #4557. Same year as this Spit, I bet I am going to have the same decal problems. Time will tell, Here goes nothing
 
The entire decal sheet should have been aplied with a gloss clear coat. The best one is the Humbrol Gloss Cote. I use it always I need to use a such old decal markings

AC5500.jpg


Also there is another way to make these black lines.... I'm sure you have other , not a such old decal sheets. There are always areas without decal markings but covered with the water decal glue. You can cut them off and "paint" with a gloss coat. When it is dry, paint it with a black colour.. The next day use a ruler and a sharp scalpel to cut black strips of a correct width. And voila.
 
Wurger,I did as Wayne suggested and sprayed the sheet with gloss clear,but after taking them out of the water and trying to apply they just cracked and looked real bad. I am going to look for new ones for this and the 109 on ebay
 

Users who are viewing this thread

Back