Airframes
Benevolens Magister
Well, despite a major problem, I managed to finish the Italeri 1/48th scale 'Huey' for my friend's surprise Christmas prezzy. The darn thing very nearly went for its first, and final flight!
I'd got to the painting stage, and decided it would be much easier to brush-paint the model, due to the awkward masking required for airbrushing. Spraying the final semi-matt coat wouldn't be such a problem, as I could roughly mask, and touch in any areas that had been missed by the clear coat. So, I gave it a coat of Olive Drab, which went on smoothly, without brush marks. A couple of hours later, I was ready to apply a clear gloss coat, ready for decalling. To my surprise, the paint was nowhere near dry, and this was Humbrol matt enamel, the type of paint I've used for 45 years or so! After 36 hours, it was still very tacky, and I knew that drastic measures were called for. A very light brushing of thinners should remove the oily surface residue, and allow me to apply another coat of paint.
Oh No !
The paint stripped off in sticky flakes and lumps and, being committed, I had to continue until all the paint was removed. Not a massive problem, thought I.
Then I experienced that sort of 'what the F...' sensation, as the starboard skid slowly folded under my gentle grip!
I also noticed that the central fuselage joint, and part of the tail-boom joint, had started to come undone!
B******s!!
Whatever had caused the paint to behave the way it had, had also caused a reaction with the thinners, and some of the glue had softened, melting through the contact point with the skid, which I was holding, and attacking the cement in the fuselage joints!
I managed to repair the damage, with less than perfect results, but the paint caused a few problems, by collecting in very small lumps, impossible to remove without doing more damage to the areas concerned. Eventually, I was able to more or less make good, or as good as it was going to get, and re-painted the model, this time with two different tins of paint, mixed to the correct shade.
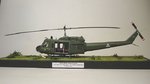
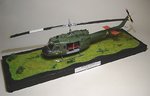
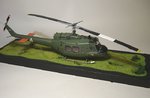
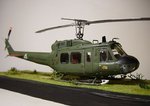
I managed to finish the model, and put it on a display base, but it looks far from how it should have looked. Fortunately, most of the flaws aren't really noticeable with the naked eye, although the camera shows up everything, and I doubt my friend will notice anyway....I hope!
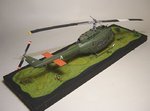
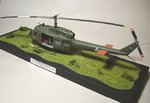
Quite a number of the kit parts have been omitted, as the model has been back-dated to a late '60's UH-1D, and is finished as a machine of the 121st Assault Helicopter Company, 'The Soc Trang Tigers', part of the 13th Combat Aviation Battalion, U.S. Army, in Vietnam, in 1969.
The markings are a mix of hand-painted and kit decals, whilst the red and white triangle and the tiger motif on the crew doors are from a decal sheet included with a modelling magazine in 1982!
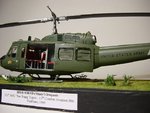
The pics show the completed model on a simple display base - 'hairy grass' mat and lichen, glued onto a piece of MDF which is bordered with masking tape painted black. The green 'tinted' cockpit roof windows were done by mixing a little green acrylic paint with Johnson's 'Klear' (Future), and brushing on.
I'd got to the painting stage, and decided it would be much easier to brush-paint the model, due to the awkward masking required for airbrushing. Spraying the final semi-matt coat wouldn't be such a problem, as I could roughly mask, and touch in any areas that had been missed by the clear coat. So, I gave it a coat of Olive Drab, which went on smoothly, without brush marks. A couple of hours later, I was ready to apply a clear gloss coat, ready for decalling. To my surprise, the paint was nowhere near dry, and this was Humbrol matt enamel, the type of paint I've used for 45 years or so! After 36 hours, it was still very tacky, and I knew that drastic measures were called for. A very light brushing of thinners should remove the oily surface residue, and allow me to apply another coat of paint.
Oh No !
The paint stripped off in sticky flakes and lumps and, being committed, I had to continue until all the paint was removed. Not a massive problem, thought I.
Then I experienced that sort of 'what the F...' sensation, as the starboard skid slowly folded under my gentle grip!
I also noticed that the central fuselage joint, and part of the tail-boom joint, had started to come undone!
B******s!!
Whatever had caused the paint to behave the way it had, had also caused a reaction with the thinners, and some of the glue had softened, melting through the contact point with the skid, which I was holding, and attacking the cement in the fuselage joints!
I managed to repair the damage, with less than perfect results, but the paint caused a few problems, by collecting in very small lumps, impossible to remove without doing more damage to the areas concerned. Eventually, I was able to more or less make good, or as good as it was going to get, and re-painted the model, this time with two different tins of paint, mixed to the correct shade.
I managed to finish the model, and put it on a display base, but it looks far from how it should have looked. Fortunately, most of the flaws aren't really noticeable with the naked eye, although the camera shows up everything, and I doubt my friend will notice anyway....I hope!
Quite a number of the kit parts have been omitted, as the model has been back-dated to a late '60's UH-1D, and is finished as a machine of the 121st Assault Helicopter Company, 'The Soc Trang Tigers', part of the 13th Combat Aviation Battalion, U.S. Army, in Vietnam, in 1969.
The markings are a mix of hand-painted and kit decals, whilst the red and white triangle and the tiger motif on the crew doors are from a decal sheet included with a modelling magazine in 1982!
The pics show the completed model on a simple display base - 'hairy grass' mat and lichen, glued onto a piece of MDF which is bordered with masking tape painted black. The green 'tinted' cockpit roof windows were done by mixing a little green acrylic paint with Johnson's 'Klear' (Future), and brushing on.