very nice Dogsbody
Navigation
Install the app
How to install the app on iOS
Follow along with the video below to see how to install our site as a web app on your home screen.
Note: This feature may not be available in some browsers.
More options
You are using an out of date browser. It may not display this or other websites correctly.
You should upgrade or use an alternative browser.
You should upgrade or use an alternative browser.
****DONE: 1/32nd scale Beaufighter VIF, 46 Sqn RAF, Egypt 1943 Group Build
- Thread starter Airframes
- Start date
Ad: This forum contains affiliate links to products on Amazon and eBay. More information in Terms and rules
More options
Who Replied?Lucky13
Forum Mascot
Jolly good show old boy, looking dogs b*ll*cks don't you know, top hole!
- Thread starter
- #184
Airframes
Benevolens Magister
I say, thanks awfully chaps! More to come, when I get my lamp fixed, and buy some more glue!!
B-17engineer
Colonel
- Thread starter
- #187
Airframes
Benevolens Magister
Thanks Keith, it's starting to get there!
Harrson, you're right - I've got plenty of glues, and liquid cement, but I'm out of decent tube poly cement. I do have a tube of what's supposed to be cement, but it's more like glue for rubber materials - bl**dy awful stuff, no use to man or beast!!
Harrson, you're right - I've got plenty of glues, and liquid cement, but I'm out of decent tube poly cement. I do have a tube of what's supposed to be cement, but it's more like glue for rubber materials - bl**dy awful stuff, no use to man or beast!!
B-17engineer
Colonel
haha 
- Thread starter
- #189
Airframes
Benevolens Magister
I've finally got the bulk of the filling and sanding done, and the model is now progressing rapidly.
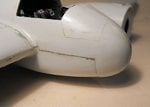
PIC 1 shows the gaps around the nose and wing roots filled, with the sanding almost complete.
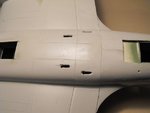
PIC 2. The slots for the cannon shell case ejectors have been cut, and are awaiting filing and clean up hear. The panel lines for the cannon access hatches have also been lightly scored, ready for proper engraving.
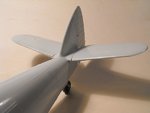
PIC 3. The modified tail planes have been attached, and fitted nicely into the angled slots at the correct 12 degree angle. The joints and spacers have been sanded, but have yet to be filled and blended to the roots. The large rudder has been attached, after cutting locating slots for the scratch-built rudder and trim tab actuators, which will be fitted later.
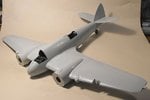
PIC 4. The main wing outer panels have been fitted, and the leading and trailing edges sanded smooth. A very small amount of filler was required at the joints, and this was achieved by using my ever-faithful 'porridge' of talcum powder and varnish mix. With the wings in place, the model is now bl**dy big, and can be a bit difficult to handle at times.
The next step is to begin work on the engines and cowlings, and modify the exhaust outlets, ready to accept the 'porcupine' flame-dampers, which will be fitted after the model has been painted. I'll be using some rather neat resin parts, as scratch-building the small outlet fins would not only be tedious, they would also not be as accurate in appearance as the finely moulded resin examples.
Once this stage is complete, the model will be ready for cleaning, and the first stages of painting.
Thanks again for your interest, and I hope to have some more pics soon.
PIC 1 shows the gaps around the nose and wing roots filled, with the sanding almost complete.
PIC 2. The slots for the cannon shell case ejectors have been cut, and are awaiting filing and clean up hear. The panel lines for the cannon access hatches have also been lightly scored, ready for proper engraving.
PIC 3. The modified tail planes have been attached, and fitted nicely into the angled slots at the correct 12 degree angle. The joints and spacers have been sanded, but have yet to be filled and blended to the roots. The large rudder has been attached, after cutting locating slots for the scratch-built rudder and trim tab actuators, which will be fitted later.
PIC 4. The main wing outer panels have been fitted, and the leading and trailing edges sanded smooth. A very small amount of filler was required at the joints, and this was achieved by using my ever-faithful 'porridge' of talcum powder and varnish mix. With the wings in place, the model is now bl**dy big, and can be a bit difficult to handle at times.
The next step is to begin work on the engines and cowlings, and modify the exhaust outlets, ready to accept the 'porcupine' flame-dampers, which will be fitted after the model has been painted. I'll be using some rather neat resin parts, as scratch-building the small outlet fins would not only be tedious, they would also not be as accurate in appearance as the finely moulded resin examples.
Once this stage is complete, the model will be ready for cleaning, and the first stages of painting.
Thanks again for your interest, and I hope to have some more pics soon.
Attachments
109ROAMING
2nd Lieutenant
Dam fine work mate! Great to see it taking shape 8)
Heinz
Captain
With Daniel! ")
Vic Balshaw
Major General
Good work Terry
hotsun:
hotsun:
B-17engineer
Colonel
Great job Terry!!
looks good Terry
lesofprimus
Brigadier General
Now she's really comin along Terry, great stuff....
ozhawk40
Master Sergeant
Another great update Terry - can't wait to see this bird with some paint on.
Cheers
Peter
Cheers
Peter
- Thread starter
- #197
Airframes
Benevolens Magister
Thanks guys, it's very much appreciated.
- Thread starter
- #198
Airframes
Benevolens Magister
Just a quick update for now. The model has now been filled and sanded where required, with all the wing and tail plane joints nicely blended. Work is currently underway on the engines, which are remarkably accurate and well detailed. As there isn't much visible in the way of wiring etc on the front of the engines, I'll only be adding the magnetos and the cowling braces, but one engine will have the wiring harness added to the rear an the cylinder heads, as per the real thing, so that it can be displayed with at least one of the cowlings removed. I'm afraid I can't post any pics at the moment, as the engines are still setting and drying, and I can't get them into a good poition for photography without risk of damaging the paintwork. All being well, I should have some progress pics tomorrow night (UK time).
109ROAMING
2nd Lieutenant
Sounds good mate
B-17engineer
Colonel
Yep, looking forward to it.
Users who are viewing this thread
Total: 1 (members: 0, guests: 1)