Navigation
Install the app
How to install the app on iOS
Follow along with the video below to see how to install our site as a web app on your home screen.
Note: This feature may not be available in some browsers.
More options
You are using an out of date browser. It may not display this or other websites correctly.
You should upgrade or use an alternative browser.
You should upgrade or use an alternative browser.
****DONE: 1/32nd scale Beaufighter VIF, 46 Sqn RAF, Egypt 1943 Group Build
- Thread starter Airframes
- Start date
Ad: This forum contains affiliate links to products on Amazon and eBay. More information in Terms and rules
More options
Who Replied? some fine work there Terry.The pit is awesome.Big cheers there bucko Kevin
- Thread starter
- #142
Airframes
Benevolens Magister
Thanks Kevin !
109ROAMING
2nd Lieutenant
Bloody beaut work mate! ( btw ,my scanners being a right whore ,will see if I can photograph those pages for ya this afternoon ,hopefully be with you soon ") )
)
)- Thread starter
- #144
Airframes
Benevolens Magister
Thanks Daniel, and there's no rush on the info on 'Our Man', as I'm off to Czech Republic this week, back on Wednesday night, 3 September.
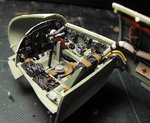
The cockpit has now been fitted, and the ammo tanks made and fitted, along with the radar transmitter, receiver and main control box. The AI MkIV radar indicator unit and its wiring has been scratch-built and fitted to the rear of the Observer's position, in the rear fuselage. The ammo tanks are just rough boxes, with yellow 'scribble' to represent the stencilled loading instructions, as these will only just be visible, more shadow than anything else, from the cockpit and rear hatch. Llikewise with the main radar equipment in the fuselage mid section .
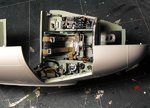
PICS 1 and 2 show the cockpit attached to the starboard fuselage half, with the heating duct connected. Once the fuselage has been joined, holes will be drilled, above the instrument panel, to accept the scratch-built mounting bracket for the gunsight.
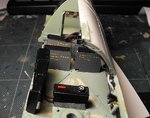
PIC 3 is a general view down the fuselage, with the ammo tanks forward, and the 'black boxes' of the radar gear on the left. These are yet to be properly fixed to align with the fuselage wall.
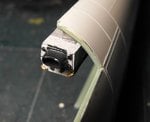
PIC 4. this is the scratch-built radar indicator unit, or radar scope. The pic was taken when the paint was still wet, and the tuning and brightness control knobs etc are still in need of touch-up.
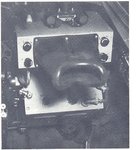
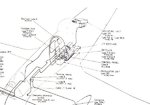
PICS 5 and 6. A photograph of an actual AI MkIV unit, in the cramped confines of a Mosquito cockpit. The object on top of the unit is a pair of 'night' binoculars, not normally carried in the Observer's station of the Beaufighter, as the position was restrivtive for their use. The diagram shows the layout of the 'black boxes' and the radar scope.
The next step is to fit the tail wheel strut, then join the fuselage halves. That will be it for now, as I need to finish the PTO Avenger before going on holiday next week.
Thanks once again for your kind comments.
Cheers,
Terry.
The cockpit has now been fitted, and the ammo tanks made and fitted, along with the radar transmitter, receiver and main control box. The AI MkIV radar indicator unit and its wiring has been scratch-built and fitted to the rear of the Observer's position, in the rear fuselage. The ammo tanks are just rough boxes, with yellow 'scribble' to represent the stencilled loading instructions, as these will only just be visible, more shadow than anything else, from the cockpit and rear hatch. Llikewise with the main radar equipment in the fuselage mid section .
PICS 1 and 2 show the cockpit attached to the starboard fuselage half, with the heating duct connected. Once the fuselage has been joined, holes will be drilled, above the instrument panel, to accept the scratch-built mounting bracket for the gunsight.
PIC 3 is a general view down the fuselage, with the ammo tanks forward, and the 'black boxes' of the radar gear on the left. These are yet to be properly fixed to align with the fuselage wall.
PIC 4. this is the scratch-built radar indicator unit, or radar scope. The pic was taken when the paint was still wet, and the tuning and brightness control knobs etc are still in need of touch-up.
PICS 5 and 6. A photograph of an actual AI MkIV unit, in the cramped confines of a Mosquito cockpit. The object on top of the unit is a pair of 'night' binoculars, not normally carried in the Observer's station of the Beaufighter, as the position was restrivtive for their use. The diagram shows the layout of the 'black boxes' and the radar scope.
The next step is to fit the tail wheel strut, then join the fuselage halves. That will be it for now, as I need to finish the PTO Avenger before going on holiday next week.
Thanks once again for your kind comments.
Cheers,
Terry.
Attachments
Heinz
Captain
Great work Terry!
Have a good time on your trip!
Have a good time on your trip!
109ROAMING
2nd Lieutenant
With Alex ,great work and have a good trip mate!
Scans will be in your inbox upon your return
Scans will be in your inbox upon your return
Lucky13
Forum Mascot
Looking tits old boy!
Beautiful Terry! have a great trip mate!
- Thread starter
- #150
Airframes
Benevolens Magister
Thanks very much guys, on both counts. And thanks Daniel, I owe you one!
excellent detail Terry
- Thread starter
- #152
Airframes
Benevolens Magister
Thanks mate.
lesofprimus
Brigadier General
Nice lookin work man, have fun with the boys on ur trip Terry....
- Thread starter
- #156
Airframes
Benevolens Magister
Thanks Paul. Now that I've just about caught up with everything, I hope to get back to work on the Beau early this week.
I had a minor set-back, when my desk lamp blew up! It means I can't see properly, as I'm in my own shadow from the main, overhead lighting. I bought a new lamp yesterday, but it's a much use a two candles on a stick! Hopefully, an electrician friend is going to try to 'rebuild' my old 'anglepoise' lamp. It was a bit annoying that it went 'bang' - after all, it was only 30 years old!!
I had a minor set-back, when my desk lamp blew up! It means I can't see properly, as I'm in my own shadow from the main, overhead lighting. I bought a new lamp yesterday, but it's a much use a two candles on a stick! Hopefully, an electrician friend is going to try to 'rebuild' my old 'anglepoise' lamp. It was a bit annoying that it went 'bang' - after all, it was only 30 years old!!
dirkpitt289
Master Sergeant
Airframes
I've never come across a Beaufighter before. I've heard it mentioned but never seen one. I just caught up with your build and despite not being able to see all the photos I'm really enjoying the build. There is nothing like watching a skilled modeler scratch building...
I've never come across a Beaufighter before. I've heard it mentioned but never seen one. I just caught up with your build and despite not being able to see all the photos I'm really enjoying the build. There is nothing like watching a skilled modeler scratch building...
- Thread starter
- #158
Airframes
Benevolens Magister
Thanks Dirk, but I wouldn't call myself skilled - cut, stick and hope it works, maybe!!
Lucky13
Forum Mascot
Don't sell yourself short old boy!
DBII
Senior Master Sergeant
great work
DBII
DBII
Users who are viewing this thread
Total: 1 (members: 0, guests: 1)