****DONE: 1/32nd scale Beaufighter VIF, 46 Sqn RAF, Egypt 1943 Group Build

Ad: This forum contains affiliate links to products on Amazon and eBay. More information in Terms and rules

Thanks Paul. Now that I've just about caught up with everything, I hope to get back to work on the Beau early this week.
I had a minor set-back, when my desk lamp blew up! It means I can't see properly, as I'm in my own shadow from the main, overhead lighting. I bought a new lamp yesterday, but it's a much use a two candles on a stick! Hopefully, an electrician friend is going to try to 'rebuild' my old 'anglepoise' lamp. It was a bit annoying that it went 'bang' - after all, it was only 30 years old!!

Sorry to hear about your lamp, Might have a bunch of wax candles I might be able to ship to you courtesy of my mother in law. :lol: By the way if you are not an excellent modeler then well I only have one military book :D
 
Thanks Paul !Hopefully, my old faithful 'anglepoise' lamp should be back, and in operation, in the next couple of days. I've just got to ensure the oil is topped up, and the wick trimmed......
 
I've finally got around to doing bit on the Beau! It doesn't seem much, but this took bl**dy ages!
After many test fittings of the fuselage halves, and the wing centre section, I knew it might be a bit of a problem to get everything to line up correctly, and I wasn't wrong!
The tail wheel assembly had to be installed before joining the fuselage halves, as there was no way it could be fitted later, so, when this had set, the fuselage was joined. This involved some careful manouevering, an increase in my vocabulary of curses, and the application of three different glues, working in stages, from the nose to the tail, tackling the upper joint first.
The wheel bays were then added to the cowlings, and the upper, inboard wing sections glued in place, again neccessitating some fiddling about in order to align everything correctly. Once the two main sections had set, the fuselage was aligned and glued to the completed centre section, ensuring that the internal fittings and bulkhead didn't foul the internal fittings in the main fuselage.
Everyhing seemed to fit snugly, after much pushing and squeezing. But, when I checked the alignment, I was horrified to notice a very pronounced anhedral !
The centre section looked more like a 'Stuka' than a Beaufighter, and some very drastic measures were needed to correct things. It appears that the internal notches and flanges on the wing roots hadn't mated correctly, so, a long, flat-bladed screwdriver was inserted through the open ends of the engine cowlings, and the wing-root faces forced into place, whilst the trailing edges were forced down at the root fillets, using a pair of pliers!
(I now have an extra 23 colourful curses in my vocabulary!!)
This has left some slight gaps around the nose area, and a very slight ridge at the wing-root joints, but they match similar anomalies along the length of the fuselage, so at least things look equal!
The gaps and ridges can easily be corrected with sanding, filling and more sanding, and this will be done before the outer wing sections are fitted.
PICS 1 and 2 show how the cockpit now looks, and some of the gaps are evident here.
PIC 3. The radar monitor, now correctly positioned, at a slight angle to the fuselage.
PIC 4. The tailwhel in place, painted, and weathered with 'sand'. This will be masked during final painting of the model.
PIC 5. How the model looks to date.
The sheer size of this thing is now becoming apparent, with the centre section span being bigger than the average 1/48th scale fighter, and it's going to sit rather tall too, once the landing gear is in place.
Work has begun on cutting out the cannon shell ejector ports, and scribing the cannon accesss panels, and the next stage will be to fit the main wing panels. Once this is done, the engines will be built and fitted, and I haven't yet decided whether to display one engine, with the cowlings off. As they are quite good mouldings, crying out for some detailing, I probably will display at least one engine, but this can be decided nearer the time.
I'll hopefully post some more progress pics soon.
Thanks again for your interest and kind words.
 

Attachments

  • MTO Build 252.jpg
    MTO Build 252.jpg
    43.6 KB · Views: 148
  • MTO Build 255.jpg
    MTO Build 255.jpg
    45.3 KB · Views: 151
  • MTO Build 253.jpg
    MTO Build 253.jpg
    40.8 KB · Views: 143
  • MTO Build 257.jpg
    MTO Build 257.jpg
    37.8 KB · Views: 144
  • MTO Build 251.jpg
    MTO Build 251.jpg
    31.2 KB · Views: 141
Good show old boy! 8) Cockpit looks real nice

btw I've found revell's 1/72 re-release of the matchbox kit and found a photo of the boxart

The asking price is $48 NZD or 20.5 Pound ! How much was your 1/32 one?
 

Attachments

  • 105889277_full[1].jpg
    105889277_full[1].jpg
    64.5 KB · Views: 129
Thanks guys.
Daniel, from what I remember of the Matchbox Beau, it's very good, with lots of optional parts. But twenty quid??!!!!
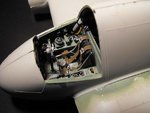
The 1/32nd scale kit cost me £16 !!!
 
Thanks VB !
Daniel, that's more like it. The average Revell re-released Matchbox kit of a similar size retails for arond £10 in the UK, from what I've seen, so £20 is a bit of a p**s take !!
 

Users who are viewing this thread

Back