**** DONE: 1/48 B-25 - Aircraft Nose Art GB.

Ad: This forum contains affiliate links to products on Amazon and eBay. More information in Terms and rules

Hey, All,
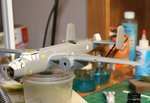
I made more progress the last couple of evenings. I have far more to go, but I think I can get this one completed just under the wire. I have most of the bird assembled and almost closed up. For those of you with sharp eyes, yes, that is the rgt side waist poistion with NO glass. I did knock that one out and I will be damned if I can find it. It is nice to have a kit to rob for a replacement if needed. I have most of the AM masks in place. AM did not provide masks for EVERY pane (see the upper panes on the cockpit). Overall, they are decent masks. However, if I had time, I would do all the panes with Tamiya tape.

For those of you who are considering an AM '25 build..... mask off the tail glass BEFORE you glue it into place. Masking after glueing it in place was a PITA.

Ok, I hope to have her ready for final wash and a coat of primer by tomorrow afternoon with a final pass on all the seams and glitches I am sure I will find. I am hoping I can get the base coats down on her by EOD Monday.

Photos:
Basic Assembly Bottom.JPG
Basic Assembly Lft Front.JPG
Basic Assembly Rgt Front.JPG


Thanks for looking in all.
Dale
 

Attachments

  • Basic Assembly Lft Front.JPG
    Basic Assembly Lft Front.JPG
    440.9 KB · Views: 74
Hey, Guys,
Thanks for the feedback. I have the 1st pass at priming and some preshading complete. I did the panel line with black and then added a touch of lgt ghost grey in between the panels on the top surfaces. I am going for a more faded top surface look. I just need to remember to be patient when shooting the OD. No pictures of the belly (sorry). That is primed with neutral grey and it looks good.

Just need to finish the engines and get them mounted and primed. The glue is drying as I type this up. Hopefully, I can have the engines on and primed before bed tonight.

Photos:
Preshading All.JPG
Preshading Lft Wing.JPG
Preshading Rgt Wing.JPG
Preshading Tail.JPG


Thanks for looking in.
Dale
 
Well, I did a test fit of the first engine/nacelle assembly. There is a nice gap on the upper carb intakes that will be tough to fill with card stock, yet large enough that putty may not hold. I'll post a pic when I get home.

Sure hope I can bring her in on time. I may have to go with an enamel based gloss coat versus future to get her in on time. Not sure I am going to have 2-3 days to let everything settle before applying the Future and the time to allow it to cure.

Dale
 
Hey, Guys,
More pics to come once I find the CF card. It is somewhere on my bench which is a complete mess with the frantic pace I am running to get this one done. I have the engine/nacelles completed and on the plane. I was able to get the seams filled on the carb intakes with some Tamiya putty and acetone process. I will start final color painting tonight. I hope to have the neutral grey on the belly and a good start on the OD. I just need to remember to be patient and slow with the OD on the top surfaces to allow the preshading to come through. I promise more pics tonight.
Dale
 
Looking forward to the pics Dale.
Quick question about the kit - is the tail gun 'cupola' a separate, optional part? In the RAF, the C and D models were both known as the Mitchell II, with the C not having a tail gun position, and the D having the one like your model, as seen on the 'J'. The 'D' also had waist windows, similar to the 'J'. At some stage, I might do a Mitchell II, to accompany the Mitchell III (B-25J), so it would be useful to know about the tail gun position. If it's not optional, then I'll use the cheaper, old Revell B-25C kit again.
 
Hey, Guys,
Thanks for stopping in. Terry, the kit has several options for the tail position ranging from a partially open tail gunner's position with guns to sealed up with "full" canopy (the way I am building this one (no guns) to no canopy, gunner laying prone position. I will grab a few pics of the various pieces from the 2nd kit I have and the scan the instructions in as well and send you a Pm.

Ok, I started with Green OD (much darker than OD). I cut it about 7-10% (counting drops, not that precise) with lgt ghost gray. I then laid this down at low pressure (~12-15psi) with a very careful pull back on the paint feed. I shot the top surfaces in this manner. I was trying to be very careful to let the preshading just come through. There are a couple of spots that need a dab more, but I wanted to stop and let everything dry before proceeding. To be honest, I am damned pleased with the look I am getting. I sure hope you can see the "fading" coming through.

Pics below:
TopFrontFadedOD.JPG
TopLftRearFadedOD.JPG
TopRearFadedOD.JPG
TopRgtRearFadedOD.JPG


Thanks,
Dale
 
Very nice Dale and I like you pre-shading, I've also used it a number of time but I find one has to be careful not overspray the top coats and obliterate it.
 

Users who are viewing this thread

Back