- Thread starter
- #61
Crimea_River
Marshal
Thanks guys. I'm back in happy land.
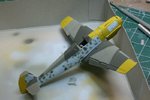
Pushing the insanity envelope once more, I was determined to get the Pollyscale Acrylic RLM 65 to work and adjusted the mix and pressure ever so slightly for tonight's session.This time the paint behaved itself for the final coat (after one last fill and sand) and I must say that I'm pretty happy with the outcome. The lesson is that this paint with my brush has a VERY small envelope in which pressure and thinning need to be just right for success. Even so, clogging still occurs frequently requiring constant dabbing of the needle with a piece of tissue.
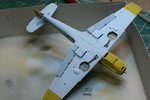
The following shots show overall top and bottom with the finished RLM 65 sprayed on over gray primer:


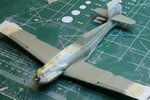
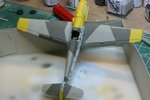
As for the repaired areas, the wing strightened out nicely and the cracks have all but disappeared. Here's the top surface where the crack was. The area where the slat goes still needs to be cleaned up and painted with RLM 02. You can see filler where the crack was here.

And here's the bottom area where the crack was. A remnant of the filled crack can just still be seen where the aileron and flap meets.

Here's the area at the wing root where the wing broke off. The break line runs through the panel line and under the rad cover. Pretty much gone. I see a couple of dust spots that will be cleaned up and the wheel wells still need to be masked and painted 02.

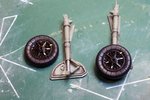
Below is the painted and assembled prop. This will get some very slight touchups yet, a coat of Future and a dullcoat to clean it up nice and purdy.

So it's back on track. Thanks for all your comments and support.
Pushing the insanity envelope once more, I was determined to get the Pollyscale Acrylic RLM 65 to work and adjusted the mix and pressure ever so slightly for tonight's session.This time the paint behaved itself for the final coat (after one last fill and sand) and I must say that I'm pretty happy with the outcome. The lesson is that this paint with my brush has a VERY small envelope in which pressure and thinning need to be just right for success. Even so, clogging still occurs frequently requiring constant dabbing of the needle with a piece of tissue.
The following shots show overall top and bottom with the finished RLM 65 sprayed on over gray primer:
As for the repaired areas, the wing strightened out nicely and the cracks have all but disappeared. Here's the top surface where the crack was. The area where the slat goes still needs to be cleaned up and painted with RLM 02. You can see filler where the crack was here.
And here's the bottom area where the crack was. A remnant of the filled crack can just still be seen where the aileron and flap meets.
Here's the area at the wing root where the wing broke off. The break line runs through the panel line and under the rad cover. Pretty much gone. I see a couple of dust spots that will be cleaned up and the wheel wells still need to be masked and painted 02.
Below is the painted and assembled prop. This will get some very slight touchups yet, a coat of Future and a dullcoat to clean it up nice and purdy.
So it's back on track. Thanks for all your comments and support.
Last edited: