Navigation
Install the app
How to install the app on iOS
Follow along with the video below to see how to install our site as a web app on your home screen.
Note: This feature may not be available in some browsers.
More options
You are using an out of date browser. It may not display this or other websites correctly.
You should upgrade or use an alternative browser.
You should upgrade or use an alternative browser.
**** DONE: 1/72 Blenheim Mk.IV - Heavy Hitters II GB
- Thread starter N4521U
- Start date
Ad: This forum contains affiliate links to products on Amazon and eBay. More information in Terms and rules
More options
Who Replied?very cool Bill....
Airframes
Benevolens Magister
Great stuff Bill!
My way of adding captions under the pics:
- Write the message and captions, add the pics (from camera ususally). The pic links will appear together after the message
- seperate the pic links (click after each and hit 'Enter' twice)
- select desired caption, hit 'Ctrl' + 'C' to copy, 'Del' to delete it from original place.
- click the cursor after the caption you want, 'Enter' to jump below it, then 'Ctrl' + 'V' to paste caption, and Bob's your aunty's live-in lover!
Believe me , if I can do that, anybody can...!
Evan, you lost me after "Write the message ..." !
One day I will figure out how to put text Under the photos.
It is quite easy to do. If you go to the Manage Attachments button and click this you will get a window for uploading files open. Browse your HDD for a file (picture) and then upload it. When your file is uploaded , hit the Insert Line button firstly and then the Done one.. Clicking on the Done button only , you cuause that a picture is attached to the post but you can't add any caption to it. The Insert Line one paste a link of your picture to the window where you usially write text of your post. Because it is a text too you can move it and put into the middle of any sentence. I hope it will help.
A4K
Brigadier General
Evan, you lost me after "Write the message ..." !
I lose myself at that stage Terry -complete idiot on the computer!
(hence the 'idiot's guide to...' way I wrote the info - no insult to Bill's or anyone else's intellect intended!
") )
)T Bolt
Colonel
Just caught up with the last 4 pages. Wonderful work Bill. Looks like you're going to need a new file when this is done with all the abuse that one is taking
- Thread starter
- #108
N4521U
Plastic Pirate
There is white dust everywhere Glenn.
Evan, you lost me after "Write the message ..." !
i was thinking the same thing too last night.....
A4K
Brigadier General
Yep, sorry guys... just can't explain myself for cr@p on the computer or phone, I'm only good 'live'!
Airframes
Benevolens Magister
Good to hear Evan - it'd be a bit weird hearing from you if you weren't alive!
Nicely done so far Vic!
- Thread starter
- #113
N4521U
Plastic Pirate
Today am going to do some of the horiz stab.
Just glued up a couple of slabs for each side. The kits part is 1.8mm thick, so I have cut 26mm squares of styrene. Two @ .75mm thick and one @ .5mm thick and glued them together. The thinnest in the middle. One glue up per side. I will cut the kit stabs at the outboard end of the trim tabs and replace the cut off pieces with the styrene pieces and shape to the drawing. I am hoping it works, if'n it don't I'll have to jump thru hoops to replace the whole part!
Then it's on to the vert stab and rudder. The leading edge has a bit of a hump to it. The back edge of the rudder needs a bit added and the bottom rear is a bit more pointed. I'll have the drawing shown with the finished tail.
I sailor on.
Catch22
Major
Some really great work there Bill.
Vic Balshaw
Major General
A lot of thought going into this one.
A4K
Brigadier General
Sounds like a good process Bill, should turn out fine.
Terry...
Terry...
- Thread starter
- #117
N4521U
Plastic Pirate
A lot of thought going into this one.
As I've said..... I am venturing into new territory, often, so I need to think things thru because of the lack of experience.
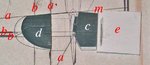
In the photos'
First is the three pieces of card glued up under pressure so there are no gaps inside.
Second;
a) trim lines, leading edge trimmed off about 1mm, diagonal trim was about 1.5mm at the top, vertical a is the parting line for the outboard shape to blend.
b) are scribe lines for the elevator and horiz stab.
c) is the inboard part to keep.
d) is the outboard part to fabricate and discard.
e) is the stack of three cards for the new end.
m) is the mating cuts. These Must be flat and true. The faces Have to be flat to mate properly and a jig Must be used to ensure these glue tight.
Next is to transfer the shape to the cards and trim...... I will have to let the glue set for at Least one full day to be cured!
Attachments

Can't wait to see it!
Airframes
Benevolens Magister
A complex job, but should work out. have you thought about making one 'master', then moulding the tail planes from resin?
- Thread starter
- #120
N4521U
Plastic Pirate
Yes I have Terry, but I have found the resin mix I get here gets old, and unusable. Turns sticky. Don't know what the problem is. The resin mix I used to get in the States was a tan, corn flakes, color. This stuff is white and sets kinda soft. The other was more rigid and was much better for shaping and sanding. Now if I had some of the tan stuff I would make a mold. That way if any others wanted correct tail feathers, I could whip up a couple in no time at all.
Users who are viewing this thread
Total: 1 (members: 0, guests: 1)