doing well Bill
Navigation
Install the app
How to install the app on iOS
Follow along with the video below to see how to install our site as a web app on your home screen.
Note: This feature may not be available in some browsers.
More options
You are using an out of date browser. It may not display this or other websites correctly.
You should upgrade or use an alternative browser.
You should upgrade or use an alternative browser.
**** DONE: 1/72 Blenheim Mk.IV - Heavy Hitters II GB (1 Viewer)
- Thread starter N4521U
- Start date
Ad: This forum contains affiliate links to products on Amazon and eBay. More information in Terms and rules
More options
Who Replied?A4K
Brigadier General
Shame Bill, but nothing you can't handle.
Won't take long to improve the one already done, easy work on the other one Bill, will be great when done!
- Thread starter
- #84
N4521U
Plastic Pirate
I have found a pic of a damaged aileron and that tab is sloped to the top. Looks like it could catch the air flow and act as power steering, like the shovels on the wings of aerobatic planes. Ingenious. They are already done and am hogging out the area in the wing. Now I wonder what the roll rate is on these things.
I sailor on.
I sailor on.
meatloaf109
1st Lieutenant
Hear, hear!Doing pretty good for a one armed, one eyed critter.

Crimea_River
Marshal
Doing great Bill. I'm not going to make it to Nanton for your pics this weekend unfortunately.
- Thread starter
- #88
N4521U
Plastic Pirate
Doing great Bill. I'm not going to make it to Nanton for your pics this weekend unfortunately.
Thanks, and don't fret over it mate.......
Thanks again Paul.
- Thread starter
- #89
N4521U
Plastic Pirate
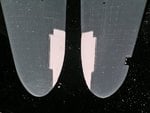
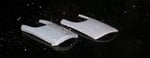
Finished the shaping on the ailerons. Just have to add the trim tabs, easy.
Need to know something about the landing lights in the wings. I've seen one, in German markings so I think it's the Canadian variant with two protruding fixtures with what look like car headlamps at the front. Then I have seen wings with two lights behind glass, more of these however.
I'm gonna slack off for a couple of days, slept on the shoulder cattywompus last night and it's a little niggley.
Attachments
vikingBerserker
Lieutenant General
Looks great so far.
Sweet work Bill!
Nicely done so far Bill!
Airframes
Benevolens Magister
Great improvement Bill.
- Thread starter
- #94
N4521U
Plastic Pirate
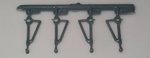
I just checked out the main gear legs, sure wish I had the MPM kits legs!
Plus they were supposed to installed when the wing was glued up! Doh.
Not sure how I am gonna approach improving them.
Choice would be to make them up from brass rods and tubes. Would need a soldering iron.
Cogitating.
Plus they were supposed to installed when the wing was glued up! Doh.
Not sure how I am gonna approach improving them.
Choice would be to make them up from brass rods and tubes. Would need a soldering iron.
Cogitating.
Vic Balshaw
Major General
You're doing good Bill and I've a feeling it's going to get even better.
A4K
Brigadier General
Great work so far Bill, especially considering the shoulder pains.
You should be able to pick up a cheap soldering iron from any hardware store. Not in the same league as professional soldering irons of course , but still good enough for the such jobs as you're planning.
If I could trust the postie's I could have done them for you myself. Being metal though you'd never get them
(Btw, I'm lucky enough to have the MPM kit myself, though it cost an arm and a leg. Very nice though, apart from an annoying incorrect nose perspex frame. I will be replacing it with another Falcon canopy.) If you need sizes or anything of any parts let me know.
- Thread starter
- #97
N4521U
Plastic Pirate
Thanks Vic.......... I hope in the end it's okay and I don't F it up.
Evan, you done so much already.
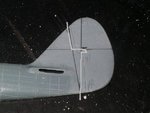
I've used the template and marked the vert stab for the correct rudder lines.
Done the same for the horiz's. But will have to cut the ends off and add new styrene for the correct lengths.
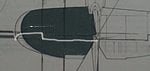
I've thinned the sheet metal gear covers, they would be about 1-1/2" thick at the kit scale.....
The gear legs are just too, too.........., you know what I mean. This is where the MPM kit is a bit better and I have to make judgement call.
I sailor on.
One day I will figure out how to put text Under the photos.
Evan, you done so much already.
I've used the template and marked the vert stab for the correct rudder lines.
Done the same for the horiz's. But will have to cut the ends off and add new styrene for the correct lengths.
I've thinned the sheet metal gear covers, they would be about 1-1/2" thick at the kit scale.....
The gear legs are just too, too.........., you know what I mean. This is where the MPM kit is a bit better and I have to make judgement call.
I sailor on.
One day I will figure out how to put text Under the photos.
Attachments
nice work Bill, will get those bombs off to you next monday, i haven't forgot !
- Thread starter
- #99
N4521U
Plastic Pirate
you're okay mate.
A4K
Brigadier General
Great stuff Bill!
My way of adding captions under the pics:
- Write the message and captions, add the pics (from camera ususally). The pic links will appear together after the message
- seperate the pic links (click after each and hit 'Enter' twice)
- select desired caption, hit 'Ctrl' + 'C' to copy, 'Del' to delete it from original place.
- click the cursor after the caption you want, 'Enter' to jump below it, then 'Ctrl' + 'V' to paste caption, and Bob's your aunty's live-in lover!
Believe me , if I can do that, anybody can...!
Users who are viewing this thread
Total: 2 (members: 0, guests: 2)