Navigation
Install the app
How to install the app on iOS
Follow along with the video below to see how to install our site as a web app on your home screen.
Note: This feature may not be available in some browsers.
More options
You are using an out of date browser. It may not display this or other websites correctly.
You should upgrade or use an alternative browser.
You should upgrade or use an alternative browser.
Done : Bf110G-4, G9+AT, of III/NJG1, Gruppe Build.
- Thread starter Airframes
- Start date
Ad: This forum contains affiliate links to products on Amazon and eBay. More information in Terms and rules
More options
Who Replied?Screaming Eagle
Senior Master Sergeant
Lovely Terry!
- Thread starter
- #143
Airframes
Benevolens Magister
Thanks guys. Got a little bit more done, only a few decals to go, then the final clear coats. Should have some pics tonight.
marek
Senior Airman
Wow. Very nice model you are doing Terry. Cant wait for more pictures.
- Thread starter
- #145
Airframes
Benevolens Magister
Thank you Marek, and here they are!
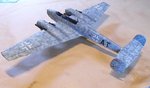
Things seem to have jumped ahead all of a sudden. All the decals are on, although, as expected, there were a few that disintegrated. So there is now a mixture of the kit decals, some hand-painted areas like the wing-walk lines, and some from the files. The Werke Nr. was made up from individual figures from an old Microscale sheet.
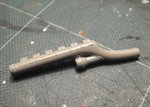
Whilst I was waiting for the decals to fully settle, before spraying the final clear coats, I assembled the undercarriage legs, and set to work on improving the exhausts.
If the kit instructions are followed, the landing gear legs would have been angled too far forward, so I adjusted the locating holes before cementing the legs in place, then added a spot of superglue to hold them in the desired position. The doors, door stays and wheels have yet to be added, and I'll scratch-build some door retraction arms from stretched sprue.
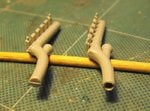
There are three parts to each of the exhausts, which are moulded as one with the flame dampers, and they are fairly good representations of the real thing. However, the outlets are solid, so I drilled them out, then reamed them, to give a more realistic appearance. The vent intakes are supplied as separate parts, and there ares some rather nice representations of welded joints at the bend of the 'tubes'. Once the rear baffle-vents had been glued in place, I went around the liquid cement joint with the point of a scalpel blade, to make the joint look like a weld. There were a number of ejector pins to be removed from each of the exhausts and dampers, and quite a bit of cleaning up to do, scraping and sanding the seam lines etc.
PICS 1 and 2 show the work in progress, before painting.
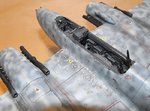
Whilst the exhausts were drying, I sprayed the model in a semi-matt clear coat, using Johnson's 'Klear' (Future), to which had been added some Tamiya acrylic Flat Base and, when this was totally dry, I began work on some light weathering, wear, and exhaust staining etc, as shown in :-
PICTURE 3.
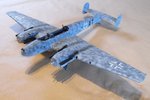
The final two pics show the progress to date, with a lot of work still to be done. I've decided to leave in the Schrage Musik cannon, as it is very possible that this aircraft was fitted with these weapons at some time, as there is evidence to show that other aircraft of this unit carried the weapons. Apart from that, it would be a right royal pain to try to remove them without causing possible damage!
I'll post some more pics in a few days, when there's more to show, as the next stage involves assembling all the fiddly bits, and altering the SN2 antennas.
Thanks again for your interest and compliments.
Terry.
Things seem to have jumped ahead all of a sudden. All the decals are on, although, as expected, there were a few that disintegrated. So there is now a mixture of the kit decals, some hand-painted areas like the wing-walk lines, and some from the files. The Werke Nr. was made up from individual figures from an old Microscale sheet.
Whilst I was waiting for the decals to fully settle, before spraying the final clear coats, I assembled the undercarriage legs, and set to work on improving the exhausts.
If the kit instructions are followed, the landing gear legs would have been angled too far forward, so I adjusted the locating holes before cementing the legs in place, then added a spot of superglue to hold them in the desired position. The doors, door stays and wheels have yet to be added, and I'll scratch-build some door retraction arms from stretched sprue.
There are three parts to each of the exhausts, which are moulded as one with the flame dampers, and they are fairly good representations of the real thing. However, the outlets are solid, so I drilled them out, then reamed them, to give a more realistic appearance. The vent intakes are supplied as separate parts, and there ares some rather nice representations of welded joints at the bend of the 'tubes'. Once the rear baffle-vents had been glued in place, I went around the liquid cement joint with the point of a scalpel blade, to make the joint look like a weld. There were a number of ejector pins to be removed from each of the exhausts and dampers, and quite a bit of cleaning up to do, scraping and sanding the seam lines etc.
PICS 1 and 2 show the work in progress, before painting.
Whilst the exhausts were drying, I sprayed the model in a semi-matt clear coat, using Johnson's 'Klear' (Future), to which had been added some Tamiya acrylic Flat Base and, when this was totally dry, I began work on some light weathering, wear, and exhaust staining etc, as shown in :-
PICTURE 3.
The final two pics show the progress to date, with a lot of work still to be done. I've decided to leave in the Schrage Musik cannon, as it is very possible that this aircraft was fitted with these weapons at some time, as there is evidence to show that other aircraft of this unit carried the weapons. Apart from that, it would be a right royal pain to try to remove them without causing possible damage!
I'll post some more pics in a few days, when there's more to show, as the next stage involves assembling all the fiddly bits, and altering the SN2 antennas.
Thanks again for your interest and compliments.
Terry.
Attachments
looks great Terry well done mate
Lucky13
Forum Mascot
Bl**dy marvelous old sock....well worth few drams!
marek
Senior Airman
Looks nice Terry
- Thread starter
- #150
Airframes
Benevolens Magister
Thanks very much guys! Having a rest now, as my hands are swollen and sore. BUT! I start the new medication of Tuesday - YIPPEE!!
- Thread starter
- #152
Airframes
Benevolens Magister
Thanks M! I'm looking forward to this very, very expensive 'wonder' drug, it's supposed to be very good. But you should see the size of these feckers! It comes in one of those injection 'pen' things, and they're bigger than a .50 cal round! Keeps down the Arthritis, but knocks holes in you that the wind can blow through!
Lucky13
Forum Mascot
Hopefully the new meds will make life a h*ll lot easier for you old scout!
- Thread starter
- #154
Airframes
Benevolens Magister
I do believe they will! I bl**dy well hope so anyway, as I'm aching all over at the moment. In fact, I'm so drained with the pain, I'm off to bed right now!
Lookin' good Terry....Good luck with the new Meds mate!
109ROAMING
2nd Lieutenant
Sweet Terry! All the best with those drugs!
All the best with those drugs!Wildcat
Major
The kit is looking fantastic Terry!!
lesofprimus
Brigadier General
Really lookin the part Terry, top notch... Hopefully u'll get some relief from the arthritis Brother... Ever since I've known u, its always been a big problem for u....
Imagine all the kits u can get done now with no pain hindering u....
Imagine all the kits u can get done now with no pain hindering u....
Lucky13
Forum Mascot
He'll be unstoppable Dan..! I really hope that the new meds will work wonders for you buddy!
lesofprimus
Brigadier General
I was thinking about the Schrage cannons, and wondered just how bad the rear-seater hearing was... Had to be a deaf SOB sittin so close to em....
Users who are viewing this thread
Total: 1 (members: 0, guests: 1)