**** DONE: Revell 1/48 P-40B RAF 112 Squadron in Egypt in 1941 MTO Group Build (1 Viewer)

Ad: This forum contains affiliate links to products on Amazon and eBay. More information in Terms and rules

Okay, and I looked at the cockpit interiors and it doesn't have a panel, it's just the controls but those are black
 
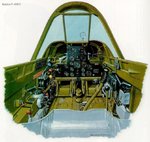
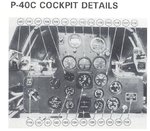
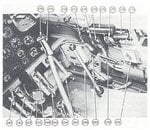
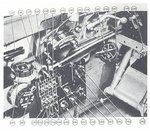
Here you are a few pics of early P-40 cockpit. There are pics of full size in the Zip file I have found.
 

Attachments

  • P-40 pilot panel.jpg
    P-40 pilot panel.jpg
    71.7 KB · Views: 108
  • P-40 left panel.jpg
    P-40 left panel.jpg
    79.8 KB · Views: 108
  • P-40 right panel.jpg
    P-40 right panel.jpg
    79.4 KB · Views: 112
  • P-40 B cockpit.jpg
    P-40 B cockpit.jpg
    111.6 KB · Views: 124
  • P-40 C pilot panel.jpg
    P-40 C pilot panel.jpg
    95.2 KB · Views: 115
  • P-40 cockpit profile.zip
    1.1 MB · Views: 63
  • P-40 C right panel.jpg
    P-40 C right panel.jpg
    120.7 KB · Views: 105
  • P-40 C left panel.jpg
    P-40 C left panel.jpg
    113.6 KB · Views: 112
Just did the painting for the interior, with the interior green.

My next steps will be put the exhaust pipes on the airframe, then it will be installing the canopy crank to the right of the pilots seat, the throttle to the left side and then painting the instruments which is going to be a pain in my a*s .
 

Attachments

  • 102_4041.JPG
    102_4041.JPG
    49.8 KB · Views: 90
  • 102_4042.JPG
    102_4042.JPG
    34.1 KB · Views: 88
  • 102_4043.JPG
    102_4043.JPG
    33 KB · Views: 91
In these two first pics the background plastic colour can be seen .If I were... I would apply the second coat.
 
Busy day today.... I just did the exhaust installation to the main frame.

I had to sand it down a bit...

First two pics are exhausts

Third is after they got sanded down.
 

Attachments

  • 102_4044.JPG
    102_4044.JPG
    38.3 KB · Views: 90
  • 102_4046.JPG
    102_4046.JPG
    41.8 KB · Views: 84
  • 102_4045.JPG
    102_4045.JPG
    31.3 KB · Views: 88
Yep..looking good. But have you glued them to the fuselage yet?
 
That's a pity.It would be easier to paint the camo spots without them. Here you are a pic where you can see the exhaust pipes. What is more you should have removed these seamas of moulds on these..With a thin drill bit you could have made them open.
 

Attachments

  • Tomahawk__MENACE_codeB.jpg
    Tomahawk__MENACE_codeB.jpg
    40.7 KB · Views: 81
Last edited:
I only glued one side, incase I had to take them out. So I can still take them out.

Because incase it wasn't fitted right.
 
Last edited:
So if you can take them out it will be fine. Then please take a few pics of these exchaust pipes and these places where they can be attached.OK?
 
Last edited:

Users who are viewing this thread

Back