**** DONE: Revell 1/48 P-40B RAF 112 Squadron in Egypt in 1941 MTO Group Build

Ad: This forum contains affiliate links to products on Amazon and eBay. More information in Terms and rules

Drill, with the drill bit? and then sand. Okay, How do I go about with the drill bit (Drilling.) Also, how do I know when I've got the proper shape?

Thanks!

17

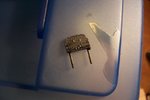
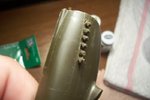
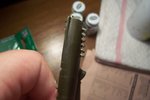
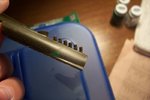
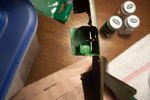
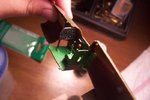
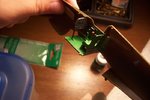
Drilling out the exhaust stack isn't that difficult IF you have the proper tool. I use this one (below). It houses the bits in the handle Now if you have these small bits you can still do it. Pick a bit that is smaller then the circumference of the tack you are drilling. If you aren't sure make it smaller rather then bigger. If its to small you can always redo it with a larger bit.

IMG_1395.jpg


I would just pit some tape in the back side of the bit to act as a grip for your fingers. Center the bit on the piece and twist. Light pressure until you get it started then you can apply a little ore. Don't go too deep! You're just looking for the affect of the stack being hollow. BECAREFUL, if the bit slips it could cut you or worse damage the plastic. lol, really be careful.

I hope this helps

Oh, and I think I would try it before I install the stacks in the fuselage but you will need to decide what would be better.
 
Ugh. Well all was going smoothly up until the drill part. My dad has a 1/16 of an inch drill bit, but it was lost. I found a nail small enough and melted it into the plastic, got no where. So I just did the sanding of the exhaust.....half ofone atleast. Took forever. Then painted the instrument panel a flat black. This instrument panel in the kit though isn't the correct one.

Don't try and melt the holes. If you don't have the tools skip it and try again with your next model. Drilling removes the plastic. Melting it just moves it someplace else and could warp or misshape the piece.

There is no rush, take your time and do the best you can. If you have to walk away or move onto something else. Come back to it later. The skills will come with time and practice.
 
Last edited:
I think the dry brushing bit went fairly well. I thank Jan and Terry for giving me links and guides. Besides the exhaust stacks, which are coming out OK I think she's pretty good so far overall. Next step would be to finish the exhausts, so they fit, but instructions say next is putting together the cockpit and gluing the fuselage together.
 

Attachments

  • 102_4061.JPG
    102_4061.JPG
    75.5 KB · Views: 78
  • 102_4062.JPG
    102_4062.JPG
    38.3 KB · Views: 72
That's what I was thinking. It'll be my first time doin it so I'll need further instruction. :D

Thanks DB and Terry :D
 
Okay after about an hour of sanding and cutting my exhaust stacks fit perfectly. They're not glued in just to show that they fit
 

Attachments

  • 102_4073.JPG
    102_4073.JPG
    37.6 KB · Views: 96
  • 102_4070.JPG
    102_4070.JPG
    30.3 KB · Views: 89
  • 102_4071.JPG
    102_4071.JPG
    31.3 KB · Views: 87
  • 102_4072.JPG
    102_4072.JPG
    33.1 KB · Views: 91
Then just a couple quick ones of what the cockpit WILL look like. Nothings glued, still have some work to do. Thanks guys for all your help so far. !
 

Attachments

  • 102_4077.JPG
    102_4077.JPG
    40.7 KB · Views: 92
  • 102_4076.JPG
    102_4076.JPG
    43.5 KB · Views: 80
  • 102_4075.JPG
    102_4075.JPG
    37.5 KB · Views: 80
  • 102_4074.JPG
    102_4074.JPG
    39 KB · Views: 80
  • 102_4078.JPG
    102_4078.JPG
    40.4 KB · Views: 86
Looking very good H, well done. When you eventually come to fit the exhausts, after you've painted the model, just give the end of each pipe a rub-down with fine wet n' dry or sandpaper, to get rid of the moulding seams. When you've painted them, then paint the end of each pipe flat black, to make it look like it's a tube - it works well and looks better than just a 'solid' pipe.
For the instrument panel, use a small brush, and put a small drop of Future on each instrument dial. Don't apply a great big dollop, just enough to fill each dial, which means only just wet the tip of the brush. Let this dry, which will only take a few minutes, when it'll probably look semi-matt. Just repeat the job until you're satisfied, and the panel should look like it's got glass over the instruments.
 
Alright thanks guys! I'll probably do the future thing today after school. Thanks!

Oh yes, should I use my brush or does something like a toothpick work, like get a tiny bit on the end and then go on or should I use the brush?
 
Last edited:

Users who are viewing this thread

Back