**** DONE: Revell 1/48 P-40B RAF 112 Squadron in Egypt in 1941 MTO Group Build

Ad: This forum contains affiliate links to products on Amazon and eBay. More information in Terms and rules

Unglue these exchaust pipes and take a few pictures of them.Also take two pics of places where they were attached inside these fuselage halves.
 
Couple quick pictures.... you can see the exhausts better in my last post with pictures...
 

Attachments

  • 102_4049.JPG
    102_4049.JPG
    33.9 KB · Views: 87
  • 102_4050.JPG
    102_4050.JPG
    76.4 KB · Views: 99
  • 102_4051.JPG
    102_4051.JPG
    36.4 KB · Views: 119
  • 102_4052.JPG
    102_4052.JPG
    35.4 KB · Views: 114
Excelent Harrison. Follow that below.
 

Attachments

  • rury.jpg
    rury.jpg
    57.3 KB · Views: 145
  • rury1.jpg
    rury1.jpg
    62.7 KB · Views: 122
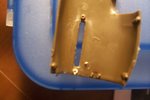
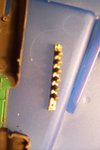
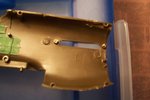
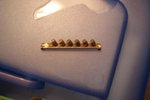
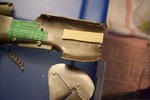
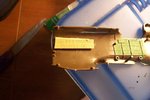
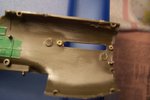
That's a pity.It would be easier to paint the camo spots without them. Here you are a pic where you can see the exhaust pipes. What is more you should have removed these seamas of moulds on these..With a thin drill bit you could have made them open.

17

As I'm sure you realize Wurger is right about the exhaust stacks. Now that you have them out you should drill out each stack. Take your time there's no rush. Also take some time to sand the seem lines off the stacks. This will be tedious but in the end it will be well worth the effort.

Revised statement: Sand first then drill. 8)
 
I did the sanding and used my hobby knife to get the extra stuff you see in the picture out. It looks better now but I went into the plastic. I knew my Opel Blitz extra pieces would come in handy!

EDIT: Okay thanks Dirk! :D
 

Attachments

  • 102_4057.JPG
    102_4057.JPG
    46.1 KB · Views: 96
  • 102_4054.JPG
    102_4054.JPG
    46 KB · Views: 101
  • 102_4053.JPG
    102_4053.JPG
    36.5 KB · Views: 102
Last edited:
Superb....let the glue be harden. What did you use for cutting these plastic plates? Are these flat on inner sides?
 
The are flat on the inner sides I put the lettering facing out and the smooth side in. And I used a heavy duty scissor. My hobby knife obviously is too flimsy and the scissors I use for cutting things off the spruce are small in weak. I may try to do the instrument panel tonight, well just paint it flat black and do dry brushing tomorrow or something.
 
OK. I see. Here two next steps.
 

Attachments

  • rury3.JPG
    rury3.JPG
    83.1 KB · Views: 92
Drill, with the drill bit? and then sand. Okay, How do I go about with the drill bit (Drilling.) Also, how do I know when I've got the proper shape?

Thanks!
 
Yes you need a thin drill bit. If you don't have a such bit leave these pipes not drilled.
How to know when .... simply by fitting to these holes in halves of the fuselage. Start shaping with the front edge of the basis like you can see in the pic above.Then try to fit it to the hole.Pay your attention to if you need to make the basis much narrow.If yes sand the basis edges.Then shape the rear edge of the basis.
 
OK. I see. So I'm not going to use the holes that are provided I am going to try to make it so it fits into the rectangle?

I'm going to go look for the drill bits. I will be back shortly and going to eat dinner. !
 
These rectangles are for making a kind of basis for the exchaust pipes.What is more these will prevent against dropping in the fuselage.Beczuse these pipes sticked out not much when you had glued them earlier you needed to push them closer to a half of the fuselage.Now these are like you would remove their mounts from halves of the fuselage and glued them direct to these halves.But you don't need them attached now because of fuselage painting.In this way you can attach them when the model is painted.Just at the build end.
 
Last edited:
OK. I understand now. I thought they were from keeping paint from getting in. I have no clue where my dad keeps his power tools and drill bits. He's getting home from work in 10 minutes and I'll ask him.

Thanks Wojtek!!
 
You are welcome Harrison. But if you want to drill these pipes you don't need to use power tools. You have to drill them using your hand.Only it the way you can do that witout damages of the pipes.

Of course these plates ( plastic rectangles ) are from keeping the paint getting in as well.

OK. Tomorrow I'm at work and will get back the day after tomorrow.But there are other guys who can help you with that model.

Sleep Well.
 
Ugh. Well all was going smoothly up until the drill part. My dad has a 1/16 of an inch drill bit, but it was lost. I found a nail small enough and melted it into the plastic, got no where. So I just did the sanding of the exhaust.....half ofone atleast. Took forever. Then painted the instrument panel a flat black. This instrument panel in the kit though isn't the correct one.
 

Attachments

  • 102_4058.JPG
    102_4058.JPG
    48.7 KB · Views: 89
  • 102_4059.JPG
    102_4059.JPG
    37.7 KB · Views: 88

Users who are viewing this thread

Back