Fw-190A-8 of JG 6

Ad: This forum contains affiliate links to products on Amazon and eBay. More information in Terms and rules

plheure2

Senior Airman
301
2
Nov 9, 2009
Massachusetts, USA
Greetings, fellow modelers:

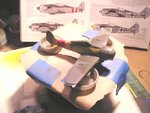
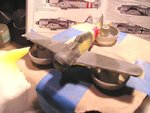
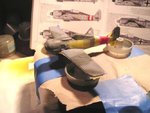
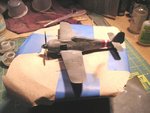
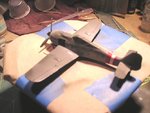
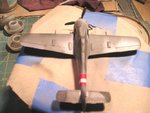
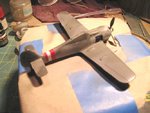
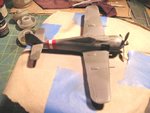
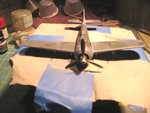
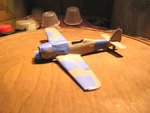
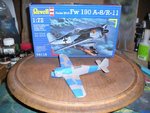
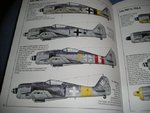
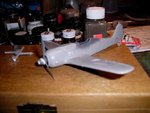
Well, I started another build, this time an R/G 1/72 scale Wurger A-8 (Wojtek pulls his chair closer :shock:). When I'm done, I hope it will look like the illustration in the book, the third from the top, with the red and white Defense of the Reich band. I'm replacing the kit cannons with Minimecca steel barrels that more closely resemble the 20mm cannons of the fighter. Here are some pics, so far...
 

Attachments

  • Fw-190A-8 001.JPG
    Fw-190A-8 001.JPG
    47.8 KB · Views: 344
  • Fw-190A-8 002.JPG
    Fw-190A-8 002.JPG
    82.6 KB · Views: 335
  • Fw-190A-8 003.JPG
    Fw-190A-8 003.JPG
    72.8 KB · Views: 346
  • Fw-190A-8 004.JPG
    Fw-190A-8 004.JPG
    55 KB · Views: 339
Great....I like that the most.:cool:
However you have to be careful of the cockpit conopy. The way the Revell made this one is absolutely incorrect. It would be better if you could use another one ( from Academy Minicraft kit for instance ). Try to the dry fitting firstly.You will notice the problem. I would suggest making it scratch-built, using the kit one or its rasin mould as the former.
 
OK, Wojtek, I hear you loud and clear about the canopy glass. Seeing as I don't have an Academy kit of the model, and I dont have resin to make copies of it, any suggestions? What problem shows up on the dry fit (I haven't done one ye)? Is there a gap between the front and back halves? I'm wide open to suggestions and help at this point, as I want to make this into a contest model if at all possible. A frend of mine told me (happens to be the one who gave me the model) that one of his friends in his club made the model an didn't run into any difficulties with the canopy glass fit.
 
I see. But a few of mine had a trouble with the cockpit conopy. It appered to be too flat and too little.

For the former material you can use a piece of wood ( balsa for instance) But you have to shape it firstly.
 
I did a dry fit of the canopy glass parts, and they fit with no difficulty or spaces, so a big sigh of relief there. More work was accomplished over the last few days. The canopy parts are masked and glued onto the aircraft, and the airframe is primed. The inside of the cowl is painted in RLM 02, and the engine front in steel. The sides which include the engine cooling gills, just in back of the exhasts, are shot with black followed by burnt iron. Looks very realistic. Those areas are masked. Last night, I shot the bottom and sides with RLM 76. Hope to do more tonight.

Pete
 
Last edited:
Greetings, fellow modelers:

Here is what my A8 looks like after doing some airbrushing tonight. Enjoy the pictures.:)
 

Attachments

  • 021010 Wurger progress 004.JPG
    021010 Wurger progress 004.JPG
    55.3 KB · Views: 250
  • 021010 Wurger progress 003.JPG
    021010 Wurger progress 003.JPG
    53.1 KB · Views: 264
  • 021010 Wurger progress 002.JPG
    021010 Wurger progress 002.JPG
    55.5 KB · Views: 249
  • 021010 Wurger progress 001.JPG
    021010 Wurger progress 001.JPG
    54 KB · Views: 261
Thanks, gentlemen, for all the encouraging words. Tonight, I completed the major painting of the airframe and installed the horizontal stabilizers and Minimecca steel tubes for the cannons. Here are the results. Hope you like. Next step is Futuring and decals.

Happy modeling to all,

Pete
 

Attachments

  • Wurger Progress 001.JPG
    Wurger Progress 001.JPG
    57 KB · Views: 187
  • Wurger Progress 002.JPG
    Wurger Progress 002.JPG
    52.6 KB · Views: 186
  • Wurger Progress 003.JPG
    Wurger Progress 003.JPG
    51.6 KB · Views: 186
  • Wurger Progress 004.JPG
    Wurger Progress 004.JPG
    53.7 KB · Views: 187
  • Wurger Progress 005.JPG
    Wurger Progress 005.JPG
    52.5 KB · Views: 195

Users who are viewing this thread

Back