RCAF Starfighter, 1/48th scale - Part Two

Ad: This forum contains affiliate links to products on Amazon and eBay. More information in Terms and rules

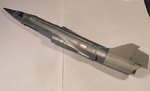
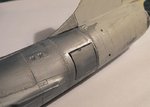
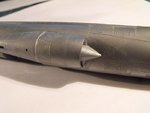
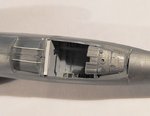
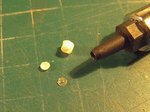
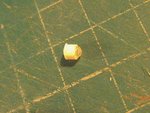
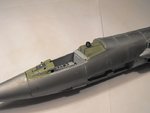
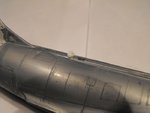
I'm not much of a jet guy but I appreciate good modeling when I see it! The discussion on Milliput was very enlightening. Before I knew that Milliput came in different grades, I had only the Terracotta and found that too coarse for my purposes so I didn't have much use for Milliput. But your post and my recent experiences with Milliput White have shown how useful it can be!

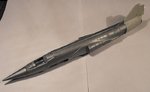
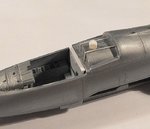
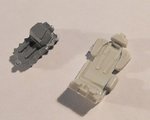
Great update on an older kit! I remember ESCI from way back when.
 
I've decided to get the Danish bird to the same stage as the RCAF example, in order to get them both finished at roughly the same time. Therefore, I've bashed on and sanded the fuselage seams, and fitted the nose cone.
The latter is made as a one-piece, quite thick part, incorporating the forward section of the fuselage ahead of the cockpit, along with the radome. There were no locating pins or a rim to aid fitting, and the wall thickness of the cone prevented the use of 'tabs' to aid alignment and adhesion. This meant that judicious use of cement was required, plus a couple of minutes aligning and holding the part, top prevent it dropping off !
A small hole was drilled in the tip before fitting, to accept the brass pitot later.
Next step was to improve and fit the exhaust afterburner can, which is illustrated below.

PIC 1. The ESCI kit part, not bad for a mid-1970's kit, and better than the Revell version. But, of course, that 'grille' should be deep in the jet pipe itself.
PIC 2. The 'grille' was removed with the aid of a razor keyhole saw, to be used later.
PIC 3. The kit nozzle and 'grille', alongside part of the jet pipe left over from the Revell kit, which will be combined to make a more acceptable exhaust.
PICS 4 . The inside of the kit nozzle was filed and sanded, to reduce the diameter of the 'ring' where the grille had been attached, and in order to allow the Revell jet pipe to fit inside it, and then the two parts were joined.
PIC5. Initial interior painting, before cementing the grille onto the other end of the jet pipe.
PICS 6 and 7 Once painted internally, some slight sanding was required around the periphery, before fitting the assembly to the tail unit. The nozzle will be masked whilst the model is painted, and then the external surfaces will be painted and highlighted later.
PICS 8 and 9. The modified tail unit was then cemented in place on the fuselage, and this, along with the nose cone, will have all joints sanded and filled as required, before continuing with the rest of the construction.
 

Attachments

  • DSCF0001 (10).JPG
    DSCF0001 (10).JPG
    44.3 KB · Views: 77
  • DSCF0003 (6).JPG
    DSCF0003 (6).JPG
    46.5 KB · Views: 72
  • DSCF0005 (2).JPG
    DSCF0005 (2).JPG
    38.8 KB · Views: 74
  • DSCF0006 (2).JPG
    DSCF0006 (2).JPG
    57.7 KB · Views: 69
  • DSCF0009 (3).JPG
    DSCF0009 (3).JPG
    50.4 KB · Views: 58
  • DSCF0012.JPG
    DSCF0012.JPG
    33.9 KB · Views: 78
  • DSCF0014.JPG
    DSCF0014.JPG
    36.2 KB · Views: 83
  • DSCF0016.JPG
    DSCF0016.JPG
    39.4 KB · Views: 76
  • DSCF0017.JPG
    DSCF0017.JPG
    37.6 KB · Views: 62
Thanks Wayne and Wojtek (that sounds like a circus act !).
Got some more done, with joints filled as required, air brakes and intakes and shock cones on, and just working on the remainder of the fuselage. Pics later.
 
A bit more progress, with most of the fuselage joints filled and sanded as required , although I'll wait until the primer has been applied before deciding on the state of the air brakes.
As the canopy will be fitted in the closed position (I can't be bothered sawing it into three pieces!), the cockpit and seat will be completed, and the canopy masked and fitted, before continuing with any more sanding or construction. Therefore, some additional detail has been added, and a seat knocked together using parts from the ESCI and Revell kits, plus some additional detail.

PIC 1. As with the Revell kit, the air brakes are designed to be fitted in the open position. The 'hinges' were cut off and the forward edge of each brake sanded, before fitting in the closed position. As mentioned above, I'm not sure about those gaps around the edges yet. The joint lines at the fin and rear fuselage have since been filled and sanded, along with a sink mark on the opposite side.
PIC 2. The air intakes and shock cones have been fitted and, although a much better fit than the Revell examples, a very small joint line needed filling on each side. This was done by dissolving finely-stetched sprue into the gap, then sanding once set. The auxiliary intake doors needed to be engraved. Apart from the originals being fairly heavy raised detail, I think this aircraft must have been destined for the Australian market, as they were moulded upside down ! (I'll get me coat later!).
PIC 3. Some very basic detail has been added to the avionics bay cover, and has yet to be tidied up. As with the rest of the cockpit, detailing is being kept to a minimum, as the closed canopy is quite thick, and distorts the view - what there is of it.
PICS 4 to 6. The RDAF Starfighters were fitted with a powerful spotlight, angled at 80 degrees to port, used for identifying aircraft at night. This was replicated using plastic tube, with the lens and rear of the lamp housing punched from plastic and clear sheet. Being so small, and using a somewhat crude miniature leather punch to make the lens and back-plate, provided an unexpected bonus, by creating domed discs. The pics show the parts, assembled, and fitted in place, ready for painting later. I originally fabricated a mounting bracket, but this prevented the canopy from seating properly, so it was removed, and the 'lamp' clagged directly to the avionics bay cover !
PICS 7 to 11. Originally delivered from the RCAF with the C-2 ejection seat, Danish F-104s were fitted with the improved Martin Baker GQ7A seat, so this is in the process of being cobbled together using parts from both kits, plus plastic card, wire and foil.
The seat in the ESCI kit seems to be a cross between the C-2 and MB GQ7A, whilst the 'spare' seat from the Revell kit is a reasonable, though basic, representation of the latter. The ESCI part for the support frame and rails has a better head rest section, so the head rest was removed from the Revell seat, and the ESCI part fitted in its place, after improving the shape of the head-rest pad, and reducing the size of the 'ribs'.
The BCF bottle on the port side of the Revell seat was filed to shape, and the seat cleaned up, before adding the rails and enlarging the side panels. The PEC was also added to the port side, and additional harness straps will be added from foil, along with the firing handles, using copper wire.
All being well, I should get that bit completed tomorrow, and the cockpit buttoned up.

Thanks again for your continued interest and support, and I'll post more soon.
 

Attachments

  • DSCF0003 (7).JPG
    DSCF0003 (7).JPG
    48.4 KB · Views: 75
  • DSCF0005 (3).JPG
    DSCF0005 (3).JPG
    50.6 KB · Views: 59
  • DSCF0019.JPG
    DSCF0019.JPG
    57.3 KB · Views: 56
  • DSCF0021.JPG
    DSCF0021.JPG
    129.7 KB · Views: 66
  • DSCF0031.JPG
    DSCF0031.JPG
    73.1 KB · Views: 78
  • DSCF0036.JPG
    DSCF0036.JPG
    92 KB · Views: 75
  • DSCF0001 (11).JPG
    DSCF0001 (11).JPG
    56.2 KB · Views: 63
  • DSCF0008 (2).JPG
    DSCF0008 (2).JPG
    33 KB · Views: 53
  • DSCF0011.JPG
    DSCF0011.JPG
    30.4 KB · Views: 75
  • DSCF0014 (2).JPG
    DSCF0014 (2).JPG
    45.3 KB · Views: 68
  • DSCF0017 (2).JPG
    DSCF0017 (2).JPG
    36.7 KB · Views: 72
Thanks Andy. I'll wait until the complete model has been primed, and see what it looks like then. If still like the Grand Canyon, then I'll fill the gaps and re-engrave.
I had considered having the brakes open, and a pilot figure in the cockpit (brakes were always closed on the ground, except for landing), but I'm probably going to have the gun bay open, and some extra detail added to the bay, and the two wouldn't really look right !
 
Thanks Wojtek and Hugh.
I decided that the gaps around the air brakes needed filling, so this ha been done and sanded, and the fuselage polished overall to remove sanding marks.
Just working on the seat and a couple of other small details, and should have some pics up later tonight.
 
Progress to date, with the cockpit instrument shroud and rear decking painted, together with the base of the gun sight head and the spot lamp, and work underway on the seat and canopy. The latter had quite a deep gouge in the top, which was lightly sanded, then vigorously polished with 'T-Cut'.

PIC 1, Cockpit detail painted, ready to fit the the gun sight lens and reflector glass.
PIC 2 Unlike the RCAF Starfighters, an anti-collision light was fitted to the spine of the Danish aircraft, the same as Luftwaffe, Norwegian and Dutch F-104Gs. This is represented here by plastic tube, shaped to fit the spine, and a 'domed' piece of plastic rod. Once the model has been painted, this will be painted red, and the top glazed to create the 'glass' dome
PICS 3 and 4. The main harness and release box have been added to the modified seat, joined to the moulded 'straps'. Adjusters were made from short lengths of stretched sprue, as were the firing handles and oxygen hose. Painting is next.
PICS 5 to 7. Sanding and polishing the canopy, with the finished result before washing to remove the 'T-Cut' residue. Next stage is to dry-polish, then mask ready for painting the internal frame colour. Due to the thickness of the canopy, I won't bother trying to add the internal support frame.

Next stage is to complete the seat, fit it into the cockpit, then fit and seal the canopy, before continuing the main construction, heading towards a primer coat.
Thanks again for your continued interest, and I'll post more very soon.
 

Attachments

  • DSCF0011 (2).JPG
    DSCF0011 (2).JPG
    40.2 KB · Views: 74
  • DSCF0010.JPG
    DSCF0010.JPG
    38.8 KB · Views: 64
  • DSCF0017 (3).JPG
    DSCF0017 (3).JPG
    43.5 KB · Views: 69
  • DSCF0020.JPG
    DSCF0020.JPG
    41.3 KB · Views: 67
  • DSCF0001 (12).JPG
    DSCF0001 (12).JPG
    121.5 KB · Views: 67
  • DSCF0007 (2).JPG
    DSCF0007 (2).JPG
    134.7 KB · Views: 66
  • DSCF0009 (4).JPG
    DSCF0009 (4).JPG
    108.8 KB · Views: 64
Thanks Wojtek and Andy.
I decided to run a bead of 'Superglue' around the edges of the air brakes, then sanded it flush. Being transparent, I can't really tell yet if the joints have gone and will need re-scribing, but I'm sure the primer coat will show it - along with other warts and pimples !
Almost finished painting the seat, and the canopy has been masked and the internal frames painted (on both sides, for 'depth'), so with a bit of luck, I'll get the seat installed and the canopy fitted later tonight.
 

Users who are viewing this thread

Back