1/32 Spitfire Mk.Vb - Defence of Britain/Atlantic.

Ad: This forum contains affiliate links to products on Amazon and eBay. More information in Terms and rules

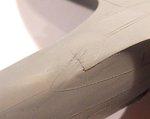
Nice work Terry. Yes, now that you point out the misaligned strakes, it's quite evident. Good fix.

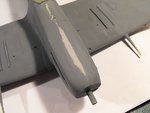
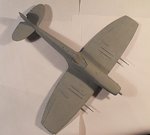
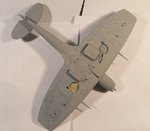
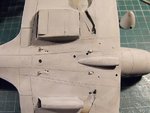
By the way, are you sure the forward mounts for the tank are square?I have this excerpt from a MkXIV manual, showing the mounting arrangement for a bomb rack, which I think uses the same hard points as the tank. They are round here.

centre_bomb_carrier_mk14.jpg


Also, a highly magnified close-up of the MkIX underside drawing shows round mounting points.

Capture.JPG
 
Last edited:
Thanks chaps, and thanks Andy for the drawings.
I have the same drawing for the bomb rack pick-ups. Yes, there is a circular 'pad' on the fuselage, but the actual 'hook' is of 'square' section, mounted as part of the 'pad'. (I'd post a pic, but at the moment, I can't copy from PDF books on the hard drive.)
I don't have a punch small enough to make the 'disc', and trying to cut and sand rod of the required diameter didn't work, so the 'hooks' have been sanded to shape, and the 'pad' will be drawn in after painting the model. The drilled holes have been filled around the 'hooks', and almost form a circular pad, but the drawing will, I hope, make it look more like the actual base of the hook mounting points.
The primer has revealed an area needing attention on the top of the cowling, although to be honest, I doubt it would show under the final paint finish, as it's more of a 'peak' along the center-line joint, rather than a poor joint, a result of the actual shape of the two fuselage halves.It only shows in certain lighting conditions, but I'll re-sand the area anyway, and spray another coat of primer.
I'll try to get some pics up later tonight, but as I need to be up early tomorrow, for the hospital appointment, I don't know of I'll have time to get any more done.
 
Here's the pics of the 'peak' on the cowling, as well as another area at the rear of the wing fillet which needed attention.

PICS 1 to 3. The 'peak' can hardly be seen (indicated by white arrows), but the flow marks of the thinned primer show how it rose slightly in the center of the cowling, causing the paint to flow away from the 'peak'. As mentioned, it could only be noticed in certain lighting conditions, particularly with light from one side, but I wasn't happy with it, so sanded and polished the area, then re-sprayed the cowling, building up the paint to ensure an even finish.
PICS 4 and 5. The primer also revealed a 'bump' in the wing fillet joint, so this was also sanded, polished, and re-sprayed, and the panel lines and rivets re-engraved.
PICS 6 and 7. The entire model was then re-sprayed with a lighter shade of primer, although the underside needs to be finished, and some patchy areas re-sprayed, as I was running out of paint and it was getting late. It will be completed tomorrow, given I get out of hospital at a reasonable hour, and I'm not too tired after being jabbed, infused and monitored for the whole day !
 

Attachments

  • DSCF0004 (7).JPG
    DSCF0004 (7).JPG
    28.7 KB · Views: 85
  • DSCF0007 (9).JPG
    DSCF0007 (9).JPG
    37.4 KB · Views: 71
  • DSCF0012 (7).JPG
    DSCF0012 (7).JPG
    37.1 KB · Views: 71
  • DSCF0006 (8).JPG
    DSCF0006 (8).JPG
    42.8 KB · Views: 93
  • DSCF0008 (9).JPG
    DSCF0008 (9).JPG
    46.4 KB · Views: 95
  • DSCF0014 (5).JPG
    DSCF0014 (5).JPG
    41.9 KB · Views: 83
  • DSCF0015 (3).JPG
    DSCF0015 (3).JPG
    38.6 KB · Views: 104
These are problems I can relate to, but you seem to have the misalignment issue well under control. Will be watching the finished product with interest....


Hope you are recovering well. I was up at my local hospital getting poked prodded and tested as well today. What I get after 50 years of abuse.....
 
Thanks guys - just waiting for the taxi to take me to hospital. She be back out by early evening - I hope !
 
Thanks chaps !
Just got back after 7 hours sitting still with a drip in my arm ! Feeling a bit drowsy due to some of the stuff pumped into me, but otherwise fine so far. Going for a bit of a snooze, then hopefully hit the bench again !
 
Thanks Hugh.

Still a bit tired, so I've only done a bit of preparation, and a tiny addition to the prop spinner.
Bells were ringing concerning the slipper tanks mounts, as I thought there should also be some rear mounting hooks, so I checked some pics I'd taken at Duxford some time ago, and sure enough, there should also be some rear mounting points, near to the deflector 'hooks'.
I also noticed the the prop spinner has small 'blisters' at each blade root opening, which I think are to accommodate the pitch gearing when the blades alter pitch. I checked period photos of the 'pointed' Rotol spinner, and most show these 'blisters', although I believe it depends on the source of the spinner, and the time of manufacture.
I can't be sure whether or not Stan's aircraft had these, but I thought I'd add them anyway.

PIC 1 Shows one of the MkVs at Duxford, with the spinner 'blisters' visible, as well as the extra 'hooks' beneath the fuselage, and a pair of breather pipes near the port wing root leading edge.
PIC 2. Adding and sanding the spinner 'blisters', made from shaped stretched sprue.
PIC 3. Preparing the slots for the tank mounting hooks, with the hole drilled to accept the two breather pipes, one of which is very small.

All being well, I should have more to show tomorrow sometime, when i'm more awake.
 

Attachments

  • Spit farm 1.jpg
    Spit farm 1.jpg
    131.9 KB · Views: 93
  • DSCF0002 (11).JPG
    DSCF0002 (11).JPG
    62.7 KB · Views: 90
  • DSCF0003 (11).JPG
    DSCF0003 (11).JPG
    56 KB · Views: 113
Glad to see you made it through the day Terry. Seems the stuff in the tube in your arm went in the right direction.
 
Some of this stuff is now several pay grades above me. Im just impressed with the basics. Attention to detail, the careful aligment of pieces, high quality of finishes, the excellent detail especially in the IP.

Its a pleasure to watch terry.
 
Thanks very much indeed for the kind words chaps, especially your compliments Michael.
After so long away from the bench, and struggling to do even simple modelling tasks for even longer, it's very much appreciated, believe me !
I slept all day today, not waking up until 16.00 hrs, as a result of the 'oil change' yesterday !
I think I can already feel some improvement as, although I ache a lot, which I was told would be normal, the pain has reduced tremendously, and I feel as if I can move more easily.
I'm going to start on the first stage of painting later, all being well, but as I'll be probably be using Xtracolor gloss enamel, it takes a long time to dry, so I doubt I'll get any photos up.
More as soon as there's something to show.
Thanks again, and I'll be back soon.
 

Users who are viewing this thread

Back