Navigation
Install the app
How to install the app on iOS
Follow along with the video below to see how to install our site as a web app on your home screen.
Note: This feature may not be available in some browsers.
More options
You are using an out of date browser. It may not display this or other websites correctly.
You should upgrade or use an alternative browser.
You should upgrade or use an alternative browser.
1/32 Spitfire Mk.Vb - Defence of Britain/Atlantic. (1 Viewer)
Ad: This forum contains affiliate links to products on Amazon and eBay. More information in Terms and rules
More options
Who Replied?- Thread starter
- #122
Airframes
Benevolens Magister
Thanks very much chaps. No more progress so far, as I've been dashing around like a blue ar*ed fly today, preparing the van and other stuff for Duxford.
Andy, what do you want me to check ?
Andy, what do you want me to check ?
Crimea_River
Marshal
Obviously I should have collected my coat at the door. It was a reference to your "friend's" interference with your preferred passtime.
- Thread starter
- #124
Airframes
Benevolens Magister
Ah! Sorry, I was half asleep - had a couple of hours kip early evening, after being non-stop all day, and it took me ages to wake up properly !
Got a bit more done, and the model is almost ready for masking and priming.
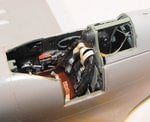
PIC 1. The small gaps around the cannons have been filled with 'Milliput', and await sanding.
PIC 2. There was a bit of a 'step' on the underside of one of the clipped wing-tips, so this was first filed using a jeweler's file, then built-up with 'Milliput', but has yet to be sanded.
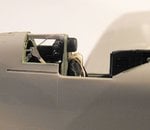
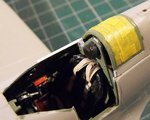
PICS 3 and 4. The 'T' section brace has been added between the cockpit frames, using plastic strip, and the harness support wire added, using stretched sprue.
PIC 5. After clean-up, the brace was painted Cockpit Grey-Green, slightly lightened with a couple of drops of white, and the wire painted in a steel colour. The forward end of the brace will also act as the canopy locking lug, when the canopy is open, and the latch will be added to the front end of the canopy later.
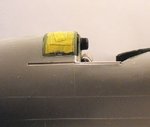
PICS 6 and 7. The rear glazing was masked, and the interior colour painted on the outside frames, as well as those areas easily accessed on the inside, before cementing into place using liquid cement.
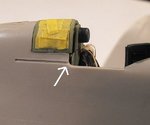
The white arrow indicates areas on both sides which need to be built-up to create a smooth continuation of the fuselage, and the canopy runner, and, on the starboard side, the runner needs to be extended to the base of the windscreen. I never could figure out why Hasegawa moulded the fuselage halves with the 'notch' - I can understand the lack of runner on the starboard side, to allow the canopy to fit if closed, but not the gap on the fuselage!
Next step, after sanding and polishing the relevant areas, is to mask the cockpit, and intakes and exhaust slots, and then spray a coat of primer. Any remaining blemishes will then be attended to, before spraying the first of the colours, starting with the 'Sky' tail band.
Got a bit more done, and the model is almost ready for masking and priming.
PIC 1. The small gaps around the cannons have been filled with 'Milliput', and await sanding.
PIC 2. There was a bit of a 'step' on the underside of one of the clipped wing-tips, so this was first filed using a jeweler's file, then built-up with 'Milliput', but has yet to be sanded.
PICS 3 and 4. The 'T' section brace has been added between the cockpit frames, using plastic strip, and the harness support wire added, using stretched sprue.
PIC 5. After clean-up, the brace was painted Cockpit Grey-Green, slightly lightened with a couple of drops of white, and the wire painted in a steel colour. The forward end of the brace will also act as the canopy locking lug, when the canopy is open, and the latch will be added to the front end of the canopy later.
PICS 6 and 7. The rear glazing was masked, and the interior colour painted on the outside frames, as well as those areas easily accessed on the inside, before cementing into place using liquid cement.
The white arrow indicates areas on both sides which need to be built-up to create a smooth continuation of the fuselage, and the canopy runner, and, on the starboard side, the runner needs to be extended to the base of the windscreen. I never could figure out why Hasegawa moulded the fuselage halves with the 'notch' - I can understand the lack of runner on the starboard side, to allow the canopy to fit if closed, but not the gap on the fuselage!
Next step, after sanding and polishing the relevant areas, is to mask the cockpit, and intakes and exhaust slots, and then spray a coat of primer. Any remaining blemishes will then be attended to, before spraying the first of the colours, starting with the 'Sky' tail band.
Attachments
Vic Balshaw
Major General
Nice stuff Terry, particularly the harness, it looks so real.
Nice job Dogsbody !
Fine job Terry!
- Thread starter
- #129
Airframes
Benevolens Magister
Thanks chaps, it's much appreciated.
I seem to have picked up some 'Malware' on the forum (nowhere else on my PC or any other sites !), which I can't get rid of, so I don't know if the next up-date pics will post, but I'll try !
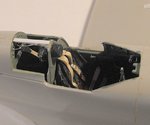
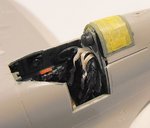
PIC 1. The rear glazing has been masked and cemented in place, and the joints sealed with PVA. The gap between glazing and fuselage on the port side has been bridged using plastic strip, and the canopy runner extended, and awaits sanding in this pic.
PIC 2. The starboard side has also had the gap fixed, and a canopy runner track fitted, built up with varying sizes of plastic strip, and again requires sanding and straightening at the rear edge.
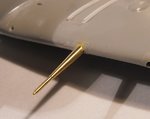
PIC 3. Just visible at the top of the head armour, and not yet painted, is the canopy locking latch bar (the small, light grey rod.)
The model has now been sanded where needed, including blending the cannon barrels to the reinforcing plates, and that 'step' beneath the starboard wing tip, and all openings have been masked ready for spraying the primer coat. Before spraying, I need to cut slots on the underside for the slipper tank shackles and deflectors, and drill holes for the fuel pressure and feed pipes. The shackles will be made from plastic strip, suitably shaped, and then fitted before spraying, whilst the pipes will be fitted after the model has been painted, to prevent them being 'clogged' with paint.
Given this post works, and I can get rid of this bl**dy annoying malware, I'll post another up-date soon.
Thanks again for the kind words and interest.
I seem to have picked up some 'Malware' on the forum (nowhere else on my PC or any other sites !), which I can't get rid of, so I don't know if the next up-date pics will post, but I'll try !
PIC 1. The rear glazing has been masked and cemented in place, and the joints sealed with PVA. The gap between glazing and fuselage on the port side has been bridged using plastic strip, and the canopy runner extended, and awaits sanding in this pic.
PIC 2. The starboard side has also had the gap fixed, and a canopy runner track fitted, built up with varying sizes of plastic strip, and again requires sanding and straightening at the rear edge.
PIC 3. Just visible at the top of the head armour, and not yet painted, is the canopy locking latch bar (the small, light grey rod.)
The model has now been sanded where needed, including blending the cannon barrels to the reinforcing plates, and that 'step' beneath the starboard wing tip, and all openings have been masked ready for spraying the primer coat. Before spraying, I need to cut slots on the underside for the slipper tank shackles and deflectors, and drill holes for the fuel pressure and feed pipes. The shackles will be made from plastic strip, suitably shaped, and then fitted before spraying, whilst the pipes will be fitted after the model has been painted, to prevent them being 'clogged' with paint.
Given this post works, and I can get rid of this bl**dy annoying malware, I'll post another up-date soon.
Thanks again for the kind words and interest.
Attachments
A4K
Brigadier General
Great job Terry!
- Thread starter
- #131
Airframes
Benevolens Magister
Thanks Evan !
I've just noticed that the canopy track on the starboard side is slightly lower than the engraved track on the fuselage - naked eye (even with a magnifying glass !) and Macro photography are two different things !
I should be able to adjust it slightly, when I straighten the rear of the track, but to be honest, all but the rear 1 or 1.5 mm of the engraved track will be covered by the open canopy, so hopefully, it won't be that noticeable. This shows some of the limitations of trying to make scale fittings with plastic - using thinner material to line-up with the kit parts would involve making the rack differently, and, being thinner, they would distort or melt when cemented !
Ah, well - it's better than no track at all, and an open, low sill had it been left as provided !
parsifal
Colonel
That pit is absolutely marvellous Terry
Crimea_River
Marshal
I'd agree with that. Looking very nice indeed.
- Thread starter
- #134
Airframes
Benevolens Magister
Thanks chaps !
No further progress so far, as I've been too busy sorting stuff for Duxford next week, including the van, which hasn't moved for four months !
I hope to get at least to the primer stage tonight, so more pics then, if possible.
No further progress so far, as I've been too busy sorting stuff for Duxford next week, including the van, which hasn't moved for four months !
I hope to get at least to the primer stage tonight, so more pics then, if possible.
- Thread starter
- #135
Airframes
Benevolens Magister
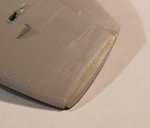
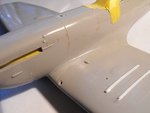
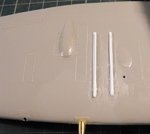
As my new engraving tool arrived today, I decided to go over some of the panel lines I'd previously done with the sharpened compass point. Some fuselage and wing panels have been very lightly engraved, along with the gun and ammo access hatches, although they didn't photograph too well - they should show up better when the model is primed, which I now hope to get done tomorrow.
The pics show the engine and fuel tank cowling panels, more heavily engraved to allow for the primer, paint and clear coats, as these are fairly prominent on the real aircraft. The second pic shows work underway drilling and cutting the slots for the slipper tank deflectors (top), and the pencil marks for the holes where the tank attachment shackles, and the fuel and pressure pipes will be fitted.
The small 'dimples' at the bottom of the photo simulate the jacking points, which will be painted in a metal colour, with a darker center 'spot', once the model has been painted.
These areas will be cleaned and polished before spraying the primer.
The model is now masked, ready for the primer, and all being well, I'll have some pics of this some time tomorrow.
Attachments
Great work so far Terry!
Crimea_River
Marshal
Looking forward to the grey stuff.
- Thread starter
- #139
Airframes
Benevolens Magister
The grey stuff is nearly done Andy !
The first thin coat of primer has been sprayed, and is currently drying. I can't move the model into better light to photograph it until the primer has dried, so pics of that will be posted sometime tomorrow.
Meanwhile, some changes have been made, and some more minor detail work completed.
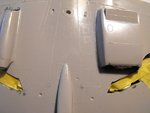
After engraving the gun access panels, those misaligned reinforcing strakes on the starboard wing really stood out, with the panels and the cannon barrel emphasising the error, and my eyes were constantly drawn to them. There was no way I could accept the cockeyed ribs, so out came the scalpel, file and wet 'n dry, and they were removed, the area sanded, and new strakes fitted.
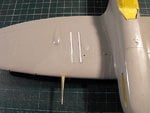
PIC 1 to 3 Show the removal of the strakes, which was much easier than I'd thought, and left relatively little surface damage. The misalignment can be clearly seen.
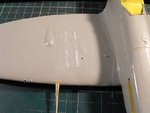
PIC 4. The new strakes fitted, with sanding in progress.
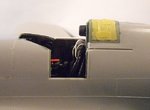
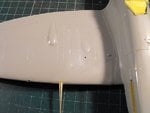
PIC 5. The deflector hooks and mounting points for the slipper tank have been made and fitted, and the holes drilled for the fuel feed and pressure pipes, which will be added after painting, using the thin alloy tube shown in the picture.
The deflector hooks, at the rear, 'catch' the back edge of the tank when it's jettisoned, thereby deflecting it from the fuselage and allowing it to fall away cleanly, without fouling the underside of the fuselage or tail unit.
Next step is to spray a further coat of primer, check for any defects or blemishes, and correct as required. It will then be time for the first stage of painting, which will probably be the application of the 'Sky' tail band, which will be masked when dry, and then the underside colour, Medium Sea Grey, will be sprayed, using Xtracolor Gloss enamel.
Before doing this, I might as well assemble the prop and spinner, and spray the 'Sky' on that at the same time, seeing as the paint will already be prepared for spraying.
Hopefully, I should be able to post some more pics tomorrow, although I'll be preparing for a full day in hospital on Friday, when I have the first of two infusions of a new drug to combat the Rheumatoid Arthritis, and I'll also be trying to get more stuff prepared for Duxford, so I'm not sure how much time I'l have at the bench.
Thanks once again for your interest and kind comments, which are very much appreciated.
The first thin coat of primer has been sprayed, and is currently drying. I can't move the model into better light to photograph it until the primer has dried, so pics of that will be posted sometime tomorrow.
Meanwhile, some changes have been made, and some more minor detail work completed.
After engraving the gun access panels, those misaligned reinforcing strakes on the starboard wing really stood out, with the panels and the cannon barrel emphasising the error, and my eyes were constantly drawn to them. There was no way I could accept the cockeyed ribs, so out came the scalpel, file and wet 'n dry, and they were removed, the area sanded, and new strakes fitted.
PIC 1 to 3 Show the removal of the strakes, which was much easier than I'd thought, and left relatively little surface damage. The misalignment can be clearly seen.
PIC 4. The new strakes fitted, with sanding in progress.
PIC 5. The deflector hooks and mounting points for the slipper tank have been made and fitted, and the holes drilled for the fuel feed and pressure pipes, which will be added after painting, using the thin alloy tube shown in the picture.
The deflector hooks, at the rear, 'catch' the back edge of the tank when it's jettisoned, thereby deflecting it from the fuselage and allowing it to fall away cleanly, without fouling the underside of the fuselage or tail unit.
Next step is to spray a further coat of primer, check for any defects or blemishes, and correct as required. It will then be time for the first stage of painting, which will probably be the application of the 'Sky' tail band, which will be masked when dry, and then the underside colour, Medium Sea Grey, will be sprayed, using Xtracolor Gloss enamel.
Before doing this, I might as well assemble the prop and spinner, and spray the 'Sky' on that at the same time, seeing as the paint will already be prepared for spraying.
Hopefully, I should be able to post some more pics tomorrow, although I'll be preparing for a full day in hospital on Friday, when I have the first of two infusions of a new drug to combat the Rheumatoid Arthritis, and I'll also be trying to get more stuff prepared for Duxford, so I'm not sure how much time I'l have at the bench.
Thanks once again for your interest and kind comments, which are very much appreciated.
Attachments

parsifal
Colonel
those cannon really look good terry
Users who are viewing this thread
Total: 2 (members: 0, guests: 2)