1/48th scale Hurricane MkIIc, 136 Sqn, India, 1943.

Ad: This forum contains affiliate links to products on Amazon and eBay. More information in Terms and rules

Thanks again chaps! Just on my way to the model shop to replace some paint that's yet again dried in the tin!
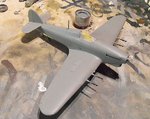
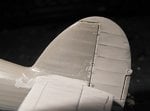
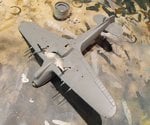
Given I can get what I need, I should get the primer coats on today, which will also act as the underside colour, Medium Sea Grey, although the latter area will be given some shading etc.
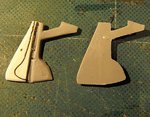
Meanwhile, I've been messing about with the kit's undercarriage doors, and have ordered some resin wheels, as the kit examples are a bit thin.
 
Thanks Glenn. The guns are supposed to be fitted before the wing is joined, with pins to locate them in slots inside the wing, but that would have really been risky, especially as the landing lamps needed to be sanded to shape. I'd have preferred to have fitted them after painting, but I knew the fairings would need filling and blending, as the holes had to be opened in the leading edge, and were not that accurate in the moulding. Similar set-up with the radio mast too !
these areas aren't too inconvenient, but the method of fitting the landing gear legs is bl**dy awkward - they have to be fitted, retracted, before the wing is joined, and then set and glued 'down' later, with the addition of the brace struts !!
 
Wow Terry looks awfully good there Mate :thumbleft: The pit looks excellant ;) Cheers
 
Here's the state of things so far.
PIC 1. Last job before priming, which I only just remembered in time. The ribbing on the fin was a touch heavy, so this has been sanded down. The rudder trim tab actuator will be added after priming.
PICS 2 and 3. The Medium Sea Grey, in this case Humbrol enamel No.164 satin, has been sprayed overall, acting as base colour and primer. The underside will have some fading and staining added later. This has revealed the need for a tiny bit more filler around one of the cannon fairings.
PIC 4. The undercarriage doors before modification, showing the heavy rivets and the tabs intended to prevent the gear falling inside when retracted. Apart from being a bit rounded and thick overall, the inner faces are far too 'flat'.
PIC 5. The 'detail' has been sanded off, and the thickness reduced overall. The chamfered inner faces have been built-up using plastic card, sanded to shape, and 'troughs' filed for the gear legs. the brake lines were added using lead wire. The inner surfaces will be painted matt silver after clean-up.
Once the primer has fully cured, the underside demarcation will be masked, and the upper surface colours of Dark Earth and Dark Green sprayed free-hand. More pics soon, and thanks yet again for your kind comments.
 

Attachments

  • BC Hurricane 124.jpg
    BC Hurricane 124.jpg
    80 KB · Views: 64
  • BC Hurricane 119.jpg
    BC Hurricane 119.jpg
    97.9 KB · Views: 72
  • BC Hurricane 121.jpg
    BC Hurricane 121.jpg
    70.8 KB · Views: 69
  • BC Hurricane 117.jpg
    BC Hurricane 117.jpg
    37.1 KB · Views: 69
  • BC Hurricane 122.jpg
    BC Hurricane 122.jpg
    68.2 KB · Views: 66
That's very nice of you to say so mate. You're not that bad yourself either, if your Catalina is anything to go by!
 
Thanks very much for the kind words guys. Michael, maybe if I spent some weeks in a beauty farm, I'd look better too - then again, probably not !!
 

Users who are viewing this thread

Back