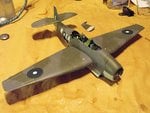
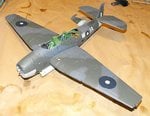
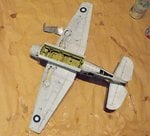
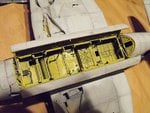
Avenger II, 857 Squadron, FAA, HMS Indomitable, December 1944, Group Build.

Ad: This forum contains affiliate links to products on Amazon and eBay. More information in Terms and rules

Sorry mate! If it's any cosolation, when I flew into Canada to go on exercise at BATUS, as the 'plane was landing, it swooped past a huge advertising hoarding, on which was an ad displaying 'Drink Canada Dry'.
I DID have a really good try at it........
 
Dunno if this differs from the Italeri kit or is of any help at all- Accurate Miniatures page on how to install the turret. Looks like it's all about the angle of attack. Sounds like you may have already figured that...

Terry, I'm going to have a gushing moment here, your work is something else beyond excellence! And not just as a modeler, but as a teacher, mentor and all round good chap.
 
Thank you DJ, that's very nice of you! (Blush, blush!).
Fortunately, I got a copy of the AM instruction sheet from Wayne, which indeed shows the turret needs careful manipulation, after being inserted at an angle, sideways. I think I'll manage, with a few curses along the way, and will need to re-paint some of the framing afterwards. I just might be tackling that later tonight, so if you hear strange noises, feintly drifting on the breeze, don't worry, it's only me shouting and bawling obscenities in various languages!!!
I might get some pics posted later.
Terry.
 
A two - part post this one, with the second half mainly to help Cory with the turret on his model.
I've now got over 100 decals applied, and the first coat of matt varnish sprayed on the model. The decals in the main were OK, although some of the smaller ones, particularly the ones used for 'Royal Navy' and part of the serial number, are printed close to the edge of the carrier film, which causes a tiny ridge, almost, but not quite, like 'silvering'. This is not really visible on the stencils, but it is more apparent on the 'Royal Navy' and serial number on the fin fillet. The serial number was made up of the letters from the kit decal, and individual numerals from an old Microscale USAAF code letter and number sheet. I'll re-touch this area once the matt coats are fully set, then give it another thin coat of clear matt.
The bomb bay will eventually have two bombs fitted, with a third being added later, suspended from a winch cable. A couple of 'deck crew' will be modelled and positioned, winching the bomb into place, when the model is on its 'mini diorama' base.
PICS 1 to 4 show the model so far. The next stage is to fit that tricky gun turret, then decide whether or not to saw the observer's canopy, to fit in the open positon.
Now, the turret.
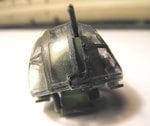
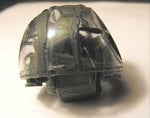
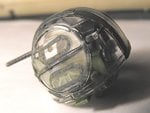
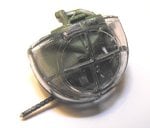
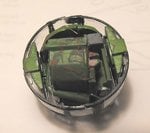
PICS 5 to 9 show what needs to be done first Cory.
I had originally cemented the halves of the turret's transparency, using liquid poly cement, which was fine. Fortunately, the joint is along the line of a main frame, so any 'slips' will not be as noticeable, and should avoid any clouding. The framework was carefully painted free-hand, as I couldn't get the masking tape to conform to the scale mouldings - not with my knackered hands anyway! I'll explain what happened to the joint, and the paintwork, later!
Anyone trying the next stage by using the Italeri instruction sheet would, quite frankly, be b*ll*xed!
Unlike the AM sheet, the Italeri one doesn't provide any guidance notes, and it's essential that these are read and followed.
When you come to fit the gun trunnions, you'll find that they will keep falling off every time you try to fit the turret assembly into the glazing. I applied a tiny spot of PVA adhesive to the locating pegs on the ammo box and turret armour pegs, using the point of a cocktail stick. This ensured that the trunnions would remain in palce, and the 'joint' can be freed later, as obviously the PVA will part once the assembly is moved.
The AM instructions point out that care and patience will be needed, and that the assembly will fit.
Well, I took a big gulp of patience, and persevered, until the joint of the turret glazing parted!
It was evident that this would continue to happen, as the glazing, like the rest of the kit, is made to scale, and therefore the joining surfaces are minimal.
To get around this problem, I brushed some Klear (Future) around the area of the joint, particulary at the angled, cut-out areas at the bottom, front and rear and, when this was dry, applied a very small spot of 'Superglue', again using the point of a cocktail stick. The 'Klear' will prevent fogging from the glue, but it's still neccessary to take extreme care, as you'll need to get the glue actually into the joint faces. Hopefully, you'll be able to see these areas in the first two pics. You'll also notice that, due to all the handling, the paint has rubbed off most of the framing. The latter will be re-painted, and then brushed with 'Klear', before I attempt to fit the turret to the fuselage, even though, again, most of the paint will probably be rubbed off through handling. At least that way, it'll minimise any re-painting once in situ, which is going to be bl**dy awkward. Any gloss effect on the frames can be covered by a fine line of matt 'Klear' later.
Now, once the joint on the glazing has set, which is virtually immediate, you can then manipulate the turret assembly into place. Take care when inserting the gun through the slot.
I used a magnifying glass, to ensure I could see exactly where the recessed parts were locating onto the glazing. Once you have one side lined up, and almost in the slot, hold it as best you can whilst the opposite side is lined up, then, again using the cocktail stick, apply a couple of tiny spots of 'Superglue' over the locating lug, and along the extreme bottom edge of the glazing, where it meets the trunnion rim. then do the same on the other side. Use a scalpel blade, or other thin, flat implement, and press the trunnions into place, holding them for a few seconds until set enough to leave. These are shown in the second two pics.
The last pic in the series shows the bottom view, and how the trunnions should look once in the correct place. Note also how the paintwork on the bottom of the turret seat and fittings has been damaged, again due to handling. At least it was only the bottom, and it can easily be touched up!
Once I've given the model another matt coat, I'll be fitting the turret (I hope!), and I'll try to get some pics showing the method, if physically possible, given the angles needed etc.
Sorry guys if this has been a long post, but it's intended mainly to assist Cory with his build, so I hope you don't mind.
More pics tomorrow, with any luck.
Terry.
 

Attachments

  • PTO Build 349.jpg
    PTO Build 349.jpg
    63.7 KB · Views: 141
  • PTO Build 351.jpg
    PTO Build 351.jpg
    50 KB · Views: 140
  • PTO Build 340.jpg
    PTO Build 340.jpg
    69.9 KB · Views: 138
  • PTO Build 341.jpg
    PTO Build 341.jpg
    69.7 KB · Views: 138
  • PTO Build 323.jpg
    PTO Build 323.jpg
    32.1 KB · Views: 133
  • PTO Build 325.jpg
    PTO Build 325.jpg
    30.8 KB · Views: 131
  • PTO Build 327.jpg
    PTO Build 327.jpg
    38.4 KB · Views: 134
  • PTO Build 332.jpg
    PTO Build 332.jpg
    36.3 KB · Views: 132
  • PTO Build 333.jpg
    PTO Build 333.jpg
    42 KB · Views: 143
Thanks Daniel. The turret is a bit of a b**l ache, but it's probably the best way to design it, so that it can be inserted last, after all the painting has been done, and fiddly bits etc. The problem is, the whole kit really is to scale, so there's not much room, or area to glue things. It makes a heck of a difference though, as the detail is fantastic. Did you notice the screw heads on the oval panels in the turret canopy? Even they are to scale!
I'll be trying to actually install the turret later today, I hope!
 
Thanks Karl and Amsel. I'll get the bl**dy thing in, otherwise it'll have to be a diorama, with a crew winching the turret out for servicing!
 
No, no, no......we do NOT want any "unless"! We do NOT like "unless" the "unless" are baaad! "Unless" are ONLY good if they're in as "unless I buy both kits instead for just the one, they're both halfprice and good quality", that's a good "unless", those, we DO like.... So please try to keep those "unless" out of the game, ok?
 

Users who are viewing this thread

Back