Navigation
Install the app
How to install the app on iOS
Follow along with the video below to see how to install our site as a web app on your home screen.
Note: This feature may not be available in some browsers.
More options
You are using an out of date browser. It may not display this or other websites correctly.
You should upgrade or use an alternative browser.
You should upgrade or use an alternative browser.
Avenger II, 857 Squadron, FAA, HMS Indomitable, December 1944, Group Build.
- Thread starter Airframes
- Start date
Ad: This forum contains affiliate links to products on Amazon and eBay. More information in Terms and rules
More options
Who Replied?marek
Senior Airman
Wery nice treed and realy nice model, Terry!
lesofprimus
Brigadier General
Damn Gremlins and their kind, as well as their cousin, the Carpet Monster....
- Thread starter
- #304
Airframes
Benevolens Magister
Thanks very much guys.
Peter, glad to help. You'll really like this kit, it's a beauty. The more I work on it, the more I see more scale detail. This can pose a slight problem though, as the parts are actually to scale, which means that fitting, for example the windows, is rather tight in places. No unsightly gaps on this baby!
Dan, that bl**dy Gremlin is going to get it! If I can get my hands on an MP5, it's going to get all 32 rounds, then it can go join the Carpet Monster!
Still can't find the windows anywhere. They can only be in an area aproximately 6 x 6 feet, so they MUST be here somewhere! Going to have to make some by the looks of things. B*ll*cks!!
Hopefully have some progress shots later.
- Thread starter
- #305
Airframes
Benevolens Magister
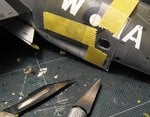
Well, I got the windows made without too much problem.
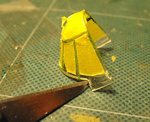
PIC 1 Shows a strip of thin, clear plastic sheet, taped into place over the window opening. This was then scribed with the tip of a scalpel blade, to trace the shape, then taped securely to the cutting mat and the shapes carefully cut out.
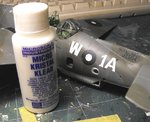
PIC 2 A thin bead of Micro 'Kristal Klear' was then applied around the recess in each opening, using the point of a cocktail stick, then the clear pieces inserted, and more 'Kristal Klear' applied around the join.
PIC 3 Shows the first window in place, with the excess 'Kristal Klear' yet to be wiped off. When totally set, after at least 12 hours, the windows will be polished, then given a coat of Johnson's 'Klear' (Future), which will not only make them look even clearer, but will also help to seal them, and blend them into the fuselage.
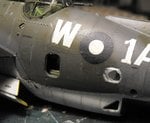
Pic 4 Shows the round observer's 'blister' windows, and the small triangular ventral gunner's windows fitted, again using 'Kristal Klear' to do the job. The 'blisters' were fitted directly over the standard, rectangular side windows, as per the real thing. These were not used on U.S. machines, where a 'flat' window was fitted.
A trial fit of the windscreen showed that it would be a very tight fit in the recessed coaming, as all this kit's parts appear to be bang-on scale. To avoid any stress marks, or worse, when the screen was fitted, it was first masked for painting, then the front, lower edge was gently sanded a touch, to help it 'seat' into the fuselage.
PIC 5 shows the area in question, with the tip of the scalpel blade pointing to the sanded area. Cory please note - the inside of this area in particular, and the interior frames in general, should be painted Interior Green.
Once the external screen frames had been painted, and had dried, the masking was removed, and the screen fitted to the fuselage, once again with 'Kristal Klear' as an adhesive.
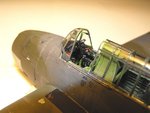
PIC 6 shows the screen in palce, with a further bead of 'Kristal Klear' apllied around the outside of the joint, any excess having been removed with a wet finger tip . Once this has fully cured, it will be brushed with Johnson's Klear (Future), then overpainted in the camouflage colour, which will totally blend the screen into the fuselage.
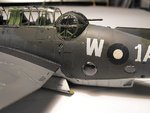
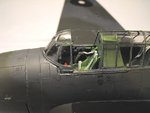
PIC 7 Shows the main canopy, screen and gunsight in place. The central frame on top of the canopy, and the sliding side windows, have yet to be fitted. Note how the kit faithfully reproduces the canopy rails, and the set-back glazing immediately to the rear of the pilot's cockpit, where the opening section of the canopy fits when opened.
The attention to, and level of detail in this kit is amazing, and the design engineers and tool makers at AM should be heartily congratulated for such fine workmanship. It's no wonder this kit caused a stir, and set new standards in plastic model kits when it was first released. I'll definitely be investing in some more Accurate Miniatures/ re-boxed Italeri kits in the future, starting with the Boston for the Bomber GB, and maybe the Mitchell too, if funds allow. These kits, although a little on the pricey side from AM, slightly less from Italeri, are worth every penny, and for this quality, I don't mind paying a little extra, especially as it's not as ridiculously 'stupid price' as some manufacturer's demand.
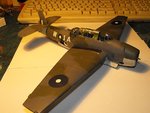
The final pic shows the model so far, and the next stage is to add a couple of bombs to the bomb bay, along with a winch and cable for a third bomb, which will be added when the diorama base is made. Then it'll be time to build, paint and add the beautifully engineered undercarriage, followed by all those delicate, sticky-out fiddly bits, including the Yagi antennas for the radar, and scratch-built trailing aerial fairlead, antenna wires etc.
Once again, thanks for your interest and kind remarks to date. And the score is now Gremlins 1 - Terry 3!!
PIC 1 Shows a strip of thin, clear plastic sheet, taped into place over the window opening. This was then scribed with the tip of a scalpel blade, to trace the shape, then taped securely to the cutting mat and the shapes carefully cut out.
PIC 2 A thin bead of Micro 'Kristal Klear' was then applied around the recess in each opening, using the point of a cocktail stick, then the clear pieces inserted, and more 'Kristal Klear' applied around the join.
PIC 3 Shows the first window in place, with the excess 'Kristal Klear' yet to be wiped off. When totally set, after at least 12 hours, the windows will be polished, then given a coat of Johnson's 'Klear' (Future), which will not only make them look even clearer, but will also help to seal them, and blend them into the fuselage.
Pic 4 Shows the round observer's 'blister' windows, and the small triangular ventral gunner's windows fitted, again using 'Kristal Klear' to do the job. The 'blisters' were fitted directly over the standard, rectangular side windows, as per the real thing. These were not used on U.S. machines, where a 'flat' window was fitted.
A trial fit of the windscreen showed that it would be a very tight fit in the recessed coaming, as all this kit's parts appear to be bang-on scale. To avoid any stress marks, or worse, when the screen was fitted, it was first masked for painting, then the front, lower edge was gently sanded a touch, to help it 'seat' into the fuselage.
PIC 5 shows the area in question, with the tip of the scalpel blade pointing to the sanded area. Cory please note - the inside of this area in particular, and the interior frames in general, should be painted Interior Green.
Once the external screen frames had been painted, and had dried, the masking was removed, and the screen fitted to the fuselage, once again with 'Kristal Klear' as an adhesive.
PIC 6 shows the screen in palce, with a further bead of 'Kristal Klear' apllied around the outside of the joint, any excess having been removed with a wet finger tip . Once this has fully cured, it will be brushed with Johnson's Klear (Future), then overpainted in the camouflage colour, which will totally blend the screen into the fuselage.
PIC 7 Shows the main canopy, screen and gunsight in place. The central frame on top of the canopy, and the sliding side windows, have yet to be fitted. Note how the kit faithfully reproduces the canopy rails, and the set-back glazing immediately to the rear of the pilot's cockpit, where the opening section of the canopy fits when opened.
The attention to, and level of detail in this kit is amazing, and the design engineers and tool makers at AM should be heartily congratulated for such fine workmanship. It's no wonder this kit caused a stir, and set new standards in plastic model kits when it was first released. I'll definitely be investing in some more Accurate Miniatures/ re-boxed Italeri kits in the future, starting with the Boston for the Bomber GB, and maybe the Mitchell too, if funds allow. These kits, although a little on the pricey side from AM, slightly less from Italeri, are worth every penny, and for this quality, I don't mind paying a little extra, especially as it's not as ridiculously 'stupid price' as some manufacturer's demand.
The final pic shows the model so far, and the next stage is to add a couple of bombs to the bomb bay, along with a winch and cable for a third bomb, which will be added when the diorama base is made. Then it'll be time to build, paint and add the beautifully engineered undercarriage, followed by all those delicate, sticky-out fiddly bits, including the Yagi antennas for the radar, and scratch-built trailing aerial fairlead, antenna wires etc.
Once again, thanks for your interest and kind remarks to date. And the score is now Gremlins 1 - Terry 3!!
Attachments
-
 PTO Build 378.jpg62.4 KB · Views: 162
 -
 PTO Build 385.jpg54.6 KB · Views: 159
 -
 PTO Build 386.jpg42.6 KB · Views: 157
 -
 PTO Build 396.jpg53 KB · Views: 162
 -
 PTO Build 387.jpg54.8 KB · Views: 170
 -
 PTO Build 402.jpg33.7 KB · Views: 171
 -
 PTO Build 400.jpg35.8 KB · Views: 165
 -
 PTO Build 390.jpg49.3 KB · Views: 162
vikingBerserker
Lieutenant General
WOW, that's fricken beautiful!
- Thread starter
- #307
Airframes
Benevolens Magister
Cheers VB! Very much appreciated, thanks.
very, very nice mate, well done on the windows as well
- Thread starter
- #309
Airframes
Benevolens Magister
Cheers mate!
marek
Senior Airman
Nice model Terry!
- Thread starter
- #311
Airframes
Benevolens Magister
Thank you Marek.
A4K
Brigadier General
Great work Terry!
ccheese
Member In Perpetuity
Good Job ! Nicely done.....
Charles
Charles
- Thread starter
- #314
Airframes
Benevolens Magister
Cheers Evan and Charles, much appreciated. BTW Evan, I haven't forgotten the Spit 19 stuff!
ellis995
Staff Sergeant
what can i say that everbody else has said great work Terry
- Thread starter
- #317
Airframes
Benevolens Magister
Thanks a lot, Keith and Paul! I try to please, as they say! Haven't got much done tonight, been too busy chasing around on E-Bay and other stupid passtimes! It's all Jan's fault, him and his Squadron build idea.........
More tomorrow, all being well.
More tomorrow, all being well.
Catch22
Major
Looks great Terry, and thanks for thinking of me as you go through this!
lesofprimus
Brigadier General
Great to see the step by steps Terry, superb stuff man....
109ROAMING
2nd Lieutenant
Very cool Terry ,top job!
Users who are viewing this thread
Total: 1 (members: 0, guests: 1)