Avenger II, 857 Squadron, FAA, HMS Indomitable, December 1944, Group Build.

Ad: This forum contains affiliate links to products on Amazon and eBay. More information in Terms and rules

Nope! They aren't misaligned. When I saw the pic, I thought 'How the heck have I managed that, and not noticed?'
So I checked, and I think it must be the lighting! Bl**dy good job, as I spent ages sanding the joints on all four bombs, and coating them, (as one of the bombs made will be on full view on a trolley) before roughing-up the casings to represent where they'd been roled around.
Thanks though, Mag and VB!
 
Pegasus.........the blue-white insigniae are Eastern Fleet rather than SEAC (RAF); on 22 Nov. 1944 this fleet was split into the East Indies Fleet (escort carriers in the Indian Ocean) with the same markings, and the British Pacific Fleet ( fleet carriers) with US-syle insignia with bars (as on no. 376).
US Sea Gray was listed as no. 603 in the ANA specs. (ANA603) in Bulletin 157a of March 1944 ; it replaced Neutral Gray 43 which was the standard AAF underside colour . Both were around FS 36118. In that bulletin under "nearest equivalent or superceded colours" 603 was listed as Extra Dark Sea Grey, Dark Sea Grey or Ocean Grey----all slightly different shades but "equivalents".There was a US equivalent to MAP "Sky" or "Sky Type S " , it was ANA 610 (FS 34424) authorised for some Lend-Lease aircraft along with Olive Drab 613 and Sea Gray 603.
All these "grays" or "greys" had black-white pigments making a perceived grey, Olive Drab was intended to match the MAP Slate Greys upper surface colours. which had a green cast.
The FAA codes ("symbols" ) identified the wing-squadron-aircraft; eg. Hellcat II "C-7T" was aircraft T from 808 Sqn. , no. 3 Wing .
Nick
 
Bomb bay looks great Terry, the bombs on my A-20 are misaligned too! I think I'll build it with the doors closed. Can't wait to see the base coming together! :thumbleft:
 
Thanks for the info Tinplate. It's similar to that which I worked off, together with a photograph of JZ594, displaying the EIF roundels in December 1944. (I have called the latter SEAC roundels for simplicity. These were 'made', in most cases, by simply overpainting the red centres of the roundels in white, and likewise the red 'stripe' of the fin flash, where aircraft were modified in the field. Of course, the 'correct' dimensions, for reduced diameter roundels, were used at Shore Depots, or MU's in the case of the RAF. The latter were supposed to employ the pale blue centres to the roundels and to replace the white portion of the fin flash, although this was often done in white instread.) The camouflage colours I have mixed myself, working from specs from General Motors Eastern Aircraft Divison, and a colour photograph, and allowing for fading / weathering. As Naval aircraft, and indeed anything east of Europe, are somewhat unfamilar to me, even after almost 50 years of modelling, I found this build rather 'different'! From comparison with contemporary photographs, colour and black and white, I think the overall finish of the model is close enough!
Incidentally, the model is portraying the aircraft at the time of the attack on Japanese oil installations, on 20th December 1944.
Keith, the 'bomb bay' of the Havoc kit is, I presume, the same as in the Boston kit. It's a bit basic isn't it?! I had considered scratch-building the bomb bay, but as the finished Boston (for the Bombers GB) will be in a diorama portraying a particular moment in time, the bomb bay doors will be modelled closed. Also, there's a very good chance I'll need to add weight to the front of the 'bay, in order to keep the nose on the deck!
EDIT: Ooops, sorry Karl! I don't need the figures until the Bombers GB mate, so there's no rush, thanks.
 
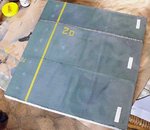
Haven't got any more done to the Avenger, as I've been busy doing some writing and stuff for Dan, but I've managed to do a bit to the base over the last couple of days. This is supposed to represent a part of the port side of the armoured deck of H.M.S. Indomitable, and needs a bit more work to tone down the centre - line stripes, and the edge boundary marker line etc., and add some 'wear and tear'. It's just a piece of MDF, with the edges trimmed with tape and painted grey, and with card cut and scored, glued down and painted. The 'expansion joint / drainage channel' is another strip of card, with the 'drain holes' punched with the tip of a 'Phillips' screwdriver, then painted in a dirty, worn metallic colour.
 

Attachments

  • PTO Build 472.jpg
    PTO Build 472.jpg
    60.4 KB · Views: 162

Users who are viewing this thread

Back