Navigation
Install the app
How to install the app on iOS
Follow along with the video below to see how to install our site as a web app on your home screen.
Note: This feature may not be available in some browsers.
More options
You are using an out of date browser. It may not display this or other websites correctly.
You should upgrade or use an alternative browser.
You should upgrade or use an alternative browser.
Avenger II, 857 Squadron, FAA, HMS Indomitable, December 1944, Group Build. (1 Viewer)
- Thread starter Airframes
- Start date
Ad: This forum contains affiliate links to products on Amazon and eBay. More information in Terms and rules
More options
Who Replied?amazing job Terry, well done mate
Bl**dy good work, now she is up and standing looks real good Terry!
ccheese
Member In Perpetuity
Excellent, Terry. I like the detail on the engine and the landing gear. Really good !
Charles
Charles
109ROAMING
2nd Lieutenant
Very very cool mate 8)
Catch22
Major
Looks fantastic Terry! My gun fell out too, but it went straight inside and I was able to shake it out and now have it in a bag. Hopefully I can get it back in.
I'm also thinking I'll make a small diorama for this in the future as I have 4 or 5 pilots from Corsairs siting around!
I'm also thinking I'll make a small diorama for this in the future as I have 4 or 5 pilots from Corsairs siting around!
- Thread starter
- #348
Airframes
Benevolens Magister
Thanks alot guys, your kind comments are much appreciated, as always.
Glad to hear you retrieved the gun Cory. The diorama sounds good, especially with five spare bods to convert! I'm deciding whether or not to include part of the deck edging, making a sort of two-tier base, or just leavie it plain. Probably the latter for now, to save a bit of time.
Glad to hear you retrieved the gun Cory. The diorama sounds good, especially with five spare bods to convert! I'm deciding whether or not to include part of the deck edging, making a sort of two-tier base, or just leavie it plain. Probably the latter for now, to save a bit of time.
Terry i've got a few 1/48 pilots kicking around, you want them
Njaco
The Pop-Tart Whisperer
Looks absouletly mahhvalous!!!
- Thread starter
- #351
Airframes
Benevolens Magister
Thanks very much Chris,
Karl, if they're other than 'sitting' I'm always in the market for 1/48th figures. I've got quite a few 'sitting in cockpit' pilot/crew figures unused from kits, some of which are quite nice, but not really suitable for conversion to bods on the ground. Cheers mate.
Karl, if they're other than 'sitting' I'm always in the market for 1/48th figures. I've got quite a few 'sitting in cockpit' pilot/crew figures unused from kits, some of which are quite nice, but not really suitable for conversion to bods on the ground. Cheers mate.
i'll send what i've got that are upright there's at least two !
- Thread starter
- #354
Airframes
Benevolens Magister
Great Karl, and thanks Keith.
Lucke.stz
Senior Airman
Great Work Terry !
Congratulations
cheers,
Congratulations
cheers,
- Thread starter
- #357
Airframes
Benevolens Magister
Thanks Lucas and Wojtek. If I can drag myself away from the forum, I should have some more done later tonight, so I'll post some pics. It's on the final leg now, although the finishing touches can't be done until the base is made, and the deck-crew figures etc positioned. Hopefully start on the base tomorrow. I want to get this one finished up, to get back to the Hunter, the Diorama Guide, and other bits and pieces of unfinished business!
- Thread starter
- #358
Airframes
Benevolens Magister
Well I managed to get a little bit done.
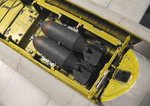
PIC 1 Shows the two bombs that have been positioned and fixed into the rear section of the bomb bay. As indicated in the instructions, this is a tricky task once the bomb doors are in place, but I couldn't really fit them until I knew where the final positioning of the model would be in relation to other elements of the small diorama.
Another hole has been drilled through the forward, port winching point access, and a flap will be made and fitted in the open position, once a hand winch has been fitted into place. I had already drilled a hole at the centre winching point, not knowning that the bombs could only be loaded into the front and rear sections of the bomb bay!
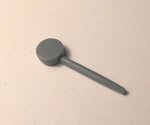
PIC 2 is the beginings of a hand winch being scratch-built from scrap. Anyone who has built a 1/32 scale 21st Century model might recgonise the 'gear housing' as a screw-hole plug for the fuselage! A winding handle is yet to be made and fitted, then the winch wil be slotted into position and glued, and a winch cable added inside the bomb bay, with another bomb suspended from it, the bomb-loading trolley being positioned below, on the 'carrier deck' of the diorama.
Once the diorama base is made, the final delicate parts will be fitted to the model, which will then be placed on the base, and the 'deck crew' figures added, after they've been converted from Tamiya' Panzer servicing crew'!
I'll hopefully have some more pics of the final stages in a day or two.
PIC 1 Shows the two bombs that have been positioned and fixed into the rear section of the bomb bay. As indicated in the instructions, this is a tricky task once the bomb doors are in place, but I couldn't really fit them until I knew where the final positioning of the model would be in relation to other elements of the small diorama.
Another hole has been drilled through the forward, port winching point access, and a flap will be made and fitted in the open position, once a hand winch has been fitted into place. I had already drilled a hole at the centre winching point, not knowning that the bombs could only be loaded into the front and rear sections of the bomb bay!
PIC 2 is the beginings of a hand winch being scratch-built from scrap. Anyone who has built a 1/32 scale 21st Century model might recgonise the 'gear housing' as a screw-hole plug for the fuselage! A winding handle is yet to be made and fitted, then the winch wil be slotted into position and glued, and a winch cable added inside the bomb bay, with another bomb suspended from it, the bomb-loading trolley being positioned below, on the 'carrier deck' of the diorama.
Once the diorama base is made, the final delicate parts will be fitted to the model, which will then be placed on the base, and the 'deck crew' figures added, after they've been converted from Tamiya' Panzer servicing crew'!
I'll hopefully have some more pics of the final stages in a day or two.
Attachments
vikingBerserker
Lieutenant General
WOW, the bomb bay looks excellent!
Users who are viewing this thread
Total: 2 (members: 0, guests: 2)