Avenger II, 857 Squadron, FAA, HMS Indomitable, December 1944, Group Build. (1 Viewer)

Ad: This forum contains affiliate links to products on Amazon and eBay. More information in Terms and rules

Thanks guys!!!!!

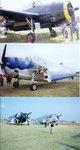
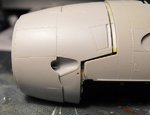
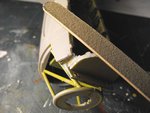
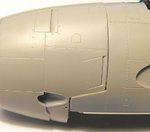
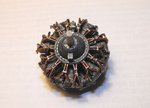
Terry I really think its up to what you want. Ive been going through my old EAA pictures and found these with out the dimand tread pattern though Im almost postive that Ive seen them with the dimand pattern also at the airshow though I cant find a picture of it.
 

Attachments

  • Scan0001.jpg
    Scan0001.jpg
    94 KB · Views: 116
Thanks again Paul, your input has been extremely helpful, and I've picked up a lot of pointers from the stuff you've posted. One of the things I noticed in the caption to the pics was the fact that the TBM1-C had a vertical radio mast, as opposed to the earlier, raked one. I wouldn't have known if you hadn't posted that particular page from the book - marvellous help! At least one of your latest pics will help Lucke too, as he wanted pics of the wing-fold details. What a fantastic forum this is! I'm more accustomed to modelling aircraft I know well, and mostly I've had first-hand experience of. I've only ever done an Avenger once, in 1/72nd scale, OOB - and that was about 43 years ago - so my references are pretty thin, and all the help here has been most welcome.
Anyway, after about eight more hours work, I think I've managed to save the warping problem, although there's still a bit of remedial work to be done. The fuselage was joined, starting the glueing at the tail and working forward up to the upper nose joint, and keeping the fuselage halves tightly taped until set, as shown in PICS 1 and 2, the latter also showing the sanding back of the CA glue used as a filler for the upper nose joint.
The problem area around the lower nose on the port side was also superglued and clamped, as shown in PIC 3, but a trial fit of the cowling showed that some re-positioning and sanding was needed, so the joint was separated and the parts re-set. A further trial fit of the cowl indicated more sanding was needed around the forward bomb-bay bulkhead, PICS 4 and 5.
Meanwhile, the engine was assembled and painted, using Xtracolor 'Oily Steel' as a base, before a wash was applied, followed by some light dry-brushing and detail painting, then the crankcase cover and ignition harness etc added. I considered adding some scratch-built detail, but the kit parts, which are mostly covered by the cowling anyway, are a good enough representation of the R2600, as shown in PICS 6 to 8.
Pics 9 to 11 show the engine in place, and the cowling now fitting more or less correctly, although a small amount of 'liquid' filler will be needed to tidy up the slight gap on the port side, which looks bigger in the pics than 'real life'. Once all the joints have been cleaned up, any erased detail will be re-scribed. It's only just visible in the pics, but the cowling fasteners, engraved into the kit parts, have actually got the slots engraved into them!
The final pic shows the progress to date, but there's a heck of a lot more to be done on the main assembly, not counting the bomb-bay interior and doors, or the landing gear etc, before the main painting can be commenced.
Thanks again to everyone, and particularly Paul, for the assistance, kind words and encouragement.
Now, I'm going for a couple of hours kip, as I stayed up all night trying to correct the bl**dy warped front end of the model!
 

Attachments

  • PTO Build 075.jpg
    PTO Build 075.jpg
    28.5 KB · Views: 106
  • PTO Build 105.jpg
    PTO Build 105.jpg
    37.3 KB · Views: 94
  • PTO Build 080.jpg
    PTO Build 080.jpg
    39.1 KB · Views: 101
  • PTO Build 097.jpg
    PTO Build 097.jpg
    27.8 KB · Views: 99
  • PTO Build 102.jpg
    PTO Build 102.jpg
    40.5 KB · Views: 95
  • PTO Build 147.jpg
    PTO Build 147.jpg
    22.1 KB · Views: 97
  • PTO Build 111.jpg
    PTO Build 111.jpg
    41.1 KB · Views: 97
  • PTO Build 096.jpg
    PTO Build 096.jpg
    35.6 KB · Views: 104
  • PTO Build 084.jpg
    PTO Build 084.jpg
    43.8 KB · Views: 92
  • PTO Build 081.jpg
    PTO Build 081.jpg
    44 KB · Views: 112
  • PTO Build 120.jpg
    PTO Build 120.jpg
    42.4 KB · Views: 102
  • PTO Build 124.jpg
    PTO Build 124.jpg
    23.4 KB · Views: 99
Looking great Terry and your welcome. As a side note Im not sure if your squadron had them but some squadrons that flew TBM-1C had flame dampers mounted for night bombing raids and such. Picture below. You may know more on history of your squadron. :D
 

Attachments

  • flame.JPG
    flame.JPG
    92.4 KB · Views: 95
Thanks Wojtek. As far as I know Paul, the squadron didn't have the dampers fitted.
 
80-100 hours huh, T you are flying through this and it looks great!!! Keep this work and pace and you should have time for more kits if you desire. :)
 
Thanks very much guys, it's much appreciated.
Corey, I've done somewhere between 40 and 50 hours on this so far, working every day (and some nights!) since last Monday night, and I reckon I'm about a third of the way. The next stages after fitting the wings will be time consuming, as it means multiple masking for the main paintwork. Then it's time to detail the bomb bay, saw part of the canopy off, add all the decals, including around 50 stencils and separate codes etc from the spares box, then clear coats and weathering, then start adding the fiddly bits, then......
I reckon it'll top out at around 120 hours total, possibly more!
That's if I don't f**k it up!!!
 
Interesting..love the photos, makes me want an avenger even more!

People in the army in the 40's were very skinny!
 

Users who are viewing this thread

Back