Excellent pics! well donre Cory!
Navigation
Install the app
How to install the app on iOS
Follow along with the video below to see how to install our site as a web app on your home screen.
Note: This feature may not be available in some browsers.
More options
You are using an out of date browser. It may not display this or other websites correctly.
You should upgrade or use an alternative browser.
You should upgrade or use an alternative browser.
Avenger II, 857 Squadron, FAA, HMS Indomitable, December 1944, Group Build.
- Thread starter Airframes
- Start date
Ad: This forum contains affiliate links to products on Amazon and eBay. More information in Terms and rules
More options
Who Replied?Catch22
Major
They're all on a guy's profile named Etiennedup on Flickr. He's got a LOT of colour photos of RAF and FAA planes. I've posted some of them in the WWII Allies Color thread a while back. Apparently he added new ones because I had never seen the last two Avenger ones before. There are some really good Hellcat ones as well.
- Thread starter
- #83
Airframes
Benevolens Magister
Thanks for the compliments guys.
Cory, thanks, the pics are brilliant! They answered the question re the colour of the carrier deck, and provided detail and colour of the little bomb carts, one of which is included in the kit - great stuff!
That model is quite good, but the colours are, as you say, a bit off, maybe because of flash photography. Also, it was HMS BEGUM, not Begium or Belgium, as the article states, and the aircraft was an Avenger I, earlier known as Tarpon I, not an Avenger III as stated, with the Squadron on support and escort duties, as far as I've learned to date, seeing little combat action. Coincidentally, an aircraft from this unit was one of my three choices!
Catch22
Major
Glad I was of some help!
Catch22
Major
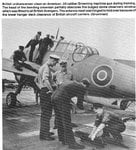
Here's a wider view of the deck:

- Thread starter
- #86
Airframes
Benevolens Magister
Thanks again mate! I knew they were metal decks, but didn't know the actual colour. That helps tremendously - also, one of the pics shows treaded tyres; that'll do for me!!
Catch22
Major
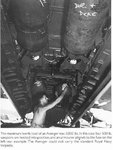
You're certainly welcome! One more thing Terry, I was reading through the thread before and flame dampeners came up. It's really hard to see, but on that first photo I posted I could swear there's one on that exhaust pipe.
- Thread starter
- #88
Airframes
Benevolens Magister
I think you could be right Cory. However, that's (obviously) a land based Avenger, possibly from RNZAF, judging by the roundel, used by some units in theatre, without the bars. As far as I've discovered from my research into 849 Sqn FAA, they only operated from Victorious, in daylight raids, although it's still possible some night ops were undertaken. I haven't found any evidence of flame dampers, but, if it proves they had them, I'll scratch-build them.
Thanks for pointing it out mate.
Thanks for pointing it out mate.
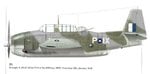
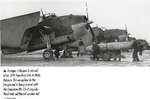
Besides though other two posts I found these of aircraft from your squadon.
Hope it helps and I hope your model has the bubble window in the fuselage which is shown in the profile. Will see if after work I can find some pictures of the window.
Hope it helps and I hope your model has the bubble window in the fuselage which is shown in the profile. Will see if after work I can find some pictures of the window.
Attachments
- Thread starter
- #92
Airframes
Benevolens Magister
Fantastic stuff Paul, thanks! Modelling certainly is educational, as I didn't know about the torpedo or the folding radio mast either! Mind you, I didn't know that much about the Avenger itself until I started this project! The profile is the actual aircraft I'm modelling, and is a great help, as it shows (as well as can be expected) the U.S. 'equivalent colours'.
I've had another late night, due to messed-up sleep patterns, so I did a bit more to the model.
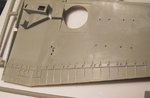
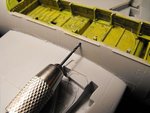
The small gap in the cowling, and the other smaller joints on the fuselage, have been filled with a mix of varnish and talcum powder, and will be sanded smooth when dry, as shown in PIC 1.
For reasons unknown, as they are moulded as part of the wing, the internal flap detail is present in the kit, and I had considered cutting out the flaps, to display them in the down position, until I discovered, during the course of my research, that the flaps were never usually deployed when the aircraft was on the ground/deck. Pity, as that fine detail is lost inside the wing, as shown in PIC 2.
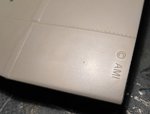
So, after sanding off the original Accurate Miniatures copyright mark from the bottom half of one wing (!), the wings were glued and joined, and put aside to set.
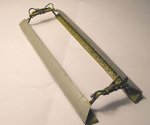
Whilst they were setting, I carried on with the bomb-bay doors, painting the insides in yellow zinc chromate, the colour for the bomb bay used by Eastern Aircraft, then giving them a 'dirty' wash, using heavily thinned matt black enamel. The doors themselves were split down the centre, then folded and glued in place on the detailed hinge/actuator mechanisms, the latter being painted and the details picked out in black and silver. PICS 4 and 5.
This assembly won't be fitted until after the model is painted, decalled and weathered, and after at least two bombs have been added to the bomb bay, which itself still needs some scratch-built detail adding.
As I intend to place the completed model in a cameo deck-top diorama, I drilled a hole at one of the exterior bomb bay winch points, PIC 6, the intention being to add the open flap to the winching point, together with a scratch-built hand winch, and have a couple of converted 1/48th scale figures in place, winching a bomb into position. That's the plan anyway!
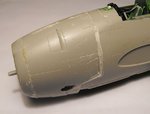
With the wings now fully set, and the gun ports cleaned up, they were fitted to the fuselage and glued, the hefty spar and recessed mounting points ensuring a good, and square, fit.
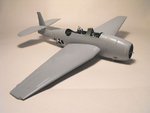
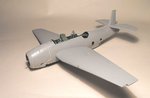
PICS 7 and 8 show the progress to date, and the next stage is to carry out some careful masking around the cockpit, engine, bomb bay, windows and entrance hatch, before preparing the model for painting. This will take some time of course, especially as the finish will need some convincing weathering and paint fading, in order to portray the rigours of seaborne and tropical operations.
Once that's all done, it'll be time to add all the decals, before proceeding with the canopy, turret, landing gear and detail parts, some way off yet!
Thanks again for your interest to date.
Terry.
I've had another late night, due to messed-up sleep patterns, so I did a bit more to the model.
The small gap in the cowling, and the other smaller joints on the fuselage, have been filled with a mix of varnish and talcum powder, and will be sanded smooth when dry, as shown in PIC 1.
For reasons unknown, as they are moulded as part of the wing, the internal flap detail is present in the kit, and I had considered cutting out the flaps, to display them in the down position, until I discovered, during the course of my research, that the flaps were never usually deployed when the aircraft was on the ground/deck. Pity, as that fine detail is lost inside the wing, as shown in PIC 2.
So, after sanding off the original Accurate Miniatures copyright mark from the bottom half of one wing (!), the wings were glued and joined, and put aside to set.
Whilst they were setting, I carried on with the bomb-bay doors, painting the insides in yellow zinc chromate, the colour for the bomb bay used by Eastern Aircraft, then giving them a 'dirty' wash, using heavily thinned matt black enamel. The doors themselves were split down the centre, then folded and glued in place on the detailed hinge/actuator mechanisms, the latter being painted and the details picked out in black and silver. PICS 4 and 5.
This assembly won't be fitted until after the model is painted, decalled and weathered, and after at least two bombs have been added to the bomb bay, which itself still needs some scratch-built detail adding.
As I intend to place the completed model in a cameo deck-top diorama, I drilled a hole at one of the exterior bomb bay winch points, PIC 6, the intention being to add the open flap to the winching point, together with a scratch-built hand winch, and have a couple of converted 1/48th scale figures in place, winching a bomb into position. That's the plan anyway!
With the wings now fully set, and the gun ports cleaned up, they were fitted to the fuselage and glued, the hefty spar and recessed mounting points ensuring a good, and square, fit.
PICS 7 and 8 show the progress to date, and the next stage is to carry out some careful masking around the cockpit, engine, bomb bay, windows and entrance hatch, before preparing the model for painting. This will take some time of course, especially as the finish will need some convincing weathering and paint fading, in order to portray the rigours of seaborne and tropical operations.
Once that's all done, it'll be time to add all the decals, before proceeding with the canopy, turret, landing gear and detail parts, some way off yet!
Thanks again for your interest to date.
Terry.
Attachments
-
 PTO Build 144.jpg29.3 KB · Views: 172
 -
 PTO Build 155.jpg28.2 KB · Views: 117
 -
 PTO Build 158.jpg24.1 KB · Views: 151
 -
 PTO Build 148.jpg25.6 KB · Views: 202
 -
 PTO Build 160.jpg28.2 KB · Views: 126
 -
 PTO Build 165.jpg22.2 KB · Views: 128
 -
 PTO Build 163.jpg42.1 KB · Views: 122
 -
 PTO Build 167.jpg20.5 KB · Views: 124
good stuff mate
109ROAMING
2nd Lieutenant
Bomb bay doors look great Terry .Will being using your method of heavily thinned enamels for weathering in future-love the result you've achieved! Shes starting to look like an Avenger! 8) nice work mate
lesofprimus
Brigadier General
Agreed with the guys, she's starting to look like an Avenger now.... Lookin good Terry, great researchin Paul....
 Keep working....
- Thread starter
- #98
Airframes
Benevolens Magister
Thanks very much Karl, Daniel, Paul and Dan.
Lucky13
Forum Mascot
Marvelous old boy!
Wildcat
Major
Excellent progress Terry!
Users who are viewing this thread
Total: 1 (members: 0, guests: 1)