****DONE: 1/32nd Ju87G-2 of Fw Josef Blümel, 10(Pz.)/SG-3, S7+EN Group Build

Ad: This forum contains affiliate links to products on Amazon and eBay. More information in Terms and rules

Dan,

Just a thought but would this work?

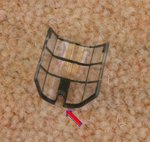
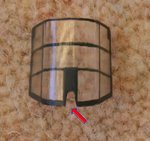
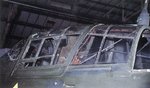
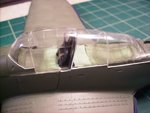
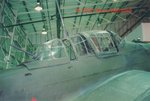
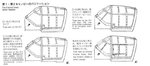
Try cutting off part of the bottom of the slide back piece for starters. That would reduce the gap between that sliding piece and the next piece back.

Then add a bit of very thin clear plasticard or white plasticard on the very outside portion of the sliding canopy to extend the framing down. That would make the framing be closer to fuselage and emulate the actual framing.

Does that make any sense?

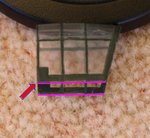
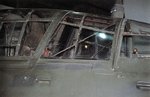
I can't tell for sure if that larger sliding piece will actually fit tighter and it's just the ledge that it slides on that is keeping the gap so large or not.
 
This is a problrm that happens to almost all kits. There are three ways of correcting the mistake, finding an aftermarket set for the conopy, making the new one or fitting it with warming up.
 
Last edited:
Sorry Dan, don't have experience with this situation but maybe someone will chime in with the heated clear plastic bottle trick discussed elsewhere in the forum. Never tried it but sounds intriguing. And cheap!
 
Dan, I have to concur with Dwight that you cut or file off the lugs at the bottom of the pilots canopy and add a strip of evergreen each side to give you height. Your idea of possibly heating the canopy to expand the sides so that it will slide over the gunners canopy sounds good, but it's not something I have ever tried, maybe one the gurus can enlighten us.

Following your dilemma about the aerial, I set to work on my canopy this morning and with the help of my dermal and some gentle work, have opened the housing on the pilots canopy and on a dry fit it looks good. Have also posted a couple of up to date pics for you on my thread.

:hotsun: :hotsun:
 

Attachments

  • Stuka Build 3h.JPG
    Stuka Build 3h.JPG
    52.8 KB · Views: 141
  • Stuka Build 3i.JPG
    Stuka Build 3i.JPG
    44.2 KB · Views: 147
  • Stuka Build 3j.JPG
    Stuka Build 3j.JPG
    43.5 KB · Views: 145
Hmmm, kinda makes sense.... Not quite sure...

I really dont want to go aftermarket if I can help it...

It's up to you only which one of these ways you will choose. A small block of balsa or lime-tree ( or some epoxy rasin and plasteline [ modeline] ) for making a former.And then warmed up a piece of thick plastic transparent foil , stretched on the former. It seems to be the fastest and cheapest solution of the problem.
 
I reckon the guy who built the model you posted either used an aftermarket canopy, or moulded his own. As Wojtek stated, moulding your own is the eassiest and cheapest - if you know how to do it. I can post a short tutorial on this, but it might not immediately solve the problem, as it takes a bit of practice to get the job perfect. And even then, the first couple of mouldings can be wrong sometimes.
Personally, I'd shy away from trying to heat and re-form the kit canopy - it could craze, deform or break, and obtaining an accurate adjustment would be difficult, especially as the kit part appears to be a bit short in height (or depth of the lower frame).
I think Dwight is on the right track.
It appears that the kit part will fit over the centrre section canopy, but is prevented from doing so fully by the thickness and angle of the bottom of the pilot's canopy.
Here's the way I would go about it.
First, refer to the pics, and identify where the 'glass' should end, in relation to the lowwer frame. Next, tape both sides of the canopy at this line, to protect the clear areas. Then, carefully thin-down the part, on the inside, by shaving with your scalpel blade. Only reduce the thickness slightly, begining on the extreme bottom edge, cutting at a 'V' shaped angle, as if adding a chamfer.
Then carefully sand/file, checking for fit over the 'fixed' canopy regularly.
When you are saitisfied that the sliding part will sit over the fixed part correctly then, on the inside, with the tape still in place, add a thin, short strip of plastic card, the length of the bottom frame, which should protrude just below the bottom edge of the moulding. The real canopy appears to be slightly deeper, and what you are now doing is replicating the panel of the lower frame. Match this strip on the outside, by adding another thin strip, butting aginst the kit moulding, and glued to the inner strip. Any trimming to correct shape and length can be done when the pieces have fully set.
If there is a visible gap or joint-line between the outer strip and the bottom edge of the kit part, this can be filled with PVA, or a mix of varnish and talc. The former can be smoothed out with a wet finger tip, the latter very lightly sanded, if required, when set.
Judging by the size and shape of the kit parts in your pics, I reckon that, short of moulding a new canopy, the above will be the best option, and should look convincing and accurate.
Hope this helps.
 
Thanks for the help Terry... Got my wheels turning...

Heres some comparison shots... Anyone noticed something about the shape of the sliding canopy??
 

Attachments

  • 17a.jpg
    17a.jpg
    78.4 KB · Views: 145
  • 21a.jpg
    21a.jpg
    91.2 KB · Views: 141
  • 20a.jpg
    20a.jpg
    86.1 KB · Views: 156
  • canopy 007.jpg
    canopy 007.jpg
    78 KB · Views: 141
  • sheb8706.jpg
    sheb8706.jpg
    59.5 KB · Views: 153
Another bunch of hmmmmm's....

To be honest, I have no idea why some have the notched lower rail and some dont....
 

Attachments

  • 72aa.jpg
    72aa.jpg
    16.1 KB · Views: 141
  • 70aa.jpg
    70aa.jpg
    10.9 KB · Views: 135
  • 69aa.jpg
    69aa.jpg
    13.8 KB · Views: 127
  • 68aa.jpg
    68aa.jpg
    16.2 KB · Views: 138
  • 67aa.jpg
    67aa.jpg
    19.8 KB · Views: 134
  • 73aa.jpg
    73aa.jpg
    7.2 KB · Views: 142
  • 74aa.jpg
    74aa.jpg
    4.2 KB · Views: 138
  • 75aa.jpg
    75aa.jpg
    5.4 KB · Views: 137
  • 76aa.jpg
    76aa.jpg
    11 KB · Views: 134
The kit canopy has been 'notched' at the rear to clear the moulding of the fuselage armour plate, which is correct for the 'real thing'. However, as mentioned in my previous post, the kit part isn't quite deep enough anyway in the area of the bottom canopy frame, and the notch is therefore not quite in the right place, and, of course, the armour plate is possibly slightly over scale. The shots of the real thing, in the RAF Museum, show that the bottom frame of the sliding canopy should be deeper, even if this bird had armour plate, and this is what I'm aiming at in the above suggestion.
Note that the kit canopy ends at the joint with the fuselage and the transparent part, whereas the real sliding canopy reaches quite well below this.
Note also the the museum example has the 'non standard' sliding panels in the sides of the canopy glass.
 
So if I took off the bottom part of the frame and added some thin card to it, detailed it some, it might pass muster? I still think its gonna sit too high one top of the center glass....

If u look at this shot here Terry, u can see how the lower frame is bowed out so it will pass over the armor plate...

119431.jpg


Interesting...
 
Tried googling reviews of this kit and almost everyone either 1) whines about this problem and leaves the canopy closed 2) whines about the problem and gets a vac form set, 3) whines about it and leaves it open with an apparent poor fit. I saw no mods to the kit part suggested unfortunately. Nothing to lose trying the self made mold so I would give that a try and if it doesn't work, mod the kit part.
 
Just my 2 cents - looking over those pics you posted Dan, it would appear that the canopy with the notch is more bulbous that the full flanged types. Could they be 2 different canopies?
 

Users who are viewing this thread

Back