fantastic job Andy
Navigation
Install the app
How to install the app on iOS
Follow along with the video below to see how to install our site as a web app on your home screen.
Note: This feature may not be available in some browsers.
More options
You are using an out of date browser. It may not display this or other websites correctly.
You should upgrade or use an alternative browser.
You should upgrade or use an alternative browser.
**** DONE: 1/48 ICM Spitfire Mk IX AE-B Ian Keltie of 402 SQDN RCAF Commonwealth GB
- Thread starter Crimea_River
- Start date
Ad: This forum contains affiliate links to products on Amazon and eBay. More information in Terms and rules
More options
Who Replied?Does look a bit of alright....
- Thread starter
- #83
Crimea_River
Marshal
Thanks guys.
Aaron, you're right, I may get the leading edge to line up but that will make the rear gap even bigger.
It was Testors Glenn, a bottle I've had for many, many years but that's still like new.
Andy, I realize I'm new at this but if you look at that photo just ahead of your tape, if you line the peak in the seam up I think the front of the wing will line up. It looks as if they cut the upper wing surface short in the curve at the rear of the wing. If I'm wrong I apologize.
Aaron, you're right, I may get the leading edge to line up but that will make the rear gap even bigger.
Real sharp looking Andy! I never had paint dissolve with accelerator. What brand was the paint?
It was Testors Glenn, a bottle I've had for many, many years but that's still like new.
Night Fighter Nut
Master Sergeant
That's a beautiful job you got going there.
- Thread starter
- #85
Crimea_River
Marshal
Thanks Bill. Onwards....
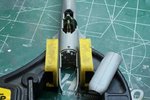
Yesterday I glued the rear half of the fuselage together and today I tackled the front. I started by clamping the seam in front of the windscreen (Pic 1). The top cowling can be seen laying on the clamp. I drew a centerline on this to aid in aligning everything as I want to be sure I get the front end aligned with its multiple pieces. I dry fitted the firewall before gluing everything and found that I had to shave some material off around the top to allow the top cowl to sit flush.
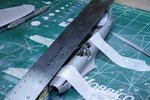
Pic 2 shows the top cowl in place and the single circumferencial seam at the back glued to the fuselage. The steel ruler was used to align the top of the rudder, fuselage seam, and the front of the top cowl. When viewed from directly above, all these parts were aligned before I glued the back of the cowl. Once this glue is set, I will progress forwards, gluing the side cowls to the top and using the prop plate to hold everything in place. All of these seams will be reinforced on the inside with plastic card. Once these are done, mounts for the exhausts will be installed on the inside and the bottom cowl will be glued on.
Thanks for looking in and for your continued interest and comments.
Yesterday I glued the rear half of the fuselage together and today I tackled the front. I started by clamping the seam in front of the windscreen (Pic 1). The top cowling can be seen laying on the clamp. I drew a centerline on this to aid in aligning everything as I want to be sure I get the front end aligned with its multiple pieces. I dry fitted the firewall before gluing everything and found that I had to shave some material off around the top to allow the top cowl to sit flush.
Pic 2 shows the top cowl in place and the single circumferencial seam at the back glued to the fuselage. The steel ruler was used to align the top of the rudder, fuselage seam, and the front of the top cowl. When viewed from directly above, all these parts were aligned before I glued the back of the cowl. Once this glue is set, I will progress forwards, gluing the side cowls to the top and using the prop plate to hold everything in place. All of these seams will be reinforced on the inside with plastic card. Once these are done, mounts for the exhausts will be installed on the inside and the bottom cowl will be glued on.
Thanks for looking in and for your continued interest and comments.
Attachments
Airframes
Benevolens Magister
Good stuff Andy. that's the way I'd planned things, but thanks for the warning about the top of the firewall - saved me some experimentation!
T Bolt
Colonel
That kit looks a lot more challenging than Tamiya's Mk.1!
Vic Balshaw
Major General
Nicely done Andy and I'm intrigued by the file in many of your pic's, in the close up shots it looks like a sizable rasp file, but naturally I know it's not
- Thread starter
- #90
Crimea_River
Marshal
Thanks guys.
Glenn, yes, definitely more of a challenge than the Tamiya kit.
Vic, the file is one of a set of 3 I picked up many years ago. I honestly can't remember if they were at a hobby shop or a woodworking store. One side is flat and the other rounded and it has a taper. It's very good for removing large amounts of material but I need to be careful as it can leave gouges that need to be filled (there are some on the wings actually where I used this file to remove the step at the wing tips). One of the other two files has a round cross section and the other is flat both sides.
Vic Balshaw
Major General
I have a set of watchmakers files which I use from time to time particularly on metal but for the most part I use what is referred to as sanding twigs in varying grades
- Thread starter
- #92
Crimea_River
Marshal
Those files sound nice Vic.
Moving along, the front of the fuselage has been closed up along the top seam and work on the wing attachment is discussed and shown below. The latter is a heads up to Terry and Wildcat Andy who may see this as well.
The first pic here shows the front of the fuselage glued up. Plastic reinforcing patches have been applied over the seams for strengthening. If care is taken to make sure that things are straight and that interferences with the firewall are removed as mentioned earlier, things come togther reasonably well here.

The lower cowl will be left off until attachment of the two exhaust manifolds is completed on the inside. A trial fit shows that these fit nicely into the provided slot so there may not be a need for much of a support in the absence of the engine block. A trial fit of the lower cowl at this stage has shown that the fit will be very good. However, the kit-provided round end plate behind the prop is too big for the hole that I'm ending up with so it will need to be either replaced or filed down to fit properly.
Next we have some issues with the wing to fuselage joint. This rather odd and busy shot below is intended to point out the issues that need to be dealt with. First of all, the gap between the top halves of the wings that I ended up with was approximately 1mm narrower than the distance between the edges of the wing roots on the fuselage, enough that when the fuselage was trial fitted to the wings, the nicely replicated wing dihedral disappeared. I therefore removed the large, flat glue surfaces on the fuselage wing roots and filed away about 0.5mm of the wing root edges on each side so that the roots fit into the gap betwen the wing halves without forcing them.

Now that the fuselage fit more or less correctly, I found that there were a couple of interferences that prevented the wing roots from sitting down fully. These are noted by the circles in the above photo. First off, the lower edge of the engine firewall (top circle above, green circle in below pic) had to be trimmed as it hit the inner surface of the wing creating a step in the wing root. Next, the cockpit bulkheads seemed to interfere with the indentations for the rad covers, so these had to be notched (red circles in above and below pics). It was impossible to tell how much of a clash there was so I just cut the notches large. Finally, there was a third interference that prevented proper fit and that was a protrusion on the bottom of the seat frame that hit the molding in the wing for the signal lamp. The yellow circle in the pic below shows where this protrusion was cut off with my Dremel tool.

After all that fitting, I finally managed to get the wing roots to sit properly without there being a step at the edge of the upper wing halves. The next issue now was how to deal with the different lengths of the wing and fuselage chords as noted in my earlier post. The pic below shows the resultant mismatch with the the leading edges of the wings lined up at the front. This arrangement will result in the least work and the smoothest transition at the fairing.

To maintain this arrangement though, the cutout in the fuselage needs to be enlarged to receive the back of the wing assembly. As can be seen below, there's about a 1mm overlap that needs to be resolved by cutting the opening back a bit. This should be reasonably straight forward.

This is where I stand with progress at the moment. I anticipate that tomorrow will see the wings cemented on and hopefully the exhausts and the bottom engine cowl installed. More pics then.
Thanks for tuning in.
Moving along, the front of the fuselage has been closed up along the top seam and work on the wing attachment is discussed and shown below. The latter is a heads up to Terry and Wildcat Andy who may see this as well.
The first pic here shows the front of the fuselage glued up. Plastic reinforcing patches have been applied over the seams for strengthening. If care is taken to make sure that things are straight and that interferences with the firewall are removed as mentioned earlier, things come togther reasonably well here.
The lower cowl will be left off until attachment of the two exhaust manifolds is completed on the inside. A trial fit shows that these fit nicely into the provided slot so there may not be a need for much of a support in the absence of the engine block. A trial fit of the lower cowl at this stage has shown that the fit will be very good. However, the kit-provided round end plate behind the prop is too big for the hole that I'm ending up with so it will need to be either replaced or filed down to fit properly.
Next we have some issues with the wing to fuselage joint. This rather odd and busy shot below is intended to point out the issues that need to be dealt with. First of all, the gap between the top halves of the wings that I ended up with was approximately 1mm narrower than the distance between the edges of the wing roots on the fuselage, enough that when the fuselage was trial fitted to the wings, the nicely replicated wing dihedral disappeared. I therefore removed the large, flat glue surfaces on the fuselage wing roots and filed away about 0.5mm of the wing root edges on each side so that the roots fit into the gap betwen the wing halves without forcing them.
Now that the fuselage fit more or less correctly, I found that there were a couple of interferences that prevented the wing roots from sitting down fully. These are noted by the circles in the above photo. First off, the lower edge of the engine firewall (top circle above, green circle in below pic) had to be trimmed as it hit the inner surface of the wing creating a step in the wing root. Next, the cockpit bulkheads seemed to interfere with the indentations for the rad covers, so these had to be notched (red circles in above and below pics). It was impossible to tell how much of a clash there was so I just cut the notches large. Finally, there was a third interference that prevented proper fit and that was a protrusion on the bottom of the seat frame that hit the molding in the wing for the signal lamp. The yellow circle in the pic below shows where this protrusion was cut off with my Dremel tool.
After all that fitting, I finally managed to get the wing roots to sit properly without there being a step at the edge of the upper wing halves. The next issue now was how to deal with the different lengths of the wing and fuselage chords as noted in my earlier post. The pic below shows the resultant mismatch with the the leading edges of the wings lined up at the front. This arrangement will result in the least work and the smoothest transition at the fairing.
To maintain this arrangement though, the cutout in the fuselage needs to be enlarged to receive the back of the wing assembly. As can be seen below, there's about a 1mm overlap that needs to be resolved by cutting the opening back a bit. This should be reasonably straight forward.
This is where I stand with progress at the moment. I anticipate that tomorrow will see the wings cemented on and hopefully the exhausts and the bottom engine cowl installed. More pics then.
Thanks for tuning in.
vikingBerserker
Lieutenant General
Nice!
lesofprimus
Brigadier General
Great tutorial Andy, nice work so far....
- Thread starter
- #95
Crimea_River
Marshal
Thanks guys.
Did the vasectomy at the back tonight and now have the wings in clamps and glued to set overnight.
Did the vasectomy at the back tonight and now have the wings in clamps and glued to set overnight.
N4521U
Plastic Pirate
I think we need to have a medal to issue here.
How about OGGMB?
The Order of Guts and Glory in Model Building!
It takes real intestinal fortitude to take on, and continue a project like this, with these little stumbling blocks!
Well done!
How about OGGMB?
The Order of Guts and Glory in Model Building!
It takes real intestinal fortitude to take on, and continue a project like this, with these little stumbling blocks!
Well done!
imalko
Chief Master Sergeant
Cool stuff there Andy. Doing a great job.
Vic Balshaw
Major General
Very nicely displayed Andy and you sure are putting in some hard yards on this one.
T Bolt
Colonel
I'm going to have to keep this thread in mind when we get to the spitfire marks group build and I'm trying to tackle this model. Exceptional work dealing with all the problems Andy!
- Thread starter
- #100
Crimea_River
Marshal
Thanks everyone for your comments. I hope I didn't make this out to be a disaster as it's really not as bad is it sounds. The key is to be patient and to do lots of trial fitting and investigating. Contrary to how I may have presented this, I really don't want to take anything away from this kit. To me, it still offers great value and I'd recommend it to anyone who wants a nicely represented Spit IX - and plenty of spare parts!
She's now sitting in some clamps for more glue-setting. Pics later tonight.
She's now sitting in some clamps for more glue-setting. Pics later tonight.
Users who are viewing this thread
Total: 1 (members: 0, guests: 1)