**** DONE : 1/48th scale N.A. Mustang III, HB837, 541 Sqn, R.A.F., Group Build.

Ad: This forum contains affiliate links to products on Amazon and eBay. More information in Terms and rules

Thanks Evan and VB.
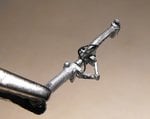
I Don't know what I'd do without this particular razor saw - got to thank Matt for that. It's far better than my old one, and extremely useful for panel line engraving too.
 
Well I just managed to get the decals on, and a bit of work done on the main landing gear legs and flaps, before the pain and stiffness attcaked again! I managed to get a couple of shots, but nothing brilliant.
The landing gear legs need retouching and a coat of semi-matt clear varnish, but the brake lines are in place, made from 5 amp fuse wire, and the torque links, tow points and tie-down loops have been drilled out. The latter are yet to be painted gloss red, and the whole lot tidied -up a bit.
The hinge-lines of the flaps have been painted in a darkish metallic shade, with the hinge acces slots picked out, and the flap degree indicator painted on the port flap. Again, the 'metal' part has yet to recieve a clear coat.
Just visible in the side-on pics of the Mustang, is the PRU Blue surround to the the Type B roundels, simulating where the AEAF stripes would have been painted around this marking. This was done freehand, using a 000 brush.
Thanks again for your support, and I hope to get more done soon.
 

Attachments

  • D Day mustang 092.jpg
    D Day mustang 092.jpg
    33.4 KB · Views: 142
  • D Day mustang 097.jpg
    D Day mustang 097.jpg
    37.7 KB · Views: 141
  • D Day mustang 098.jpg
    D Day mustang 098.jpg
    20.9 KB · Views: 136
  • D Day mustang 099.jpg
    D Day mustang 099.jpg
    24.5 KB · Views: 150
Beauty work Terry! I didn't catch whether you had to scratch build the flaps where they are bare metal. Look really good, as does the strut.
 
Looking very nice there Terry,keep up the great work and hopefully the arthritis gives you a holiday.Cheers
 
Thanks very much guys. The pain etc seems to be easing off abit. As I've been in bed for around 24 hours, I'm a bit out of line with normal hours, so I've now sprayed the matt clear coat, and started painting the prop spinner - a sod as it's white!
Andy, the flap hing-line is moulded nicely, same as the Tamiya kit, but perhaps better defined. It just needs careful painting to give the correct appearance when the flaps are fitted in the fully down (47 degrees) position.
I should have some more pics tomorrow with a bit of luck.
 
great work terry,the open hood should look the business,i've got a few b mustangs and only the trumpeter 1/32 comes with an open canopy option.(started on that one but back in the box for now)
 
The Mustang is now in the final stages, as this batch of pics shows.
PIC 1. The Malcolm' hood ran on external rails, retro-fitted after removal of the originall, hinged canopy, and these have been simulated on the model by strips of stretched sprue, ending at the point where the open canopy will fit. They are shown here before adjustment, and the canopy itself will have 'internal rails' matching these on the fuselage. The gunsight has also been fitted and painted, and the thick, moulded reflector screen replaced with a piece of clear sheet.
PIC 2. The lower frame, and the extensions for the fuselage rails, have been fitted to the old Monogram canopy, using stretched sprue and thin plastic card. The canopy itself did not have framework around the rim at front and rear, but was 'roll moulded' to a thicker profile. After painting the lower frame, the canopy will be cleaned and polished before fitting.
PICS 3 to 5. The windscreen and canopy in place after painting. The PVA adhesive sealing the windscreen is still drying in these shots, and will be painted to match the surroundings.
PIC 6. The main undercarriage in place and the model supported whilst it sets. The wheels will be adjusted to the proper 'stance' later, and the detail painting completed, before fitting the main gear doors, which will display a slight droop, representing hydraulic 'bleed-off'.
PICS 7 and 8. How the model looks to date.
There's only a few things to do to finish off now, with the flaps to be fitted in the down position, the whip antenna, pitot and a scratch-built IFF aerial to be fitted, along with the rear wheel doors, landing lamp cover, exhausts and prop.
The next installment should show the completed model.
Thanks again for your interest and compliments.
 

Attachments

  • D Day mustang 117.jpg
    D Day mustang 117.jpg
    32.1 KB · Views: 129
  • D Day mustang 133.jpg
    D Day mustang 133.jpg
    35.4 KB · Views: 135
  • D Day mustang 112.jpg
    D Day mustang 112.jpg
    41.8 KB · Views: 134
  • D Day mustang 110.jpg
    D Day mustang 110.jpg
    75 KB · Views: 125
  • D Day mustang 101.jpg
    D Day mustang 101.jpg
    46.3 KB · Views: 124
  • D Day mustang 127.jpg
    D Day mustang 127.jpg
    38.1 KB · Views: 123
  • D Day mustang 124.jpg
    D Day mustang 124.jpg
    36.7 KB · Views: 128
  • D Day mustang 131.jpg
    D Day mustang 131.jpg
    33.5 KB · Views: 134

Users who are viewing this thread

Back