Navigation
Install the app
How to install the app on iOS
Follow along with the video below to see how to install our site as a web app on your home screen.
Note: This feature may not be available in some browsers.
More options
You are using an out of date browser. It may not display this or other websites correctly.
You should upgrade or use an alternative browser.
You should upgrade or use an alternative browser.
**** DONE : 1/48th scale N.A. Mustang III, HB837, 541 Sqn, R.A.F., Group Build.
- Thread starter Airframes
- Start date
Ad: This forum contains affiliate links to products on Amazon and eBay. More information in Terms and rules
More options
Who Replied?dirkpitt289
Master Sergeant
Outstanding work as usual.
- Thread starter
- #64
Airframes
Benevolens Magister
Thanks very much chaps! The wings and tailplanes are now attached, although the wings took a bit of work, probably more my fault than the kit though. They went together very well, after removing the very prominent sprue attachment points, and opening up one flashed-over landing gear locating hole. The central wheel well moulding fitted like a glove, as did the tops of the wings to the one piece lower section - no slippage or misalignment whatsoever.
However, when I came to dry fit to the fuselage, althoiugh the joint was excellent, and would have held almost without cement, there was absoulutely zero dihedral!
So out came the files, and after about an hours' work, filing, test fitting, filing and fitting, the wings were finally set at the right angle (I hope!).
In retrospect, it might have been better to attach and cement the lower section first, let this set, then attach the two upper sections, but of course that might have been just as bad. Anyway, they're done now, and only required a small amount of work to blend into the wing-root fillet. The fuselage, on the other hand, has turned out perfectly, with an absolutely beautiful joint throughout , although I still have to check this with a primer coat. That's the next step, after fitting the air-intake and radiator shutter, then it'll be time for the first stage of painting.
I'm afraid I forgot to charge the spare set of camera batteries, so I'll have some pics either late tonight, or sometime tomorrow.
Thanks again for your interest and kind coments.
lesofprimus
Brigadier General
Looks great Terry, love the scratch built camera..
imalko
Chief Master Sergeant
Echo the posts above. Great work Terry.
- Thread starter
- #67
Airframes
Benevolens Magister
Thanks Dan and Igor!
Here's the pics of how she looks at the moment. The same as before basically, but with wings!!
There's still a tiny bit more to do around the wing and tailplane roots before priming to check the joint lines, then it's fit those other bits, scratch - build the lower fuselage camera housing behind the radiator outlet, then onto the first painting stage.The upper engine cowling is only clipped in place here, to facilitate fitting the exhausts later.
Apart from the couple of minor, and expected issues mentiond, this kit has been nice to work with, and has extra detailed parts compared to the Tamiya 'mother kit'.
More tomorrow, all being well.
Attachments

looks very neat and tidy Dogsbody, might look at getting one of them
A4K
Brigadier General
Great (and fast!!!) work Terry!
Crimea_River
Marshal
Coming along nicely there Terry.
Real nice Terry...!
- Thread starter
- #72
Airframes
Benevolens Magister
Thanks very much chaps ! This is a real value for money kit, bearing in mind this issue also has the air/ground crew set included. The aircraft kit by itself is even cheaper, at around £10 in the UK, so I can reccomend it Karl.
It's every bit as good as the Tamiya 'original', and better in parts. It doesn't 'build itself' as the Tamiya one does, but there's nothing too drastic to cope with.
Should have some more pics soon.
It's every bit as good as the Tamiya 'original', and better in parts. It doesn't 'build itself' as the Tamiya one does, but there's nothing too drastic to cope with.
Should have some more pics soon.
Lucky13
Forum Mascot
I say! Looking totally spiffy there old what!
- Thread starter
- #74
Airframes
Benevolens Magister
Thanks awfully old chap! Sherry?
109ROAMING
2nd Lieutenant
Beaut stuff T
Keep it coming
Keep it coming
Aaron Brooks Wolters
Brigadier General
Excellent work sir. I am becoming addicted to watching you guys build these models.
- Thread starter
- #78
Airframes
Benevolens Magister
Thanks very much Kevin, Daniel and Aaron.
She's almost ready for the first paint stage - just need to do a bit of cleaning and polishing after the latest additions.
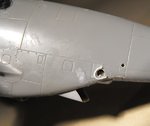
PIC 1 Shows the underside, with the air scoop intake fitted, and the radiator shutter, which has a piece of stretched sprue inside to represent the actuator ram. The grey 'mess' is a primer-filler, painted on to check the joints, and this will be lightly sanded and polished later.
PIC 2. The 'splash guard' has been added to the fuselage camera port, again from stretched sprue, and the 'lens' will be added after the model is painted. Only just visible, beneath the fuselage, is the scratch-built camera housing, and the whole area is yet to be cleaned-up in this shot.
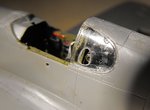
PIC 3. The camera 'clear vision' port in the cockpit quarter light was drilled out, then filed to shape. The spots and what appear to be scratches on the window are swarf and dust from the filing, and will be cleaned off, and the window polished then given a coat of 'Klear' (Future), after the masking is removed.
Just out of view here is the mount and hole for the radio whip antenna, drilled and formed from stretched sprue.
PIC 4. How the model looks so far, with both quarter lights in place. The cockpit will be masked, and the flaps fitted temporarily, ready for painting. The first step will be the application of the AEAF stripes to the fuselage and wings, which will then be masked, and the whole airframe sprayed in PRU Blue.
Hopefullyy, I should get most of this done tomorrow, so I should have some more pics tomorrow night or Thursday.
Thanks again for your kind comments.
She's almost ready for the first paint stage - just need to do a bit of cleaning and polishing after the latest additions.
PIC 1 Shows the underside, with the air scoop intake fitted, and the radiator shutter, which has a piece of stretched sprue inside to represent the actuator ram. The grey 'mess' is a primer-filler, painted on to check the joints, and this will be lightly sanded and polished later.
PIC 2. The 'splash guard' has been added to the fuselage camera port, again from stretched sprue, and the 'lens' will be added after the model is painted. Only just visible, beneath the fuselage, is the scratch-built camera housing, and the whole area is yet to be cleaned-up in this shot.
PIC 3. The camera 'clear vision' port in the cockpit quarter light was drilled out, then filed to shape. The spots and what appear to be scratches on the window are swarf and dust from the filing, and will be cleaned off, and the window polished then given a coat of 'Klear' (Future), after the masking is removed.
Just out of view here is the mount and hole for the radio whip antenna, drilled and formed from stretched sprue.
PIC 4. How the model looks so far, with both quarter lights in place. The cockpit will be masked, and the flaps fitted temporarily, ready for painting. The first step will be the application of the AEAF stripes to the fuselage and wings, which will then be masked, and the whole airframe sprayed in PRU Blue.
Hopefullyy, I should get most of this done tomorrow, so I should have some more pics tomorrow night or Thursday.
Thanks again for your kind comments.
Attachments
- Thread starter
- #79
Airframes
Benevolens Magister
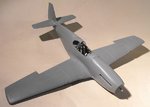
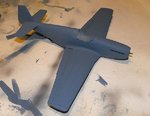
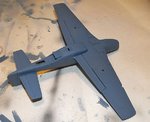
The painting is underway, with a slight change of plan. I was going to spray the AEAF stripes first but, apart from the fact I thought they might look too neat, even though the 541 Sqn aircraft did appear to be rather tidy, the tin of Humbrol Matt White I bought only two weeks ago, has already gone 'off', after only using a couple of times.(That's three tins in as many months!).
I can't get any until Thursday, so I thought I'd follow 'full size aircraft' practice, and paint the overall PRU Blue colour first.
I'd picked up a tin of Humbrol 87 when I re-stocked with the other paints, which looked just like the slightly lighter, post-war PRU Blue, which, when mixed with some RAF Blue (Humbrol 96), should produce the desired shade.
But Humbrol strike again, as it's listed as 'Steel Grey'! Sure enough, on opening the tin, and thoroughly stirring the paint, it is a light grey colour, absolutely nowhere near the colour on the tin lid!!
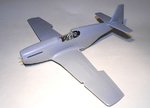
Ah well, on with the show! I mixed this with the RAF Blue anyway, and was able to produce an acceptable shade of 'brand new' PRU Blue, which should suit this Mustang, as it was only re-painted immediately before joining the Squadron just before 'D-Day', having previously been in camouflage colours.
So, the cockpit and quarter lights were masked, along with the landing lamp lens (cover will be fitted later), and the flaps and landing gear doors held in place with 'Blue Tac', and the first two coats applied.
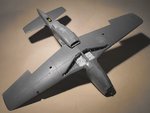
The pics show how she looks so far, and the fuselage camera housing is now also visible on the underside, just at the rear of the radiator exit ducting.
When the model is fully dried, given that a third coat is not required, rough masking will be added, and the AEAF stripes brush painted, fairly neatly, but hopefully replicating the appearance of the 'real thing'. Then it's time for some light panel line work, exhaust staining etc, before moving on to the decal stage.
Thanks again for your interest and support, and I should have some more pics soon.
I can't get any until Thursday, so I thought I'd follow 'full size aircraft' practice, and paint the overall PRU Blue colour first.
I'd picked up a tin of Humbrol 87 when I re-stocked with the other paints, which looked just like the slightly lighter, post-war PRU Blue, which, when mixed with some RAF Blue (Humbrol 96), should produce the desired shade.
But Humbrol strike again, as it's listed as 'Steel Grey'! Sure enough, on opening the tin, and thoroughly stirring the paint, it is a light grey colour, absolutely nowhere near the colour on the tin lid!!
Ah well, on with the show! I mixed this with the RAF Blue anyway, and was able to produce an acceptable shade of 'brand new' PRU Blue, which should suit this Mustang, as it was only re-painted immediately before joining the Squadron just before 'D-Day', having previously been in camouflage colours.
So, the cockpit and quarter lights were masked, along with the landing lamp lens (cover will be fitted later), and the flaps and landing gear doors held in place with 'Blue Tac', and the first two coats applied.
The pics show how she looks so far, and the fuselage camera housing is now also visible on the underside, just at the rear of the radiator exit ducting.
When the model is fully dried, given that a third coat is not required, rough masking will be added, and the AEAF stripes brush painted, fairly neatly, but hopefully replicating the appearance of the 'real thing'. Then it's time for some light panel line work, exhaust staining etc, before moving on to the decal stage.
Thanks again for your interest and support, and I should have some more pics soon.
Attachments
Jesus Terry, fast work man....Real good though
Users who are viewing this thread
Total: 1 (members: 0, guests: 1)