Navigation
Install the app
How to install the app on iOS
Follow along with the video below to see how to install our site as a web app on your home screen.
Note: This feature may not be available in some browsers.
More options
You are using an out of date browser. It may not display this or other websites correctly.
You should upgrade or use an alternative browser.
You should upgrade or use an alternative browser.
**** DONE : 1/48th scale N.A. Mustang III, HB837, 541 Sqn, R.A.F., Group Build.
- Thread starter Airframes
- Start date
Ad: This forum contains affiliate links to products on Amazon and eBay. More information in Terms and rules
More options
Who Replied?- Thread starter
- #82
Airframes
Benevolens Magister
Thanks very much Wayne and Bemay. Now that the fuselage is together Wayne, it's pretty straight forward - just the Tamiya mouldings, but with extras - and no locating pins! Being a single colour helps with the speed of painting of course!
- Thread starter
- #83
Airframes
Benevolens Magister
Got some more done, as I want to knock this one on the head and get on with other things which have fallen behind.
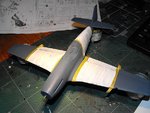
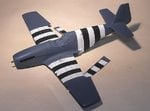
The first stage of the AEAF stripes has been completed. The required areas were roughly masked at the edges, more to provide a line to work to, and a coat of matt white applied roughly, deliberately using an old, stiff, flat-tipped brush. This has given the desired streaky and patchy appearance, and a further, thinner coat will be applied just to smooth things out and give it some semblance of a job which was at least attempted properly in the field.
Once the white has fully hardened, the black stripes will be added, again freehand and by brush, following pencilled lines to mark the scale 18 inch width.
Whilst waiting for the first coat of white to dry, attention was given to the canopy. As with the Tamiya kit, two canopies are provided, the original, side-opening framed canopy, and the blown 'Malcolm' hood, although both are in the closed position only.
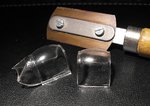
A quck test showed that the 'Malcolm' hood as provided will not fit over the fuselage spine in the open position, so I had a choice of either trying to thin-down the kit canopy, after separating it from the windscreen, or using one from the spares box. I chose the latter, as I've had a separate 'Malcolm' hood sitting around for about thirty years, left over from the old Monogram kit. This one does fit in the open position, and only needs a little enhancement, in the form of the lower frame and runners, and a bit of a polish.
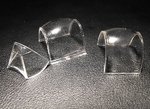
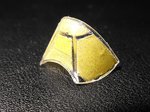
The windscreen was carefully cut from the kit canopy, using a razor saw, and the edges cleaned up, before masking ready for painting.
PIC 1 Shows the first coat of white for the stripes on wings and fuselage. I'm afraid I had to use flash for this shot, which has 'washed out' the PRU Blue, making it look grey.
PIC 2. The kit canopy and windscreen is on the left, with the old Monogram 'Malcolm' hood on the right.
PICS 3 and 4 Show the windscreen separated, and masked, ready for painting.
I hope to have a further update and pics tomorrow. thanks once again to all. Cheers, T.
The first stage of the AEAF stripes has been completed. The required areas were roughly masked at the edges, more to provide a line to work to, and a coat of matt white applied roughly, deliberately using an old, stiff, flat-tipped brush. This has given the desired streaky and patchy appearance, and a further, thinner coat will be applied just to smooth things out and give it some semblance of a job which was at least attempted properly in the field.
Once the white has fully hardened, the black stripes will be added, again freehand and by brush, following pencilled lines to mark the scale 18 inch width.
Whilst waiting for the first coat of white to dry, attention was given to the canopy. As with the Tamiya kit, two canopies are provided, the original, side-opening framed canopy, and the blown 'Malcolm' hood, although both are in the closed position only.
A quck test showed that the 'Malcolm' hood as provided will not fit over the fuselage spine in the open position, so I had a choice of either trying to thin-down the kit canopy, after separating it from the windscreen, or using one from the spares box. I chose the latter, as I've had a separate 'Malcolm' hood sitting around for about thirty years, left over from the old Monogram kit. This one does fit in the open position, and only needs a little enhancement, in the form of the lower frame and runners, and a bit of a polish.
The windscreen was carefully cut from the kit canopy, using a razor saw, and the edges cleaned up, before masking ready for painting.
PIC 1 Shows the first coat of white for the stripes on wings and fuselage. I'm afraid I had to use flash for this shot, which has 'washed out' the PRU Blue, making it look grey.
PIC 2. The kit canopy and windscreen is on the left, with the old Monogram 'Malcolm' hood on the right.
PICS 3 and 4 Show the windscreen separated, and masked, ready for painting.
I hope to have a further update and pics tomorrow. thanks once again to all. Cheers, T.
Attachments
r2800doublewasp
Senior Airman
Coming along nicely! ")
great progress mate

- Thread starter
- #87
Airframes
Benevolens Magister
Thanks guys. More soon.
vikingBerserker
Lieutenant General
Beautiful work!
Crimea_River
Marshal
Looking good Terry!
- Thread starter
- #91
Airframes
Benevolens Magister
Thanks very much guys!
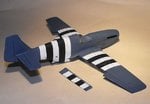
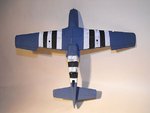
The AEAF stripes are now done, hopefully looking temporary but relatively neat, and some light panel line work has been completed. The flaps have been removed from their temporary location, and are awaiting painiting of the bare metal leading edges, where the hinge access slots are visible.
Some light exhaust staining has been added, and a small amount of detail painting has yet to be done before the model recieves a clear gloss coat, ready for the decals, which will be sourced from the spare decal files, and a sheet of serial numbers and letters decals. Dead simple this one, just four roundels, two fin flashes and the serial numbers!
There will also be a few stencils, but I'm guessing most of the original stencil work was covered up when the aircraft was re-painted in PRU Blue, and others would be covered by the AEAF stripes, with not much time available, before the aircraft joined the Squadron, to re-apply all the stencil marks. A bit of research into similar situations has indicated that only those stencil notices deemed important or neccessary were re-applied, such as fuel type and capacity, safety and electrical warnings etc., presumably as an aid when landing away from the parent unit, and particularly on a forward airstrip on the Continent.
Anyway, here's how she looks so far. The next step, after the decals, is to detail, paint and attach the landing gear, and prop, before a matt clear coat and some more detail painting.
Thanks again for your interest and compliments.
Attachments
- Thread starter
- #93
Airframes
Benevolens Magister
Thanks Mags !
Sweet Terry!!
very nice
Crimea_River
Marshal
Hope I get the stripes to turn out as well on my Hellcat Terry. Great job!
- Thread starter
- #98
Airframes
Benevolens Magister
Thanks very much indeed guys. Andy, the only difficult thing about the stripes is trying to make a bad job of it ! Otherwise they look factory applied!!
A4K
Brigadier General
Great work Terry! I have to get me a razor saw too...what a great job on the canopy!
vikingBerserker
Lieutenant General
Very nice!
Users who are viewing this thread
Total: 1 (members: 0, guests: 1)