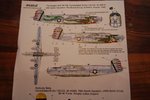
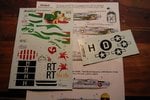
Hey all, hopefully I can squeeze this one in by deadline. Badbear was so kind enough to send me the Green dragon decal sheet as this kit comes with a red and dark tan kind of looking dragon. The pictures of the layout sheet and decals are all to his credit, as I wanted to build a model of it after seeing a restored picture of it today on the web. Also did the little gun section. I bought a custom weight which fits under the cockpit to hold it down, no one likes tail sitters... Off we go!
Navigation
Install the app
How to install the app on iOS
Follow along with the video below to see how to install our site as a web app on your home screen.
Note: This feature may not be available in some browsers.
More options
You are using an out of date browser. It may not display this or other websites correctly.
You should upgrade or use an alternative browser.
You should upgrade or use an alternative browser.
DONE: 1/72 Minicraft B-24J Liberator, "The Dragon and His Tail" Group Build
- Thread starter Maglar
- Start date
Ad: This forum contains affiliate links to products on Amazon and eBay. More information in Terms and rules
More options
Who Replied?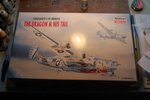
Airframes
Benevolens Magister
Nice one Mag! Hope you can get it done in time without rushing.
- Thread starter
- #3
Heinz
Captain
Great stuff man!
vikingBerserker
Lieutenant General
Nice maglar, living life on the edge.
- Thread starter
- #6
Haha yes. Didnt get a lot done as I downloaded battlefield 43' and have been playing the whole night. Friggin Minicraft decided to put one side of the fuselage into two pieces, cockpit side then the rest of the fuselage. So I have to putty each side then attach them together. I do like their bomb bay though, Has the option for open or closed and some decent detail. Painting will be a breeze, glossy black, chrome, done. Shooting to make it look likes its restoration.
Attachments

Oh...very interesting subject.....better shake a leg mate....clock is ticking!
ozhawk40
Master Sergeant
DBII
Senior Master Sergeant
Always loved the dragon. I hope you finish it.
DBII
DBII
- Thread starter
- #10
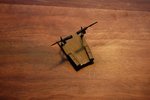
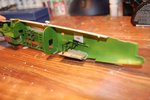
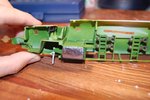
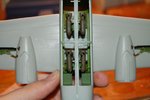
Well here is the finished interior. Not much on Minicrafts behalf, but eh. I decided to lock down the right sides gun window as I want the dragons tail to go over it. As you can see, the lead custom weight fits nice and tight and does not disturb the other pieces. I also lucked out as my Testors window cement did its "make your own window" as seen in pic 4. So now I dont have to stress about masking the kits little windows as I can make my own after I paint it. Next to join the fuselage and go from there..
Attachments

very nice maglar
Airframes
Benevolens Magister
Nice work, and quite a bit of provided internal detail for 1/72nd scale.
vikingBerserker
Lieutenant General
Off to a nice start. I
m really impressed how well the windows turned out, I need to get some of that!
m really impressed how well the windows turned out, I need to get some of that!
- Thread starter
- #14
Well since it is 1/72 I knew I could pull it off.. Its just a kind of PVA glue. All you do is dip a brush handle into the glue then wisp it around hte window until you have a "bubble" then wipe off the excess and your done. Think of when you put a wand into bubble container, it gets that thin film layer, this is that exact thing.
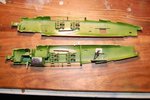
Fuselage went together and need to putty it. Didnt get anything done today as I just was distracted. WIll probably get most of it done on the weekend.
Fuselage went together and need to putty it. Didnt get anything done today as I just was distracted. WIll probably get most of it done on the weekend.
Good progress Mag! Well done.
- Thread starter
- #16
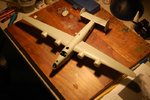
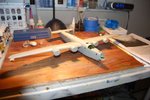
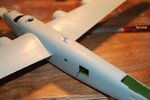
Well here we are. Need to putty the 4 nacelle sides, from the top / bottom joining, also need to get a piece under the plane. That white piece on the bomb is fallen putty from filling in the entire fuselage, will scrape it off later. Luckily there will be no putty needed for the wing / fuselage joint, the way it was designed it fits perfect.
Attachments
Sweet Corey! 
looks good Maglar
Heinz
Captain
With the guys ")
vikingBerserker
Lieutenant General
Very nice!
Users who are viewing this thread
Total: 1 (members: 0, guests: 1)