**** DONE: Bf109E4 'White 6' I/JG3 BoB Group Build.

Ad: This forum contains affiliate links to products on Amazon and eBay. More information in Terms and rules

I spent a year in 'sunny' Manchester and know exactly how you feel T - mind you when the temp gets to about 38C or more here in Perth....

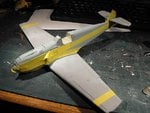
Great progress on the 109 and your just getting to the exciting part! :lol:

Cheers

Peter
 
The model has now had another coat of primer, after attending to a few small blemishes and tiny gaps. Work has now started on some of the ancillaries, whilst waiting for the primer to fully harden before giving it a light rub-down prior to applying the RLM 65.
I wasn't sure about what looked like just a highlight on the spinner, so I hit it with a deliberately rough coat of primer, and, lo and behold, the highlight is a sink mark, all the way around the tip !
I've decided to set this aside and think about it, whilst I make a start on the 1/48th scale Hurricane. I've got a choice of either trying to sand it to the correct profile, or fill it then sand it, and it'll probably be the latter.
The pic shows the little blighter!
More in a couple of days, once I've got the Hurricane to a reasonable stage.
 

Attachments

  • BoB Build 2 180.jpg
    BoB Build 2 180.jpg
    38.5 KB · Views: 94
Andy, the single malt is for special occasions - like today. It's Saturday, and that's special enough for me!
I agree Glenn, I just hope the filler will stay in place, as the depression is quite shallow. No doubt I'll get it sorted. If not, I'll see if I can alter the spare 'pointed' spinner from the Hasegawa kit. One way or the other, it'll get done !
 
Thanks H. Where you been hiding then?
Some good progress, with the main painting stages completed. The mottle and the white wing tips and rudder have still to be done, and then some detail painting etc, before applying the mix of home made and kit decals. I just hope the kit decals work without problems, as they're over thirty years old! I think a spray with clear acrylic is called for before attempting to use them!
PIC 1. The RLM 65 Hellblau has been sprayed on the undersides and fuselage. The light spots on the starboard wing are where I accidentally splashed some enamel thinners when cleaning the airbrush! A quick dust-over cured this!
PIC 2. The masking has been applied ready to spray the top sides overall in RLM 02, which was mixed with Humbrol 27 Dark Sea Grey and 30 Dark Green, matching against a colour chip. The masking along the fuselage demarcation has been loosely applied, and pulled back slightly, to allow a very fine soft edge.
PIC 3. The method of soft-edge masking. The spraying is done close in, using the edge of the tape as a guide, and quickly applying the demarcation line first, on minimal trigger and pressure settings, before pulling back and filling-in the rest of the area on almost full trigger.
PIC 4. The first coat of RLM02. It looks rather grey in these pics, but does have the correct green-grey tone in 'real life'. A second coat was sprayed and, once fully dry, the wings and tail planes were masked with Tamiya tape, and the fuselage marked in pencil to indicate the splinter pattern. The RLM 71 was then sprayed, freehand on the fuselage, for a soft edge, and following the edge of the tape on the wings, for a slightly tighter, more defined demarcation. Humbrol 163 (Satin) Dark Green was used, as a close match for RLM 71, and allowing for the darkening effect of the clear coats to follow.
PIC 5 shows the completed splinter pattern after removal of the masking tape. The main wing tips are still in primer, and are yet to be painted white.
After a very small amount of touch-up here and there, the RLM02 mottle will be applied, referring to the somewhat 'fuzzy' reference photos. The mottle appears to be fairly light, and in an elongated pattern, so I think this is going to take some time to get it right.
Thanks again for your kind comments and interest, and I'll post another up-date soon.
 

Attachments

  • BoB Build 2 189.jpg
    BoB Build 2 189.jpg
    29.2 KB · Views: 100
  • BoB Build 2 181.jpg
    BoB Build 2 181.jpg
    64.2 KB · Views: 103
  • BoB Build 2 183.jpg
    BoB Build 2 183.jpg
    44.2 KB · Views: 102
  • BoB Build 2 186.jpg
    BoB Build 2 186.jpg
    27.3 KB · Views: 100
  • BoB Build 2 190.jpg
    BoB Build 2 190.jpg
    28.5 KB · Views: 107

Users who are viewing this thread

Back