Done : Bf110G-4, G9+AT, of III/NJG1, Gruppe Build.

Ad: This forum contains affiliate links to products on Amazon and eBay. More information in Terms and rules

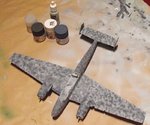
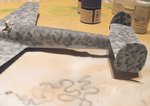
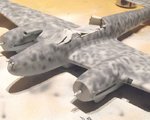
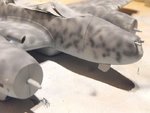
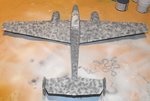
one of the stinkers in the late war pics and the angle of the photo is whether or not some of the NJG 1 birds indeed carried rear warning radar. don't think 9th staffel had them installed though. leave the bomb rack it is a 50/50 call anyway. true enough doing ground atack duties for other staffels of other NJG's not sure if NJG 1 ever performed these in late 44 and into 45.
 
Thanks Erich. I think I might eventually remove the Schrage Musik, unless i do the Stab machine or another.
Jan, I started at about 1:1, also tried various mixes, and all worked! As it's hard to see the actual paint in this colour as it goes into the water, which I use for thinning, I can't give a definite answer to the final ratio. But, bear in mind, I'm still getting to know the new brush, and I found differing results at different distances, angles and trigger pressures. I reckon the optimum will be either 50/50, or 60 paint/40 water. I even tried a very thin mix, which was OK as a light mist, or an area spray to build up,but was too thin and splattered close up, which is to be expected. I'll let you know more when I've done more.
Karl gave me the Model Colour, which is the same as Model Air, but unthinned. Good idea, as then it can be used for brushing and spraying and, in effect, you're getting twice as much paint for the same cost! It certainly seems to go a long way so far.
 
looks great Terry

Jan the guy in the shop where i got the model colour said you need to thin 50/50 for best results and you could go to 40/60 with water
 
Thanks guys! Haven't got anymore done, as I was so knackered I've been asleep all day, only woke up when Jan sent me a text! Might get the start of the mottling done tonight, just as a test, as I know it's going to take a LONG time!
 
Thanks Jan and 'Eagle, much appreciated.
As my sleep pattern is totally messed up, I had a 'bit of a dabble' after correcting the slight mistake on the underside of one wing, with a light spray of Vallejo's RLM 76.
Not having the required colour in Vallejo paints, or any other acrylics in fact, I bought a bottle of Tamiya XF24 Dark Grey, which was mixed with XF18 Medium Blue, and XF2 Flat White, to get something resembling RLM 74 and 75.
When happy with the shades, this was thinned 50/50 with Tamiya Thinner, and a few trial squirts made, to see how fine, and soft, I could go with the new airbrush.
Although precise trigger control was a little difficult, and rather painful, due to my b*gger*d hands, I managed to get a fine line less than 1mm wide, which was extremely satisfying. So, with the model on the workbench, and, to make things easier for me, and less painful, the airbrush held in both hands, I had a practice 'spray' on the tailplane. Happy with the results, and the degree of control, I continued, and 'accidentally' found that I'd sprayed the entire model! Well, at least where it needed spraying!
Having closely studied the photos of G9+AT, it was apparent that the wavy mottle pattern was heavier on the fuselage spine, and around the engine cowlings, and the entire scheme seems to be a mix of wavy lines, and elongated mottle, with the occassional smaller mottle 'spot'. Further study of the photos showed that the spinners also had some sparse, but fairly dense mottle, and this was also apllied.
When this was finished, the upper surfaces of the wings and tailplanes were given a very fine, light misting of RLM75, just to tone-down the lighter RLM76.
I know I've got some areas perhaps a little too heavy, particularly on the tops of the main wings, but this can be toned-down by a very fine dusting of RLM76 and, if neccesary, a small amount of 'reverse mottle' in the same colour.
However, I'll await suitable comment from Erich before proceeding any further, as there's no immediate rush.
With many construction stages yet to be done, such as the landing gear, fuel drop tanks etc, and with two months still to run for this GB, I can afford to take my time. This is rather convenient, as I still haven't quite finished the Photography Guide, the Diorama Guide Pt2 needs some more work, and I can hear the big Hunter calling me from the corner of the room!
The pics trell the story, and I have to say that, for airbrushing at least, I think I've finally been converted to acrylic paints - well those from Vallejo anyway!
Terry.
 

Attachments

  • 110 Build 116.jpg
    110 Build 116.jpg
    67.3 KB · Views: 70
  • 110 Build 119.jpg
    110 Build 119.jpg
    47 KB · Views: 66
  • 110 Build 120.jpg
    110 Build 120.jpg
    51.4 KB · Views: 68
  • 110 Build 121.jpg
    110 Build 121.jpg
    58.3 KB · Views: 69
  • 110 Build 126.jpg
    110 Build 126.jpg
    52.6 KB · Views: 64
  • 110 Build 131.jpg
    110 Build 131.jpg
    49.1 KB · Views: 62
  • 110 Build 134.jpg
    110 Build 134.jpg
    45.5 KB · Views: 66
Thanks chaps, your comments and observations are, as always, welcome and appreciated!
Yes Wojtek, I used the new airbrush, and it's a dream!
Wayne, thanks, I thought myself there were a few 'heavy' spots; they became more noticeable in the pics. I'll hit them with a few 'squiggles' of RLM76 I think. ('Squiggles' is a highly technical term BTW!)
Karl, that'd be great mate! It'd be much easier, probably quicker, and cheaper on postage that way. When I know what I need, I'll send you some dosh and a small list. Hopefully, Iris, at the LHS, will be able to stock Vallejo sometime in the future, which will make life easier.
 

Users who are viewing this thread

Back