- Thread starter
- #21
Navigation
Install the app
How to install the app on iOS
Follow along with the video below to see how to install our site as a web app on your home screen.
Note: This feature may not be available in some browsers.
More options
You are using an out of date browser. It may not display this or other websites correctly.
You should upgrade or use an alternative browser.
You should upgrade or use an alternative browser.
Done : JV44 Fw190D-9 "Red1" of Heinz Sachsenberg Gruppe Build....
- Thread starter lesofprimus
- Start date
Ad: This forum contains affiliate links to products on Amazon and eBay. More information in Terms and rules
More options
Who Replied?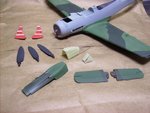
- Thread starter
- #22
lesofprimus
Brigadier General
From the other threads tail end, to carry this through....
les said:Got the front canopy piece taped off as well now... Will probably spray them and some other small items today....
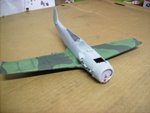
Im really at a loss as to how to do the fuselage camo mottleing... I was planning on taping off the main areas that will have the deeper tones and spraying them... Then, let dry, remove tape and try to free hand the lighter splashes of RLM82 and 83...
I know u mentioned something about it to me awhile ago about a mask/template for the camo job Wayne... An idea I was going to possibly try was to use blue tac tape, draw out the camo pattern as best I can on it from the profile, then cut it out with an exacto knife, apply to the crate and spray it, using the techniques we been talkin about with the airbrush...
With my well-known lack of skill and glitchy sprayer, which is the right way to go???
Wayne said:How about a higher mix of thinner to paint and practice on some scrap paper to see if you can create the mottle effect?
The masking of the primary area is probably a wise start but if you can get the mottle to work this would be better.....
les said:OK Wayne.. I use Model Master enamels and use a mix of 1 part paint/3 parts thinner now, so maybe 1/4 ratio for the mottle??
And u are recommending, if I can, to do the entire fuselage camo in a mottle??? If so, wont it look kinda off if the wings werent done that way and the fuselage was???
Wayne said:Try the higher ratio...even 1:5 ? can't hurt to try.....on scrap!! you have to do small areas at a time, keep the tip clean and work down from the top, concentrating on getting the flow just right, if it's not you pull away and start again...your fuselage would take me 30 minutes or more to do, light Green first over the full length then the Dark Green on its correct areas over the light Green....mottling lightly and building it up, trying to get a soft but hard edge, just like on my 1/48 190....
If the Light green is going on right I usually apply random mottle on the fuselage too...!
Man If you can get it right it will look good....
IF you get it right you can always go over the hard edge camo on the wings....
...and make sure your wings are covered you don't want overspray messing them up!
- Thread starter
- #23
lesofprimus
Brigadier General
Alright Wayne, Ill give it a shot... Thanks for the advice....
Airframes
Benevolens Magister
Dan, that is looking extremely good! One heck of an ambitious project, with a lot of complex paintwork to figure out...hat's off to you for the job so far mate!
I really like the worn/scratched metalwork in the 'boiler room', and the cockpit is superb! No way could I manage all that PE stuff!
The paintwork so far is excellent, lot's of patience needed with all the various masking etc.
I'm really looking forward to seeing the finished result - should be stunning, and a possible winner!
Thanks for the breakdown and progress reports to date.
- Thread starter
- #25
lesofprimus
Brigadier General
Thanks Terry... I wanted to have this thread and Gruppe Build to mimick how the others should do their threads as well, with progress shots and research etc etc.....
Heinz
Captain
Looking sweet Dan 
- Thread starter
- #27
lesofprimus
Brigadier General
Thanks man...
Lucky13
Forum Mascot
Outstanding brother...! When I get started I everything in the thread as well, questions and what not...jolly good show old chap! 
Njaco
The Pop-Tart Whisperer
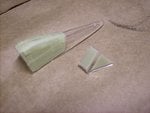
Dan, what are you using to mask the canopy? I always have a rough time with that.
- Thread starter
- #30
lesofprimus
Brigadier General
I used some really fu*kin expensive small masking tape I got from the Hobby Store in Orange Grove...
I had a rough time as well, cut myself twice with the xacto and very nearly gouged the canpoy glass to hell and gone...
But I got it right....
I had a rough time as well, cut myself twice with the xacto and very nearly gouged the canpoy glass to hell and gone...
But I got it right....
Matt308
Glock Perfection
Bloody hell, Les! That is lookin' good, my man!
- Thread starter
- #32
lesofprimus
Brigadier General
Thanks Matt....
Im currently waiting for a reply to my question about paint chipping in the Weathering Section... So while I wait Ive been messin around with some panel line work.... Usin a chisled mech pencil and a smal paint brush....
Im wanting my model to show some wear and tear, and while doin the lines in, I noticed the extra graphite sittin there on the sandpaper.... So I grabbed a brush and started to lightly hit the line with it...
I like it... Sorta like usin pastels, only graphite.... It'll tome down some with the gloss and then dull coats...
- Thread starter
- #33
lesofprimus
Brigadier General
Matt308
Glock Perfection
Nice.
BUT BE CAREFUL!!! Without a finish of Future on your model, the graphite will smear into your flat camo work and ruin it. If you coat it in Future and then apply your graphite work, you can wipe it off without it smearing into your paint.
BE CAREFUL! I've screwed this up before. And the only alternative is to repaint.
Tip: You can apply Future by brush over your graphite areas to seal it. Future applied by brush is self leveling and will not mess up your sprayed camo. I would do this immediately to avoid a catastrophe.
Lookin' good, buddy!
Airframes
Benevolens Magister
Very effective, Dan. As you say, when it's got the gloss/matt coats, it'll tone down and blend in nicely. But Matt's right, give it a quick coat of Klear (Future) to seal the graphite.
Catch22
Major
Looks great!
Lucky13
Forum Mascot
Looking awesome Dan boy! 8)
Lookin' ok Dan....your paint is Matt right?
You ARE using my type of method, haven't completed the Pastels (Part 2) application sheets yet....
I apply the pastels to the Matt paint surface BEFORE the Clear Gloss coat...carefully!! You need to keep it light in application and tight along the lines....nice and subtle...darken if necessary or to taste!
- Thread starter
- #39
lesofprimus
Brigadier General
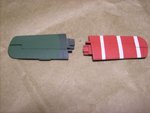
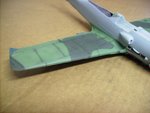
Ive noticed the problems with this kind of detailing.... Its addictive I'll tell ya.... I did mess up on the port wing and had to break out the airbrush and touch up one area.... I cant use an eraser on it either as it takes off the damn paint....
The way I did it was to first hit the lines with a chisel pointed mech pencil, then dabbed a brush into the powder left over on the sandpaper and lightly brush it on the lines.... Some of them I went too heavy, some too light....
Follow on brushing made them relativly even.... I now have the wings lightly taped over to prevent overspray when I start the RLM82 camo on the fuselage... That tape will also remove some of the extra graphite on the panel lines and tone it down some....
I didnt want to spray the clear Future on the wings before I sprayed the whole thing, to keep it uniform...
I also went and diffused some of the camo with some brushed graphite in certain areas to give some tonality to the camo and to mimick, albeit rookie level, the mottleing that Wayne has been demonstrating... Also some filth...
It worked to some degree I think...
looks great Les
Users who are viewing this thread
Total: 1 (members: 0, guests: 1)