nice work Terry, must be little peices those exhausts ?
Navigation
Install the app
How to install the app on iOS
Follow along with the video below to see how to install our site as a web app on your home screen.
Note: This feature may not be available in some browsers.
More options
You are using an out of date browser. It may not display this or other websites correctly.
You should upgrade or use an alternative browser.
You should upgrade or use an alternative browser.
H.P. Halifax B.MkIII Dedication.
- Thread starter Airframes
- Start date
Ad: This forum contains affiliate links to products on Amazon and eBay. More information in Terms and rules
More options
Who Replied?- Thread starter
- #342
Airframes
Benevolens Magister
Thanks mate, and yes they are, about 27 mm x 2 mm. Only drilled one hole in my finger .......
Lucky13
Forum Mascot
Looking absolutely fantastic there old bean! Known you for this long, seen your builds 'live', I'm still amazed by your abilities, even when that (beep) pain and stiffness kick in!
- Thread starter
- #344
Airframes
Benevolens Magister
Thanks awfully old chap! Got a nasty little bug, on top of the other stuff, at the moment not a happy bunny !
Vic Balshaw
Major General
She is looking fantastic Terry.
- Thread starter
- #346
Airframes
Benevolens Magister
Thanks Vic, it's appreciated.
I'm still trying to blend that canopy! There's still a slight ridge and 'ripple', but I think if I try any more it'll ruin the whole thing.
The problem is, the fuselage is supposed to be cut, before construction, along the line of the cockpit rim, and the whole canopy section then glued in, and the joints sealed. Of course, I didn't know this, until after I got the canopy, when the model was already built!
I'm hoping that it will look acceptable when finished, and probably won't be as noticeable to the naked eye, especially when set in the overall diorama, and at least it's better than the kit canopy. Just irritating that I feel it could be better.
Still, with the aggrevation factor aside....your doing great Terry!
- Thread starter
- #348
Airframes
Benevolens Magister
Thanks Wayne !
Crimea_River
Marshal
If you stopped now, it would look fine and meet most standards Terry.
- Thread starter
- #350
Airframes
Benevolens Magister
Thanks Andy - I'm probably being too self-critical, but you know how it is! Got to have a break anyway, as my daughter is visiting.
parsifal
Colonel
I think it looks marvellous terry
- Thread starter
- #353
Airframes
Benevolens Magister
Thanks very much, Wojtek and Michael, it's very much appreciated.
I think I've now got it as good as it's going to get, and can now continue with the final bits tomorrow. Then, it's on to the rest of the ground equipment and diorama base. About 9 days left, plus one day 'for emergencies' !
Pics sometime tomorrow, all being well.
I think I've now got it as good as it's going to get, and can now continue with the final bits tomorrow. Then, it's on to the rest of the ground equipment and diorama base. About 9 days left, plus one day 'for emergencies' !
Pics sometime tomorrow, all being well.
- Thread starter
- #354
Airframes
Benevolens Magister
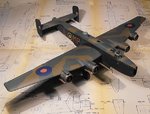
Progressing towards the final parts on the model itself, with the delicate parts to befitted once on the display base.
PIC 1. The canopy is as good as it's going to get, and has yet to be cleaned-up and have a matt clear coat applied around the area.
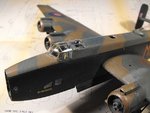
PIC 2. The modified exhausts have been painted, installed, and given some staining.
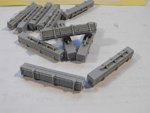
PIC 3. The resin SBC's to be used are from Mike Belcher's 'Belcher Bits' set, and they really are excellent.
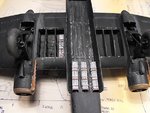
PIC 4. After careful painting, three SBC's were mounted in the fuselage bomb bay, and one in the port wing bay. The remainder will be displayed as one being winched into position, with one on one bomb trolley, and the final six on another trolley.
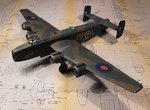
PICS 5 and 6. How the model looks to date.
Next step is to fit the wheel bay doors and wing bomb bay doors, then the gun turrets and some antenna parts, before moving on to the diorama itself.
Thanks again for your continued interest and support.
PIC 1. The canopy is as good as it's going to get, and has yet to be cleaned-up and have a matt clear coat applied around the area.
PIC 2. The modified exhausts have been painted, installed, and given some staining.
PIC 3. The resin SBC's to be used are from Mike Belcher's 'Belcher Bits' set, and they really are excellent.
PIC 4. After careful painting, three SBC's were mounted in the fuselage bomb bay, and one in the port wing bay. The remainder will be displayed as one being winched into position, with one on one bomb trolley, and the final six on another trolley.
PICS 5 and 6. How the model looks to date.
Next step is to fit the wheel bay doors and wing bomb bay doors, then the gun turrets and some antenna parts, before moving on to the diorama itself.
Thanks again for your continued interest and support.
Attachments

I'm pleased with it!
- Thread starter
- #357
Airframes
Benevolens Magister
Thanks Wojtek and Wayne. Got to add a bit of detail to the main bomb bay, then finish the other bits before getting 'stuck in' on the base.
Crimea_River
Marshal
Coming along nicely Terry.
- Thread starter
- #359
Airframes
Benevolens Magister
Thanks Andy - about another 20 to 30 hours work to do, including the diorama base.
Crimea_River
Marshal
About those SBC's, how did the drop sequence work? Did the whole container get dropped and then disintegrate or did they open the containers in the bomb bay?
Users who are viewing this thread
Total: 1 (members: 0, guests: 1)