great progress Terry
Navigation
Install the app
How to install the app on iOS
Follow along with the video below to see how to install our site as a web app on your home screen.
Note: This feature may not be available in some browsers.
More options
You are using an out of date browser. It may not display this or other websites correctly.
You should upgrade or use an alternative browser.
You should upgrade or use an alternative browser.
H.P. Halifax B.MkIII Dedication.
- Thread starter Airframes
- Start date
Ad: This forum contains affiliate links to products on Amazon and eBay. More information in Terms and rules
More options
Who Replied?Crimea_River
Marshal
Excellent work and description Terry. Hope you don't mind but I thought I'd post this painting by Ivan Berryman that can be found here showing the final minutes of MP-L as Wenning curves in for the shoot down.
Attachments

Cool Andy!
dirkpitt289
Master Sergeant
Great stuff. The picture is a nice find and a good compliment to the thread.
- Thread starter
- #326
Airframes
Benevolens Magister
Thanks guys, and thanks Andy for posting the picture. Mike has sent me a copy, and I will include it in the final version of the PDF, along with location maps, when I finsih the model.
Matt308
Glock Perfection
Very nice write up. Perhaps I missed it, but what is the red box on the upper port wing used for?
- Thread starter
- #328
Airframes
Benevolens Magister
Thanks Matt. The red 'box' is the outline around the dinghy compartment, painted there so it can be quickly located in an emergency. There were two handles inside the aircraft which, when any one of the two was pulled, opened the compartment, and ejected and inflated the dinghy, which was connected to the inside of the 'box' by a halyard, to prevent it floating away. Alternatively, the hatch could be opened from the outside, by raising a latch at the upper right hand corner of the hatch cover. A similar marking could be found on the Lancaster, but on the starboard wing.
Matt308
Glock Perfection
I had guessed that, but second guessed the thickness of the red lines symbolizing some other equipment. I suppose on a black moonless night in the middle of the North Sea that no red line could be thick enough after a ditching. Thanks. 
Crimea_River
Marshal
Thanks guys, and thanks Andy for posting the picture. Mike has sent me a copy, and I will include it in the final version of the PDF, along with location maps, when I finsih the model.
So sorry Terry. I had not realized you were goint to add to the .pdf and so ended up stealing your show.

- Thread starter
- #331
Airframes
Benevolens Magister
No problem Andy - I wasn't sure about posting it in the actual thread, so hesitated, thinking it would do in the PDF. But I guess it'll be acceptable, as a credit has been given and it is, after all, a pic of Mike's relative's aircraft, and relevant to the thread. Good to haver it here at this stage too.
Crimea_River
Marshal
I would not have posted it if it were not already available elsewhere on the web.
Gerry
Staff Sergeant
Very nice detailing work Terry, it's coming along very nicely. Can I ask a question, though? In the photos, the tubular cockpit braces appear unpainted or is that something you did since?
Gerry
Gerry
- Thread starter
- #334
Airframes
Benevolens Magister
I agree Andy, and there shouldn't be a problem.
Gerry, thanks for the kind words. In the first photos, the tubular braces are un-painted, and unfortunately, the photo showing therm painted isn't too good, being washed out in the area of the braces! The other areas show the new paint, but the braces still appear rather pale.
I've got quite a bit more done, although a lot of time has been spent on the relatively slow process of blending-in the canopy which, so far, seems to be working out reasonably well. The main wheels and retraction struts are painted and fitted, but not without a problem, when one of the starboard axles snapped off at the oleo. This took some time to repair, as it had to be located into the hole in the wheel, which, of course, wanted to drag it out of alignment.
Been floored today with some strange bug, so progress has been spasmodic and minimal, but there's not that much to do on the model itself now, as the final work will be done when it's on the diorama base.
I hope to have some pics to show later tonight, or, if not, tomorrow at the latest.
Thanks again for your continued interest.
- Thread starter
- #335
Airframes
Benevolens Magister
OK, those photos.
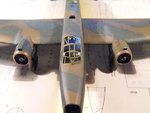
PIC 1. Here, the base of the windscreen has been sealed and blended in, then re-touched and given a coat of clear matt. The little 'lump' visible in front of the screen at the left in the picture, has since been removed and re-touched. This was a tiny piece of dried PVA (Kristal Klear), which didn't show up until painted!
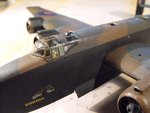
PIC 2. The continuing process of blending in the canopy. This was treated to a bead of PVA, then painted when dry. However, a slight ridge was still visible, at the front of the engineer's canopy, where it meets the bulkhead frame. This was due to the fuselage tapering towards the nose, but the canopy was straight-edged. Here, the depression is being built up with further PVA, shown clearing in this photo. Once set, the re-touching and clear matt coat will be repeated. The patchy appearance of the green paint is due to wiping away previously applied excess PVA, and will be rectified when the area is re-touched.
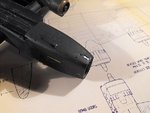
PIC 3. The bomb-aimer's window was glazed with the same material, as was the camera port, the latter needing a touch of matt clear at the rear. The central hole for the pitot has yet to be filled, and a new hole has been drilled outboard, on the port side, which is the correct position.
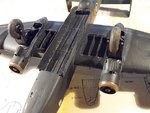
PIC 4. Main wheels and retraction jacks in place. The tyres suffered from some scratching, due to having to press the wheels between the axles, which also caused the damage mentioned previously. These will be retouched later, and the bay doors fitted after the exhaust have been modified, painted and fitted. Also visible here is the semi-matt clear coat on the exhaust collector rings, and some paint chipping and wear in and around the bomb bays. Some further small detail and the door actuators will be made and fitted later, as will the wing bay doors.
Now, I'm going to have some Paracetamol, and get off to bed to try to shake off this darned bug!
PIC 1. Here, the base of the windscreen has been sealed and blended in, then re-touched and given a coat of clear matt. The little 'lump' visible in front of the screen at the left in the picture, has since been removed and re-touched. This was a tiny piece of dried PVA (Kristal Klear), which didn't show up until painted!
PIC 2. The continuing process of blending in the canopy. This was treated to a bead of PVA, then painted when dry. However, a slight ridge was still visible, at the front of the engineer's canopy, where it meets the bulkhead frame. This was due to the fuselage tapering towards the nose, but the canopy was straight-edged. Here, the depression is being built up with further PVA, shown clearing in this photo. Once set, the re-touching and clear matt coat will be repeated. The patchy appearance of the green paint is due to wiping away previously applied excess PVA, and will be rectified when the area is re-touched.
PIC 3. The bomb-aimer's window was glazed with the same material, as was the camera port, the latter needing a touch of matt clear at the rear. The central hole for the pitot has yet to be filled, and a new hole has been drilled outboard, on the port side, which is the correct position.
PIC 4. Main wheels and retraction jacks in place. The tyres suffered from some scratching, due to having to press the wheels between the axles, which also caused the damage mentioned previously. These will be retouched later, and the bay doors fitted after the exhaust have been modified, painted and fitted. Also visible here is the semi-matt clear coat on the exhaust collector rings, and some paint chipping and wear in and around the bomb bays. Some further small detail and the door actuators will be made and fitted later, as will the wing bay doors.
Now, I'm going to have some Paracetamol, and get off to bed to try to shake off this darned bug!
Attachments
Nice work so far Terry!
Matt308
Glock Perfection
Peebs
Senior Airman
Looking good Terry... my mkIII is sitting ready for paint, but I've jumped into the carrier GB for the moment
- Thread starter
- #340
Airframes
Benevolens Magister
Thanks chaps. The joint of the canopy is almost there. I painted the last application of PVA, but there is still a slight ridge and 'ripple', so another dose is in order.
Meanwhile, I've started work on the exhausts, cleaning them up and adding a little detail.
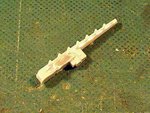
PIC 1. Not a very good shot, due to lighting, but this shows the rough moulding of the 'porcupine' exhausts, with lots of flash, moulding seams, and oversize locating tabs. These were all cleaned up, and, after numerous test fitting, the locating tabs were cut down and filed.
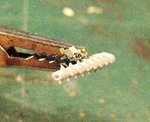
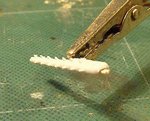
PIC 2. The outlet of each exhaust was drilled and slightly hollowed.
PIC 3. The front joint with the collector ring was drilled, and two short lengths of stretched sprue cemented in place, to represent the breather/pressure tubes.
I've got my daughter visiting today, before she returns to University in London, but I hope to get the canopy blended in and re-painted finally, and the exhausts finished, before moving on to the bomb bays, and adding a couple of SBCs to the wing bays, later tonight.
Thanks once again for your compliments and continued interest.
Meanwhile, I've started work on the exhausts, cleaning them up and adding a little detail.
PIC 1. Not a very good shot, due to lighting, but this shows the rough moulding of the 'porcupine' exhausts, with lots of flash, moulding seams, and oversize locating tabs. These were all cleaned up, and, after numerous test fitting, the locating tabs were cut down and filed.
PIC 2. The outlet of each exhaust was drilled and slightly hollowed.
PIC 3. The front joint with the collector ring was drilled, and two short lengths of stretched sprue cemented in place, to represent the breather/pressure tubes.
I've got my daughter visiting today, before she returns to University in London, but I hope to get the canopy blended in and re-painted finally, and the exhausts finished, before moving on to the bomb bays, and adding a couple of SBCs to the wing bays, later tonight.
Thanks once again for your compliments and continued interest.
Attachments
Users who are viewing this thread
Total: 1 (members: 0, guests: 1)