H.P. Halifax B.MkIII Dedication.

Ad: This forum contains affiliate links to products on Amazon and eBay. More information in Terms and rules

terry a very good job, you are very well informed that this great, as for example as you're doing good is a tremendous help, although the detailed bomb bay makes me the brass if I can make a decent impression on paper acetate.
 
Thanks Evan and Sergio.
Evan, I'll let you know. I have a 'full load' of what appear to be 500 pounders (with separate bomb carriers no less!) left over from the Lancaster build, and some others in the spares box, including a nice 'cookie', and what I think is supposed to be a 2,000 pounder (it'll pass for one anyway!) the latter also from the Lanc.
Mike has sent me the Station Returns Report for the bomb loads on that night's operation, and it shows each aircraft carried a load of one 2,000 pounder, and incendiaries, a mix of the two types of 4 pounder, and 30 pounders. This means I'm going to have to make a load of SBCs, but, subject to Mike's approval, I might display six 500 pounders, either in, or being loaded in to, the wing bays, just to make things more recognisably familiar to the lay man 'spectator'.
I'll be posting some background information on the raid, and the bomb loads, in a later 'instalment', but for now, it's back to adding some basic detail to the bomb bays, and working out how to get a 120 foot diameter dispersal pan onto a 18 inch square base board !
 
Sounds like fun Terry!

What make of Cookie do you have? The only accurate version is the Airfix, of which I have one spare if you need it. (Also have 3 anorexic Revell and Hasegawa items if anyone needs any)
 
Yep, it's the 'cookie' from the 1980s issue Airfix Lanc - found one in the spares box, built, painted and decaled, , and should have another somewhere. Very nicely moulded. The one from the Revell kit looks more like the 2,000 pound blast bomb, or an aerial mine, and should pass for one. It's certainly not a 4,000 pounder !
 
Maybe it's actually supposed to be the cylindricle 2,000 pounder, as opposed to the finned, AP version?
 
Could be Terry, had thought about that. Just trying to think where I got the idea from they were meant to be Cookies, which they definitely do not represent accurately.
 
Thanks Hugh.
Must admit Evan, when I first saw it in the Revell Lanc kit, I thought it was a under-scale 'cookie', then figured it was supposed to be the 2,000 lb HC.
 
Thanks Aaron.
I guess most reviewers just guessed it was supposed to be a cookie Evan - a lot of people forget about the other bombs, and particularly SBCs, TIs and so on.
Anyway, made some good progress, after another six hours work. Wing bomb bays are done as far as they can go for now, wing tip nav lamps are fitted and shaped, and the wings are on.
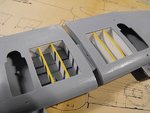
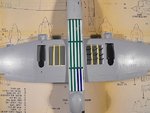
PIC 1. Some basic structural detail has been added to the port wing bays only, as the starboard bays will have SBCs inside, obscuring the view of any detail. Also, by adding detail here, it could make things difficult when fitting the scratch-built SBCs. The final touches, and the 'split' doors for each bay, will be added near the end of the build.
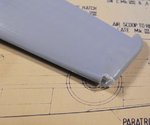
PIC 2. Pieces of roughly shaped clear sprue were 'superglued' into the pre-cut notches in the wing tips, and when fully set they were filed and sanded to shape. Note also that the wing joints have been sanded smooth, paying particular attention to the tips, and the joint where the ailerons will fit, which can often cause problems on older kits such as this. The ailerons are designed to be movable, and are supposed to be fitted when joining the wings. But as these are going to be set in the neutral position, they can easily be added later, by simply cutting off one 'hinge' pin, slotting the part in place, and cementing it. This helps prevent damage to an otherwise delicate moving part.
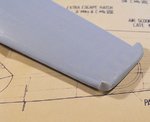
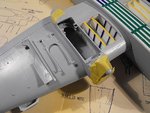
PIC 3. The nav lamps have been sanded to shape, and have had the first rough polish. These will be polished properly later, then masked. Once the model has been painted, the masks can be removed, and each lamp will receive a coat of transparent red / green paint for port and starboard wings respectively.
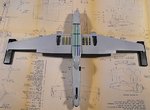
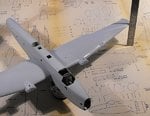
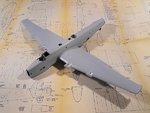
PIC 4. Once the wings were cemented in place, the model was set on a level surface, in this case inverted, because of the H2S dome, checked for vertical, and items of equal height placed under the wing tips to maintain an even dihedral. This was checked regularly before the cement hardened fully, as there was a little 'play' in the starboard wing, which was not such a snug fit as the port.
PIC 5. Once the wings had set enough to be able to move the model, it was turned right way up, and positioned on top of two tins, under the level section of the bomb bay, and measurements taken at identical spots on each wing, in order to verify that the dihedral was equal, and all 'square'. This proved to be a useful exercise, as trying to judge by eye on this aircraft is affected by the asymmetric shape of the cockpit when viewed from the front, and the H2S dome from the rear.
PIC 6.How the bomb bays look now the wings are in place. Further structural and attachment point detail will be added once the 'load' has been constructed, although this will be minimal, as not much will be seen. The eight-section bomb doors will also be scratch-built, and fitted near the end of the build. Note that the slight misalignment of the yellow bay wall flange, on the left in the picture, has since been corrected.
PIC 7. Next stage is to fit the engine nacelles, and in order to minimise the number of 'dangly' things which can be troublesome when handling and painting, the inner nacelles were checked to see what can, and can not, be added after constructing and fitting these. Here, one nacelle has been taped and loosely fitted to the wing, with one of the doors and the rear struts of the landing gear being tested. This showed that the main gear legs will need to be fitted, but can be folded back into the bay, and the remainder of the parts, with very slight modification, can be fitted after painting.
PIC 8. How the model looks to date. Note that the tail planes and fins, according to the instructions, should have been fitted at this stage. However, being twin fins, these are also relatively delicate items, and could get damaged when handling the model to fit the engine nacelles and engines, so they will be fitted after this work has been completed. It also means that any filler which may be required, for example, around the engine nacelles, wing joints, and the joints between fuselage and tail plane, can all be done at the same time, rather than have to prepare and fill repeatedly. For those new to modelling, it is this sort of forward planning, and the constant test-fitting and checking, which makes the job of construction and fault correction so much easier, rather than 'bashing on' quickly, only to find at a later stage that mistakes have been made, or parts damaged, leading to frustration and further unnecessary work.
I hope this is continuing to prove helpful, and interesting, and again, many thanks for your kind words and interest to date. I hope to post a further up-date very soon.
 

Attachments

  • Halifax build 177.jpg
    Halifax build 177.jpg
    54.3 KB · Views: 69
  • Halifax build 179.jpg
    Halifax build 179.jpg
    46.8 KB · Views: 68
  • Halifax build 180.jpg
    Halifax build 180.jpg
    46.2 KB · Views: 58
  • Halifax build 181.jpg
    Halifax build 181.jpg
    64.4 KB · Views: 74
  • Halifax build 183.jpg
    Halifax build 183.jpg
    59 KB · Views: 74
  • Halifax build 182.jpg
    Halifax build 182.jpg
    58.4 KB · Views: 66
  • Halifax build 186.jpg
    Halifax build 186.jpg
    59 KB · Views: 78
  • Halifax build 188.jpg
    Halifax build 188.jpg
    63 KB · Views: 88
Thanks Charles. No, the plans aren't part of the kit package, I purchased this set about 30 years ago . There used to be a plans service via the publishers of a series of modelling and aviation magazines (MAP, Model Allied Publications), where a huge number of scale plans could be had, covering aircraft from WW1 to modern day, normally available as a set, in three scales (1/72nd, 1/48th and 1/32nd scales) depending on aircraft type, and at reasonable prices. Unfortunately, the plans service no longer exists, although some of the magazines are still around, with slightly different titles, under new publishers.
 

Users who are viewing this thread

Back