Navigation
Install the app
How to install the app on iOS
Follow along with the video below to see how to install our site as a web app on your home screen.
Note: This feature may not be available in some browsers.
More options
You are using an out of date browser. It may not display this or other websites correctly.
You should upgrade or use an alternative browser.
You should upgrade or use an alternative browser.
Movie Double Bill.
- Thread starter Airframes
- Start date
Ad: This forum contains affiliate links to products on Amazon and eBay. More information in Terms and rules
More options
Who Replied?Njaco
The Pop-Tart Whisperer
Terry, just found this link which is interesting. Love the pic of Galland and Tuck.
THE BATTLE OF BRITAIN - The making of the movie - Behind The Scenes
THE BATTLE OF BRITAIN - The making of the movie - Behind The Scenes
- Thread starter
- #83
Airframes
Benevolens Magister
Thanks Chris. I've seen that web-site, but for some reason couldn't find that page the last time I looked !
The pic of Galland and Tuck is great, and is also in the original theatre programme for the movie. I found my copy very recently, which I've had since the regional premiere in 1969 ! I used to have most of the promotional stuff released during the lead - up to the film's release, but it was lost during the house clearance when my Dad passed away three years ago. Pity, as there was some good stuff there, and apparently some of it is sought after by collectors of movie memorabilia.
Anyway, making the decals for the fictitious Jagdgeschwader badges was successful, although I thought I'd dropped a clanger at one stage. The Geschwader with yellow spinners and numerals had a shield with a blue and white background, split vertically, and the blue to the right, with a black, stylised 'Austrian' -type eagle superimposed in the centre.
The Geschwader with the red spinners and numerals had the same coloured shield, but with the blue on the left, and a black silhouette of a Luftwaffe eagle, with a red swastika beneath it.
Just after I'd made the decals, I spotted a pic of the 'yellow' JG with the shield showing the blue on the left, and thought I'd made a mistake !
However, further checks showed the shield orientated both ways, so it seems there was no consistency in the production of these self-adhesive, 'Fablon' badges. I also found a pic of 'Red 11' in formation, with the badge as I'd drawn it - phew !
So, the decals are now on, with the crosses and fuel triangle from the kit, the swastikas from a Microscale sheet, the numbers from two Tamiya FW190 sheets, and the shields off my printer !
The only decals that gave a bit of a problem were the crosses - Academy decals again showing their reluctance to adhere. As soon as they'd more or less set, they were quickly coated in Johnson's Klear (Future), and hopefully they'll stay put, especially after the model has been sprayed in a semi-matt clear coat.
The shields had to be printed on white decal sheet of course, as PC printers can't print white, and they were closely trimmed before use, and then any tiny areas of white remaining outside of the image touched-in with paint.
Next stage is to spray the clear coat, and then continue with the build, and add a few small detail parts.
Thanks again for your interest and kind comments.
Attachments
hawkeye2an
Staff Sergeant
Looking good. Like the homemade decals, came out real good.
- Thread starter
- #85
Airframes
Benevolens Magister
Thanks Andy.
dirkpitt289
Master Sergeant
Great looking build Terry 8)
Njaco
The Pop-Tart Whisperer
Sweet work. You said you were gonna try that B-25 photo ship? Just saw that on that sight - very colorful.
Love those decals Terry!
dirkpitt289
Master Sergeant
Sweet work. You said you were gonna try that B-25 photo ship? Just saw that on that sight - very colorful.
???? Site
Njaco
The Pop-Tart Whisperer
sorry, it should be cite.
- Thread starter
- #91
Airframes
Benevolens Magister
Oh, I thought it was syte !
Thanks very much guys, glad you like the decals Wayne. I was quite surprised they held the fine definition of the swastika so well.
Chris, apart from the few shots on the DVD with the movie in the twin-disc set, that's the best overall pic I've seen of the B25 camera ship. I actually met Jeff Hawke a couple of times, the owner and pilot of the B25, when he was flying the Ju52 in the UK. He went missing, in mysterious circumstances a couple or more years ago, and the wreckage of his aircraft, or part of it, was found somewhere in the Med - can't remember where.
I might get around to doing the B25 camera ship someday - that poor 'day glo' finish would be a challenge to replicate. Fancy having to set out to produce a bad paint finish !!
T Bolt
Colonel
Those decals turned out great Terry! Something I've done from time to time when decals don't want to stick is wet the area they are to go in with Future. It glues them down pretty good, but makes the area kind of sticky so I clean the area up with Windex then re-coat with Future when dry.
Tony Hill
Tech Sergeant
Great stuff Terry! The decals look superb.
- Thread starter
- #94
Airframes
Benevolens Magister
Thanks Glenn and Darryl.
Glenn, I did the decals gain, putting Future under and over them. It's helped, but a couple of the crosses still lifted in the centre, hours after the Future had set ! I did it again, after pricking the offending areas with a pin, and putting some Micro Sol in, then re-coating with Future.
Touch wood, they seem to be holding, and should settle once the semi-matt clear coat goes on.
T Bolt
Colonel
sounds like those are some really stubborn decals. I first used that trick with the old Monogram Ford Tri-motor with decals that wouldn't respond to Micro Sol and it worked after running a toothpick into every corrugation.
- Thread starter
- #96
Airframes
Benevolens Magister
I've heard a lot of adverse comments about Academy decals, but I must admit, this is only the second set I've had any trouble with, and it isn't that serious. I think I might go back to using gloss enamel varnish for clear coat for decal application though, as the Klear (Future) can be a bit hit and miss giving a gloss finish sometimes. Never had that problem previously, but then again, the bottle I have at the moment is the 'old' stuff, and well over a year old, so maybe it's degrading slightly. I'll still use it for small jobs though, and definitely for mixing to make semi-gloss, semi-matt etc.
T Bolt
Colonel
Never had Academy decals that didn't want to stick, just thick and unresponsive to setting solutions. I use to have a lot of trouble with Hobbycraft decals though, not sticking, and silvering something awful. That kit is ex Hobbycraft, so maybe you got stuck with some of the old Hobbycraft decals.
Crimea_River
Marshal
Great work Terry. Decals turned out very nice.
- Thread starter
- #99
Airframes
Benevolens Magister
Thanks very much Andy.
They could be the old design from Hobbycraft Glenn, although they have the Academy logo printed on them, and are dated 2004, printed in Korea. They certainly had the 'thick feel' I've encountered with Academy decals before, and maybe this was the problem. They'd stick like poo to a blanket at first, but as soon as they were slid into position, they lost their tackiness, and that's when they wouldn't fully settle. After around 48 hours or more, they seem fine now - I hope !
They could be the old design from Hobbycraft Glenn, although they have the Academy logo printed on them, and are dated 2004, printed in Korea. They certainly had the 'thick feel' I've encountered with Academy decals before, and maybe this was the problem. They'd stick like poo to a blanket at first, but as soon as they were slid into position, they lost their tackiness, and that's when they wouldn't fully settle. After around 48 hours or more, they seem fine now - I hope !
- Thread starter
- #100
Airframes
Benevolens Magister
Well, the decals are still on, and have more or less settled into any panel lines, although they needed a bit of help here and there.
I decided to fit the landing gear, and replace the oversized prop shaft before spraying the semi matt clear coat, to avoid any wear to the latter during subsequent handling. The kit prop shaft was cut off (I'll retrieve the part rattling around inside when the cockpit masking is removed!), and a new one made from plastic tube. The holes in the spinner and fuselage had to be enlarged slightly to allow the tube to fit properly, and I may yet have to cement the prop in place, as it seems to want to tilt down more often than not, but that's no big deal.
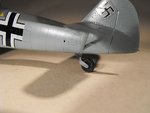
The main undercarriage legs were cleaned up, and brake lines fitted, made from stretched sprue in this instance. The gaiter around the tail wheel, although probably correct for a '109G, was larger than the ones seen on the movie Buchons, so this was cut down, re-textured and fitted to the tail wheel leg, which was also sanded and reduced in length, being a bit thick and long.
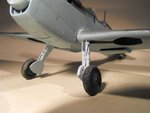
After studying frames from the movie, and the documentary on how it was made, I noticed at least four different tread patterns on the main wheel tyres, so I stayed with the kits' cross-treaded type, but sanded the centre area of tread almost smooth, painting the tyres a rubber colour, and the hubs a dark grey, as per the movie examples.
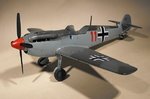
The aerial mast has been fitted and painted, and is further aft than that fitted to the '109G.
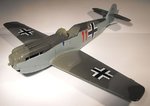
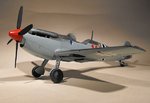
PIC 1 Shows the landing gear in place, and a small amount of staining on the underside. The small items such as the aileron mass balance horns, and the engine overflow and breather pipes etc, will be fitted, or made and fitted, after the clear coat.
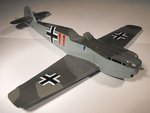
PIC 2. The brake lines, made from stretched sprue. The gear legs, and the centre of the tyre treads, still need some detail painting, and a semi-gloss clear coat for the legs.
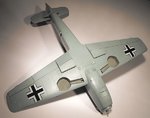
PIC 3. The tail wheel in place, with the cut-down 'canvas' gaiter visible.
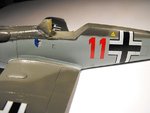
PICS 4 and 5. The aerial mast in place, and awaiting the wire, and the prop test fitted. This still needs the relevant clear coats on the blades and spinner, and the logos need to be hand-painted on each blade. Some light exhaust staining has been added, and the exhausts themselves will be painted and fitted, after drilling out the 'tubes', after the clear coat is applied.
So, once the clear coat is dry, the masking can be removed, and the canopy sections finished and fitted, along with all the small fiddly bits.
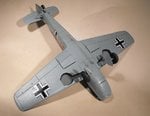
The aircraft were fitted with dummy wing cannons for the movie, and these were deliberately longer, and slightly 'thinner' than the 20 mm MG/FFs fitted to the real Bf109Es during the BoB, in order that they would be clearly visible in the aerial shots. Although the kit does provide barrels, not mentioned in the instructions for this issue of the kit, they are more like actual 20mm barrels, and therefore over sized. After pondering on this, and searching the spares box, I realised that there were some .30 cal barrels, with the conical flash suppressor, in the Italeri Harvard/Texan kit, which won't be required, and these look ideal for the purpose. So, once the model is clear coated, these will be fitted to the holes already drilled into the wing leading edges.
The model is now beginning to look like it's movie star original, and once the main work is complete, work can begin on its co-star, the 'Mk Haddie' Spitfire. Thanks again for your interest and kind comments, and I'll post another update soon.
I decided to fit the landing gear, and replace the oversized prop shaft before spraying the semi matt clear coat, to avoid any wear to the latter during subsequent handling. The kit prop shaft was cut off (I'll retrieve the part rattling around inside when the cockpit masking is removed!), and a new one made from plastic tube. The holes in the spinner and fuselage had to be enlarged slightly to allow the tube to fit properly, and I may yet have to cement the prop in place, as it seems to want to tilt down more often than not, but that's no big deal.
The main undercarriage legs were cleaned up, and brake lines fitted, made from stretched sprue in this instance. The gaiter around the tail wheel, although probably correct for a '109G, was larger than the ones seen on the movie Buchons, so this was cut down, re-textured and fitted to the tail wheel leg, which was also sanded and reduced in length, being a bit thick and long.
After studying frames from the movie, and the documentary on how it was made, I noticed at least four different tread patterns on the main wheel tyres, so I stayed with the kits' cross-treaded type, but sanded the centre area of tread almost smooth, painting the tyres a rubber colour, and the hubs a dark grey, as per the movie examples.
The aerial mast has been fitted and painted, and is further aft than that fitted to the '109G.
PIC 1 Shows the landing gear in place, and a small amount of staining on the underside. The small items such as the aileron mass balance horns, and the engine overflow and breather pipes etc, will be fitted, or made and fitted, after the clear coat.
PIC 2. The brake lines, made from stretched sprue. The gear legs, and the centre of the tyre treads, still need some detail painting, and a semi-gloss clear coat for the legs.
PIC 3. The tail wheel in place, with the cut-down 'canvas' gaiter visible.
PICS 4 and 5. The aerial mast in place, and awaiting the wire, and the prop test fitted. This still needs the relevant clear coats on the blades and spinner, and the logos need to be hand-painted on each blade. Some light exhaust staining has been added, and the exhausts themselves will be painted and fitted, after drilling out the 'tubes', after the clear coat is applied.
So, once the clear coat is dry, the masking can be removed, and the canopy sections finished and fitted, along with all the small fiddly bits.
The aircraft were fitted with dummy wing cannons for the movie, and these were deliberately longer, and slightly 'thinner' than the 20 mm MG/FFs fitted to the real Bf109Es during the BoB, in order that they would be clearly visible in the aerial shots. Although the kit does provide barrels, not mentioned in the instructions for this issue of the kit, they are more like actual 20mm barrels, and therefore over sized. After pondering on this, and searching the spares box, I realised that there were some .30 cal barrels, with the conical flash suppressor, in the Italeri Harvard/Texan kit, which won't be required, and these look ideal for the purpose. So, once the model is clear coated, these will be fitted to the holes already drilled into the wing leading edges.
The model is now beginning to look like it's movie star original, and once the main work is complete, work can begin on its co-star, the 'Mk Haddie' Spitfire. Thanks again for your interest and kind comments, and I'll post another update soon.
Attachments
Users who are viewing this thread
Total: 1 (members: 0, guests: 1)