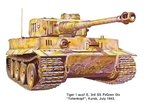
Tiger I. Kursk Armor Group Build

Ad: This forum contains affiliate links to products on Amazon and eBay. More information in Terms and rules

T Bolt

Colonel
13,565
3,368
Mar 24, 2010
Chicago, Illinois
User name: T Bolt
Name: Glenn
Category 2, Intermediate
Kit: Airfix Tiger I
Scale: 1/76th.
Accessories: Scratch-built parts, 6"x 6" diorama
This is my entry for the Kursk Armor Group Build.

I bought this kit quite a while ago with a lot of other Airfix armor kits I found on sale for about $4 a piece with the intention of building them with my kids, but their interest wasn't there at the time. My compressor is broken so I'm stalled on the XF-85 until the new one arrives, so I pulled out the Tiger to have a look and was presently surprised. It looks like a decent little kit.

I have not built armor since grade school so any help / advice would be welcome, in particular with color and marking.

The kit has 2 options. One in North Africa, and one at Normandy. I know the Tiger I was used at Kursk, but all I have found of these machines is black white photos. I like the muli-color camo on the Normandy machine, but don't know if it is proper for the Kursk battle.

Any help would be appreciated.

P6092202.JPG
P6092205.JPG
User name: T Bolt
Name: Glenn
Category 2, Intermediate
Kit: Airfix Tiger I
Scale: 1/76th.
Accessories: Scratch-built parts, 6"x 6" diorama
This is my entry for the Kursk Armor Group Build.

I bought this kit quite a while ago with a lot of other Airfix armor kits I found on sale for about $4 a piece with the intention of building them with my kids, but their interest wasn't there at the time. My compressor is broken so I'm stalled on the XF-85 until the new one arrives, so I pulled out the Tiger to have a look and was presently surprised. It looks like a decent little kit.

I have not built armor since grade school so any help / advice would be welcome, in particular with color and marking.

The kit has 2 options. One in North Africa, and one at Normandy. I know the Tiger I was used at Kursk, but all I have found of these machines is black white photos. I like the muli-color camo on the Normandy machine, but don't know if it is proper for the Kursk battle.

Any help would be appreciated.
 
Last edited:
Nice one Glenn. If it's the original kit, I remember that from around 19....er...some time ago! The Dark Yellow overall was standard factory finish from late 1941, with dark green and wine red being applied in the field. I should have some pics of Tigers in Russia from that period, which I'll post when found.
 
Nice choice as a Group Build entry Glenn.
So called "Ambush scheme" used in Normandy is typical for late war machines, while Tigers at Kursk were painted differently. You should also note there are other differences between early and late Tigers other than paint scheme, most notably commander cupola on the turret.

Here are couple of paint schemes used on Tigers at Kursk...
 

Attachments

  • Copy of Squadron-Signal - Panzer Colors III - Markings Of The German Panzer Forces 1939-45_Page_.jpg
    Copy of Squadron-Signal - Panzer Colors III - Markings Of The German Panzer Forces 1939-45_Page_.jpg
    76.8 KB · Views: 1,351
  • Copy of 008.jpg
    Copy of 008.jpg
    33.9 KB · Views: 684
This is great guys! Thanks a million! I found a source for turret numbers in red and white so that should let me match a lot of possibilities, so any pictures you guys have will help.

Terry, I bought the model maybe 8 years ago and it has a 'Made in France' sticker on the side if that helps you identify it.

I was test fitting it last night and all I could think of was that Tiger in Kelly's Heroes. (I heard that was actually a converted Russian tank but it sure looked like this one!)
 
Nice profiles Igor. The first one is typical of the photos I have of the Kursk period, with overall 'Dark Yellow' streaked with Winerot or Dark Green. The Normandy colours were typical of Northern Europe from mid 1943 on, with heavier green and wine red striping. The 'Ambush' scheme came slightly later, around August 1944, and added a more wavy, 'solid' pattern of the three colours, with the Dark Yellow (sand) also applied as 'spots' on the green and red.
IIRC, the Airfix kit is the correct early version, with the early cupola, road wheels and the 'Pfiefel' exhaust system pipes and filters.
EDIT: Crossing posts! Made in France means it was made for Airfix, by Heller, after that company was acquired by Airfix in the late 1980's. The original kit, which might have been improved since, dates back to around 1965 ! Yes, the 'Tigers' in 'Kelly's Heroes' were 'vis-modded' T34/85's, as were those in 'Saving Ryan's Privates' (!!), although the latter had the front extended to look better.
 
Last edited:
That's good news. So the model is correct for Kursk with out any major reworking. As far as colors I'm sure I can come up with the "Dark Yellow" but is the green close to any RLM numbers as I have quite a stock of those in my rack. Also were there different colors used for the turret numbers, or were they all black for the most part like the ones Igor posted.
 
I wouldn't worry too much about the actual shade of green Glenn. Being applied in the field, it could be (almost) any available paint stock. However, RLM71 Dunklegrun is close, but apply it lightly and thinly. Many Panzers at the time had a mid-brown streaking, instead of green, which was a bit lighter than RAF Dark Earth.
Turret numbers, signifying the Battalion, Section and individual tank, were normally black, or red, with a white outline. However, white outline only, and solid white could be found later in the war. Only an actual reference pic can determine which to use, but unless modelling a specific vehicle, black or red should pass.
 
Thanks Terry, that's a big help! I have those paints on hand. I like the look of the red numbers with the white outline so I think I'll go with that and not really worry about doing a specific tank. Thanks again for all the help.

And thanks Igor for the picture, that will help me a lot with the paint pattern.
 
Your welcome Glenn. Glad to be of some assistance. I'm quite looking forward to see your work on this model.
Tiger tank in 1/72 - that has to be tiny, but not as tiny as Panzer I would be I guess. :)
 
This should be a learning experience for me Igor. The last time I built a tank I was about 12 years old. I'm looking forward to doing the weathering as with aircraft I have to be careful to restrain myself. I foresee muddy tracks in this Tigers Future! :lol:
 
I foresee you yelling at those tracks because they are made of relatively stiff plastic. :lol:

Getting them to sag will take a trick. I'll be watching closely so you can teach me how to do mine.
 
Yea Matt I was worrying about that myself, That's why I was thinking a lot of mud. Help to disguise them a little.:lol:
BTW what's the best way to glue the tracks? I vaguely remember from my preteen-age days that nothing seemed to stick to them worth a D*mn, and the use of a hot knife.
 
Last time I built an AFV with the vinyl type tracks, I used Superglue, both to join the track, and glue them down onto the top of the road wheels, duplicating the 'sag'. You'll need to hold them until the CA sets, as it takes longer on this material.
 
:lol:Thats good to know. I wouldn't have guessed super glue would have worked with that soft material. I probably wouldn't even had tried that. I have super glue accelerator so that should make it easier. Just have to keep my fingers out of the way or I'll be using skin as a new modeling product to replicate mud!

Going to put the body together now.
 
Airframes is spot on. Those dang vinyl tracks I recall being a real pain the arse.

Having said that, I'm now licking my chops thinking about getting a collection of 1/72nd armour and ARVs.
 
I assembled the major parts last night before bed and everything went well, though it is a tiny little bug! The Goblin looks huge compared to it, I think maybe I'll have to pull out my 1/48th B-24 after this one to give by eyes a rest.:lol:
Will add the lower body parts with the wheel axels(I'm sure there's a name for that but my knowledge of tank parts is limited) this morning and do some filling and sanding.
More pictures later.

P6102208.JPG
P6102209.JPG
 
Last edited:

Users who are viewing this thread

Back