Navigation
Install the app
How to install the app on iOS
Follow along with the video below to see how to install our site as a web app on your home screen.
Note: This feature may not be available in some browsers.
More options
You are using an out of date browser. It may not display this or other websites correctly.
You should upgrade or use an alternative browser.
You should upgrade or use an alternative browser.
**** DONE: 1/72 CAC CA13 Boomerang - Aircraft Nose Art GB.
- Thread starter parsifal
- Start date
Ad: This forum contains affiliate links to products on Amazon and eBay. More information in Terms and rules
More options
Who Replied?")
fubar57
General
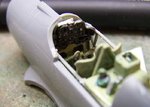
At first, looking at the photo, I thought, the panel is an inch wide, not bad. Then I remembered, 1/72, and the ruler is marked in centimeters. Very nice Parsifal.
Geo
Geo
not a bad start at all!
Airframes
Benevolens Magister
I agree with all - nice work Michael, and your skills are visibly improving.
- Thread starter
- #25
parsifal
Colonel
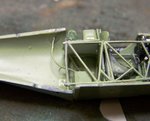
Ive made some good progress tonite, fitting the rudder kick bars, the tubular frme that surrounds the pilot, the pilot seat, the front firewall and finally the IP to the cockpit assembly. Its all pretty good, but I have run out of time and will post photos topmorow.
I think Ive found the problem with this kit. its in the area afdt of the pilot seat. The kit has a lot of detail forward of the pilot, and then just leaves a void behind him. This is clearly wrong and will be visible (highly so) from the outside.
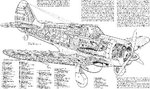
The attached cutaway drawing shows what I think shoud be there, paraphenalia for the radio, a supporting deck. Underneath that a 70 gallon fuel tanki and leading froim the tank to the dorsal, a fuel fillier line leading to the port side. In the tail there is an oxygenm supply and of course the rudder and tail plane cables.
Some of the stuff not visible doesnt need to be made (but depending on how it goes I may attempt it). But some of the gear does need to be represented, because its visible from the outside, I need to scratch build this and it wont be easy, though Ive attempted harder. ive made a start, cutting from styrene card the rear deck. I will also at least build or simulate the radio assembly and the fuel filler line....the rest is optional
I think Ive found the problem with this kit. its in the area afdt of the pilot seat. The kit has a lot of detail forward of the pilot, and then just leaves a void behind him. This is clearly wrong and will be visible (highly so) from the outside.
The attached cutaway drawing shows what I think shoud be there, paraphenalia for the radio, a supporting deck. Underneath that a 70 gallon fuel tanki and leading froim the tank to the dorsal, a fuel fillier line leading to the port side. In the tail there is an oxygenm supply and of course the rudder and tail plane cables.
Some of the stuff not visible doesnt need to be made (but depending on how it goes I may attempt it). But some of the gear does need to be represented, because its visible from the outside, I need to scratch build this and it wont be easy, though Ive attempted harder. ive made a start, cutting from styrene card the rear deck. I will also at least build or simulate the radio assembly and the fuel filler line....the rest is optional
Attachments
N4521U
Plastic Pirate
Cute little buggers them Boomerangs!
meatloaf109
1st Lieutenant
You too?You can say that again, only about 2/3 the length of a similar scale spit, and the wings are equally as tubby. Got about the same physique as me im sad to say....though the boomerang is just short and fat, Im short and fat, and ugly.....
Thought I was the only one!
N4521U
Plastic Pirate
Yous are amongst many!
- Thread starter
- #30
parsifal
Colonel
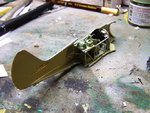
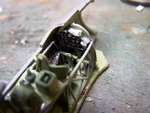
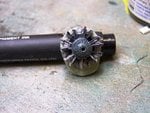
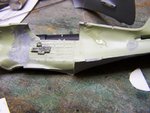
some further progress shots. There are a couplwe of minor issues, and my finishes when viewed in close up still suck, buts its okay generally. Ive put the engine together, fitted a fuel tank and radio fit in the reqar, fitted the cockpit assembly to the port side fuselage half. ive noticed the kickbar has broken, probably during fitting, which is annoying. The lower cowling also chipped....it just broke away before i did anything to it. it must have had a crack in it which i didnt see. It will take some fixing, but i'll wait until just before the the fuselage is going to be put together before trying to do anything.
Ive also drilled holes in the dorsal and glued radio lines that will eventually loop to the tail.
Despite these problems, this is a pretty good kit, and im really enjoying putting it together. Sure there are some problems, but in general, it goes together nicely
Ive also drilled holes in the dorsal and glued radio lines that will eventually loop to the tail.
Despite these problems, this is a pretty good kit, and im really enjoying putting it together. Sure there are some problems, but in general, it goes together nicely
Attachments
Wildcat
Major
Good stuff Parsifal. Have you decided on what markings yet?
Great progress so far Michael!
- Thread starter
- #34
parsifal
Colonel
Good stuff Parsifal. Have you decided on what markings yet?
Havent really made a decision, but vaguley would prefer No4 or 5 Squadron.
Which do you think best captures the best of this type?
- Thread starter
- #35
parsifal
Colonel
Looking good. However you use too much of a glue for sticking of small details. Michael , you should use a needle for applying of it.
Yeah, it was clumsy I know, but at least the heavy handed glueing is not visible.
I like the striking White tail and wing leading edges so "Home James"....that would be my first choice.
Nicely done so far!
Users who are viewing this thread
Total: 1 (members: 0, guests: 1)