Navigation
Install the app
How to install the app on iOS
Follow along with the video below to see how to install our site as a web app on your home screen.
Note: This feature may not be available in some browsers.
More options
You are using an out of date browser. It may not display this or other websites correctly.
You should upgrade or use an alternative browser.
You should upgrade or use an alternative browser.
**** DONE: 1/72 CAC CA13 Boomerang - Aircraft Nose Art GB.
- Thread starter parsifal
- Start date
Ad: This forum contains affiliate links to products on Amazon and eBay. More information in Terms and rules
More options
Who Replied?- Thread starter
- #62
parsifal
Colonel
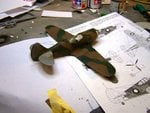
A very quick update. I photocopied a 1;1 scale of the camo scheme, cut out the brown bits, painted "maskol" on the underside of each patch and then attached the shapes to the aircraft (the maskol giving the adhesion needed). sealed off the ends that touched the wing edges with tamiya tape, and resprayed the edges for final seal with earth brown (terry's method). Alowed 4 hours to dry and then applied the forest green second colour. let it dry overnight, and couldnt resist removing one of the camo templates this morning. So far, very good, nice crisp edges and good colour selection. No runs or bleeds that i can see. I will complete the mask removal tonite and touch up (if required), and then post the results. Hopefully will be successful.
Ive still got to apply the underside colour and the white trim and tail colours
Ive still got to apply the underside colour and the white trim and tail colours
fingers crossed for a good result!
- Thread starter
- #65
parsifal
Colonel
had some blemishes in one or two spots. i am currently touching up those imperfections, but overall, it was not too bad. The method seems to work pretty well. This was the first time that i tried this, and i think i can do better with some experience.
Will post progress shots when dry
Will post progress shots when dry
What...no pictures.....?
- Thread starter
- #68
parsifal
Colonel
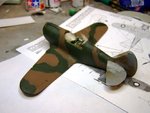
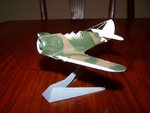
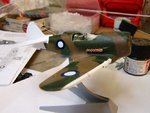
unfortunately it didnt go as well as i had thought, which is a huge disappointment. it looked okay from a distance, but when i looked at the thing fully revealed with the magnifying glasses and close up photography, it revealed numerous imperfections. there were blotches in the forest green paint, thin patches, ragged edges. i was very disappointed.
obviously i need to reconsider how i approached this excercise, and will do that, but for the moment i have a model i want to complete. So, i decided to brush over the green parts, which were the major problem. The brown 'underlay i kept as is
obviously i need to reconsider how i approached this excercise, and will do that, but for the moment i have a model i want to complete. So, i decided to brush over the green parts, which were the major problem. The brown 'underlay i kept as is
Attachments
looks ok to me
once you put a gloss coat on it will smooth out those different paint tones quite a bit, as i only use a brush to paint my models with mine dont look any better than yours at the same stage but once glossed and decals are on they look loads better !
once you put a gloss coat on it will smooth out those different paint tones quite a bit, as i only use a brush to paint my models with mine dont look any better than yours at the same stage but once glossed and decals are on they look loads better !
Crimea_River
Marshal
Yep. Gloss coats work wonders on uneven paint finishes. Once a matte coat is applied, the unevenness should disappear.
- Thread starter
- #72
parsifal
Colonel
okay guys, youve given me the necessary fire in my gut to put the seal on the main camo scheme. I will mask off the unpainted areas (leading edges are supposed to have white trim, the same as the tail) and finish in a satin clear hardcoat. We'll see if that clean up the finishes enough to improve my termperament.
You gave it a go Michael, that's the important thing, doesn't look too bad....and it's all in the learning curve
- Thread starter
- #74
parsifal
Colonel
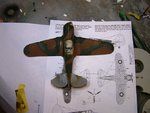
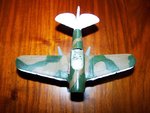
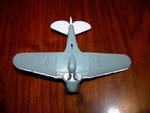
Tonite i painted the white bits, and the belly, and attached the exhaust. i applied a satin clear finish as wel.
ive attached the photos, but im not saying too much just yet. To be honest, im sure if Im happy or not. Ill put it this way, its turned out better than I was thinking it would
ive attached the photos, but im not saying too much just yet. To be honest, im sure if Im happy or not. Ill put it this way, its turned out better than I was thinking it would
Attachments
fubar57
General
Yep, the learning curve. I use it daily, sometimes hourly. As a brush user, I often get uneven paint finishes requiring touch ups. Once in a while I get lucky and it looks like weathering. Coming along nicely Michael.
Geo
Geo
Good work so far!
Its always hard to get the white on a model, from personal experience, make sure to wash the section that you are applying with soapy water and then towel (or t-shirt) dry after a dribbling of clean water to wash the soap out. It helps the paint stick much better onto it ") and it still ends up being a challenge when applied
and it still ends up being a challenge when applied
From my angle here it looks good and I wouldn't change a thing, especially if some of the other colors are a bit challenging going on, sometimes you end up re-doing a color and wishing you stayed with the first coat that you had removed
and it still ends up being a challenge when applied From my angle here it looks good
and I wouldn't change a thing, especially if some of the other colors are a bit challenging going on, sometimes you end up re-doing a color and wishing you stayed with the first coat that you had removed meatloaf109
1st Lieutenant
Great advice from the guys. As they have all said, it's all about learning. Every kit is better because of the ones that proceeded it. I have built close to a thousand models in my time and I still make some real disasters. I think you are doing fine!
- Thread starter
- #80
parsifal
Colonel
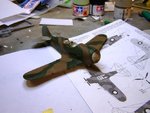
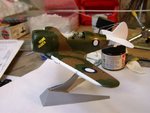
some small progress tonite. i am half way through applying the decals, which are a dream to use. CMR always do a nice job with thair decal art. I washed the model down with soapy warm water and then just warm water before application, then used a decal setting and softening solution to try and get the most snug and smooth decal application that i could. so far pretty happy to be honest. i'll let these main decals set and then apply a sealant before donig the next lot of decals which are all next the ones Ive already applied.....
Attachments
Users who are viewing this thread
Total: 1 (members: 0, guests: 1)