**** DONE: 1/72 CAC CA13 Boomerang - Aircraft Nose Art GB.

Ad: This forum contains affiliate links to products on Amazon and eBay. More information in Terms and rules

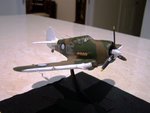
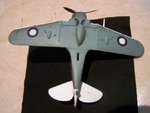
Ive finished painting the canopy, using many of the methods mentioned here. Thanks guys for the advicem, it certainly made a difference.

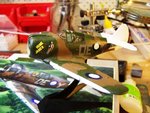
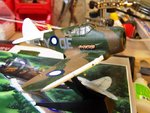
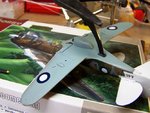
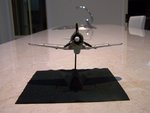
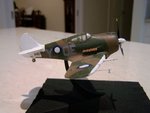
I still found painting the canopy a challenge. It takes a lot of patience and hard work, and even though im the first to admit my work is still not in the same league as that around here, i still fairly happy. There were bo leaks or oversprays, and the struts at least look in proportion.

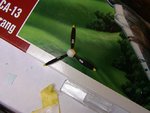
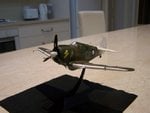
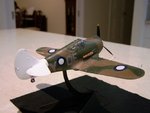
ive also now completed the decalling process, and the prop assembly and painting. Everything except the main paint work has gone more or less to plan, but even the paint job seems to look better as i draw nearer to completion.
 

Attachments

  • 102_2732.jpg
    102_2732.jpg
    79.8 KB · Views: 107
  • 102_2733.jpg
    102_2733.jpg
    60.6 KB · Views: 117
  • 102_2734.jpg
    102_2734.jpg
    72.3 KB · Views: 114
  • 102_2735.jpg
    102_2735.jpg
    69.3 KB · Views: 115
You're doing a fine job on this one Michael and what great guidance to us all from Wojtek. With respect to the Maskol on your best sable brush. While applying the Maskol, just add a little masking to the brush, make the application and then swish the brush in water between applications, this cleans the brush out. Alternatively I use very cheap brushes as you would find in Woolies, then you just chuck them when they become clogged.

Wojtek, is Da Man! :D

You're not wrong.
 
Hi Vic, how are you. Its nice to have you back my man.


Some further progress, but no shots tonite. Have the canopy on, the props, and about 1/3 of the 62 additional tiny decals put on the model. I also mounted the gun armamanet, but not the tail wheel or the (i think) pitot tube.

The prop and the canopy have fitted rather nicely.
 
quick update. Am now nearing completion, have spent the last two weeks painstakingly applying 62 minute decals that dont make a lot of difference to the appearance, but add greaatly to the authenticity of the model.

I now just have to attach the wing mounted pitot tube and it will be finished. Has come up better than i expected.
 
well, i think ive finished. I will take my competition photos tommorrow with daylight to help me, but here are some night time shots to give some idea of what it looks like.

generally I am satisfied with what ive built, and ive learnt a few new techniques in this build. this canopy is the best that ive done so far, though the final fit was not as good as i had thought. The canopy is very clear, the decals applied very nicely and the general fit of the build was pretty good. cockpit was okay. i had problems with the camo paint scheme, but even here, it turned out better than i had first expected. the white tail is very dazzling and i think the edges are pretty good too. Anyway, here are the shots of the completed kit.

This model is a prety good version of the boomerang at 1/72 scale, though the body fit needed a bit of work. you can tell its a limited production kit, and for me, it kinda challenged me a bit. still i enjoyed this build very much....
 

Attachments

  • 102_2737.jpg
    102_2737.jpg
    46.8 KB · Views: 94
  • 102_2738.jpg
    102_2738.jpg
    47 KB · Views: 98
  • 102_2739.jpg
    102_2739.jpg
    47.2 KB · Views: 100
  • 102_2740.jpg
    102_2740.jpg
    43.9 KB · Views: 97
  • 102_2741.jpg
    102_2741.jpg
    46.7 KB · Views: 99
  • 102_2742.jpg
    102_2742.jpg
    44.6 KB · Views: 102
  • 102_2743.jpg
    102_2743.jpg
    47.9 KB · Views: 96
  • 102_2745.jpg
    102_2745.jpg
    51.8 KB · Views: 102
Michael, she is looking really very nice. I like it and found your work on the model also very good. One more tip though.. for the future builds of course regarding a cockpit conopy. It has to be fitted to a model fuselage too just like any pieces before starting painting. Usually I do that at the beginning of a build because often it is matter of adding of a thin plastic strip in order to fill a gap etc... Sometimes the glass has to be fitted by sanding but it happens to a fusealge too. By doing that in the way you will avoid a couple of later problems when keeping a build running.
 
i agree completely wotjek. it seemed to fit fairly nicely when i dry fitted it, but now it has sort of popped out, or at least it seems that way. its still firmly glued in , and i dont think it optimal to now try and fill that gap. i could attempt it, but i think it would ruin the nice decal job and the okay paint job that i have achieved. a lesson learned for next time i think....
 
You have excelled yourself with this one Michael, it looks very nice and that bit of knowledge from our mentor Wojtek is good guidance for all of us that have problems from time to time fitting canopies.
 

Users who are viewing this thread

Back