Navigation
Install the app
How to install the app on iOS
Follow along with the video below to see how to install our site as a web app on your home screen.
Note: This feature may not be available in some browsers.
More options
You are using an out of date browser. It may not display this or other websites correctly.
You should upgrade or use an alternative browser.
You should upgrade or use an alternative browser.
DONE: RNZAF F4U-1A Corsair NZ5255 ,Flt/Sgt R L.Bayly No.21 Sgn/4 Su Group Build
- Thread starter 109ROAMING
- Start date
Ad: This forum contains affiliate links to products on Amazon and eBay. More information in Terms and rules
More options
Who Replied?- Thread starter
- #82
109ROAMING
2nd Lieutenant
Cheers Wojtek ,Jan and Terry
Gonna be either putting another coat of white on or some blue next -pics later of my success or miserable failure (proberly the latter)
Gonna be either putting another coat of white on or some blue next -pics later of my success or miserable failure (proberly the latter)
- Thread starter
- #83
109ROAMING
2nd Lieutenant
miserable failure
My prediction skills are getting better and better
- Thread starter
- #84
109ROAMING
2nd Lieutenant
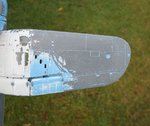
 Think this build maybe a write off
Decided today to strip all the paint off and start afresh ,using turps
For a couple minutes all seemed to be okay then disaster -it started to "melt" the plastic .Raced inside and got some soap which seemed to at first make it worse , lost quite abit of surface detail .Tried to clean it up best as possible and gonna give it multiple coats of klear in the hope te surface smoothes out abit .Definately won't be done tomorrow ,next estimate is a week .Gonna clear my head and not do any tomorrow but gonna get some more paint and then paint it all white on friday .The dam temperature aint helpingIf I can recover from this ,I can recover from anything
- Thread starter
- #85
109ROAMING
2nd Lieutenant
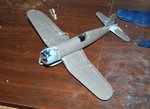
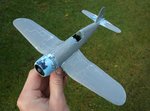
Here it is as of tonight - for all you guys saying what a waste of a tamiya kit -please forgive! I need to learn somehow
The second pic is the colours I'm after - the blue on the upper fusalage and lower fuselage and tailplane
Advice please on how to get these colours? will buy any brand/colours - Please help!
I got Warren Russel's book giving colours ,but he gives colours for the older range of Humbrol paints -so its a tad useless for me
Attachments
![05[1].jpg](/forum/data/attachments/88/88002-b5fc6a3ac78863f751256f962ba0199d.jpg)
A4K
Brigadier General
I've got a 'comparative' colour chart at home for the various paints Daniel, I'll get you the details later.
What's the story with the kits now - how badly did the turps eat the plastic?
What's the story with the kits now - how badly did the turps eat the plastic?
- Thread starter
- #87
109ROAMING
2nd Lieutenant
Thanks mate! pretty bad espicially the fusalage sides and left wing
Really hoping klear can save the day
Really hoping klear can save the day
lesofprimus
Brigadier General
Sorry to hear about the misfortunes Daniel.... Im interested as to why the plastic got eaten away....
- Thread starter
- #89
109ROAMING
2nd Lieutenant
Heres my best attempt at explaining it
This turps stuff is as you may know slightly acidic .I used a cloth with this dabbed on -paint came off fairly easily and then hit the plastic -obviously it was so strong it started to dissolve it
Must of been atleast 5 minutes before I realised what was going on .What delayed realising was it was a total mess (paint bits everywhere) then underneath it all this 'sticky' plasticy stuff started to appear -then it was a case of finding a base as soon as possible .Soap was the only thing I think I have thats near a base so as I said ,I ran inside and grabbed some and started to wash it as quickly as possible ,in a pathetic attempt to neutralise the turps .Nearly took it inside for a bath but the motor would of been ***** then -almost forgot about it
Anyone got tips on smoothing plastic like this? Il try and get a better photo up but frankly its a little embarassing .Will have a go at rescribing some of the lost panel lines ,now I'm just hoping I can get a okay result from it let alone near good
Lesson learn't NEVER put turps on a plastic model to clean it (my own stupid fault really ,should of tested it on some sprue) what a pain in the arse lesson to learn
Last edited:
More pics Daniel to see the extent of the damage...then we can see what is needed to get you back on track....hopefully mate!
- Thread starter
- #91
109ROAMING
2nd Lieutenant
Alright! first thing tomorrow! thanks mate
Catch22
Major
Sorry to hear about this!
From the pics though it doesn't look too too bad. Maybe you can sand it smooth?
From the pics though it doesn't look too too bad. Maybe you can sand it smooth?
Bummer! It might be salvagable though Dan.
This advice is a bit late, but for future reference.... Use Mr Muscle oven cleaner, or Fairy Powerspray (a bit gentler) if you can get it, to remove paint, spray it on, put the model in a plastic bag and tie it closed, leave for a few hours and then wash it off with soap and water, it removes the paint and doesn't damage the plastic.
This advice is a bit late, but for future reference.... Use Mr Muscle oven cleaner, or Fairy Powerspray (a bit gentler) if you can get it, to remove paint, spray it on, put the model in a plastic bag and tie it closed, leave for a few hours and then wash it off with soap and water, it removes the paint and doesn't damage the plastic.
Airframes
Benevolens Magister
I'm with wayne, need to see some good, clear pics, and some close-up shots if possible Daniel.
That's a great tip Keith, now noted in my memory cells, the 'little grey cells' as Poirot would say.
I'm a little puzzled that turps should attack the plastic, unless it's a really strong %, and even then, it shouldn't really do much, apart from possibly a slight etching, which would make 'fresh' plastic a little matt in appearance. Are you sure it isn't cellulose thinner? That would certainly dissolve the plastic.
EDIT:- Nearly forgot, IF this should ever happen again, pour milk over it, followed quickly by a strong solution of detergent, such as dish-washing liquid, in water. The milk won't cure the problem, but it should start to halt the process, whilst the detergent will separate the oils in the turps/thinner, making them inactive, and then it'll be fairly easy, if a little soapy, to rinse off any resulting mess.
Last edited:
- Thread starter
- #95
109ROAMING
2nd Lieutenant
Thanks for the tips guys -espicially that oven cleaner Keith! theres a build on the net ,a guy who also built a RNZAF Corsair using the tamiya kit and he said he used oven cleaner to strip it bare after the decals started to crack -I just didn't see the harm in using turps at the time!
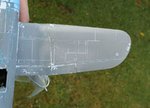
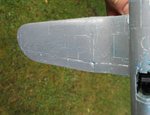
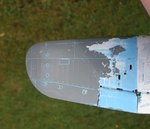
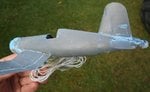
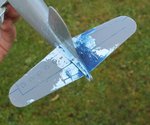
I think it could well be cellulose thinner Terry -as you can hopefully see by the pics -the left wing really took the worse hit (its literally removed all the fabric like detail) and the fusalage sides ,hopefully Cory I can get some like 6000 grit sandpaper and clean up some of the surfaces
I do think though its salvageble -just not by me!
Attachments

Catch22
Major
Dan, it looks bad, but you'll be able to sand it back to mostly new. Just don't get overzealous with the sanding or you'll remove everything that's left. Very fixable Dan!
Whoa. Sorry for the bad luck. Geez. I have to ask if anyone has used a product called Goof-Off. Seriously. It's supposed to safely remove acrylic paint. I've used it for that purpose but never on a model (styrene) because I don't use acrylics. I wonder if it's worth a try.
- Thread starter
- #98
109ROAMING
2nd Lieutenant
Thanks for the info Sweb - maybe see if I can get some of that as now theres only acrylics left on it
I agree Cory! I' got some 1000 grit sandpaper today and more klear so will see what I can do with it tomorrow
I agree Cory! I' got some 1000 grit sandpaper today and more klear so will see what I can do with it tomorrow
Certainly looks like you have lost some detail Daniel... make sure you DO use a very fine sandpaper to rub back very carefully so you don't loose too much more detail.
Do you have a fine needle or similar so you can carefully remove the paint from the panel lines, sort of rescribing them as you go, but again real careful as you do it.....
Do you have a fine needle or similar so you can carefully remove the paint from the panel lines, sort of rescribing them as you go, but again real careful as you do it.....
- Thread starter
- #100
109ROAMING
2nd Lieutenant
Sure will Wayne ,couldn't resist doing some tonight both wet and dry sanding -Wow! the fusalage sides are ALOT smoother
With further sanding and some rescribing I hopefully should be able to make it look okay , Ya think couple coats of klear will help 'level off' the uneveness? I'm real pleased I got that sandpaper -good thing is to you only need bugger all and so far its given a smooth finish! thanks for advice mate! theres hope
With further sanding and some rescribing I hopefully should be able to make it look okay , Ya think couple coats of klear will help 'level off' the uneveness? I'm real pleased I got that sandpaper -good thing is to you only need bugger all and so far its given a smooth finish! thanks for advice mate! theres hope
Users who are viewing this thread
Total: 1 (members: 0, guests: 1)