**** DONE: Spitfire Mk. Vb Trop. BS231 “D” of No 452 Sqn defending Darwin .

Ad: This forum contains affiliate links to products on Amazon and eBay. More information in Terms and rules

I Think they had "C" wings attached when they were transited to Oz from the UK.
I cannot find any pictures of the underside of the "C" wing at all to confirm.
The indent Are on the "B" wing.
 
Does this help Bill?
 

Attachments

  • 85sqnRAAF8.jpg
    85sqnRAAF8.jpg
    68.7 KB · Views: 110
And That is why I got it. By the photos you post, and someone had asked you what camera you used. I have been searching for one in My price range ever since, No I have one!!!! Maybe I can get some clear pictures now.:D

:thumbright: :D
My 555 cost considerably more than yours when I bought it all those years ago!:D

...and you're doing pretty good so far!!
 
I don't see the light on that pic from Andy. I believe the white circle near the wing tip is an access panel and it's not in the same place as the wing section Bill has posted.
 
I don't know of any Spit with those lamps; the only downward ID lamp normally fitted was the amber one, centrally placed just aft of the wing trailing edge. Very late Spits (21,22 and 24) had three lamps, in line, in a similar position. The photo posted shows a circular inspection panel, one of several on the forward section of each wing. The standard navigation lamps were mounted just outboard of the wing tip joints, on the leading edge, and were hemispherical Red to port, green (actually a blue/green) to starboard. There was a clear light on the fuselage spine, just aft of the radio mast, and another on the trailing edge of the rudder.
 
I knew I could count on yous guys, I think the light has been cleared up....... Your the tops, as Hawkeye would say.

This 555 I got is used, but guaranteed to be in top order and from the States. I do have an old Minolta XE-7 and a macro lens, I wish it was digital. That lens is sooo bloody good.

Yesterday was a bit of an exhausting day for me, slept most of the day. Today I will be painting the aluminium bits on my Typhoon. Thanks for the encouragement.
 
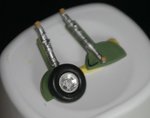
I couldn't believe it............. I vassillated, made and remade..... the bloody brake line.

Only to discover......... you can't see it when the wheel is attached!!!!!!!!! Aaaaaargh.
 

Attachments

  • 7 gear leg.jpg
    7 gear leg.jpg
    31.6 KB · Views: 102
That's a little funny Aaron. Reminds me when I was sign painting I spent 2-3 days lettering a van for a customer, really top job. Customer came to pick it up. As he was driving away I asked if I could have another day on it. "Hows come"? he asked.

So I can take My phone number OFF IT,and paint Yours ON IT! says I...............
 
So now I am fretting over the etched flaps I got for This one. You think I would have learned after One, the Typhoon!!!!!!!!! I hope this one goes quicker.

Hard to find time when the wife is on holiday!!!!

Well SH!T.............
Turns out these are for a Has kit, and mine is Tamiya. Thought I would just check lengths, and Has are shorter, but fatter. The inside short flap piece is longer on the Has kit. So they will be in the "I'll trade you for that" thread...... bugger.
 

Attachments

  • 8 etched flaps.jpg
    8 etched flaps.jpg
    47.7 KB · Views: 96
Last edited:
You're not the only one to make this sort of error Bill, my answer would be to purchase the Hasegawa kit after all, cant waste the flaps......................Maybe you can pick one up while down Melbourne way.
 
Not another kit!!!!!!!!
I've got a 1/48th Mustang, Merlin's Magic to finish.
A 1/48th F4U-1D to do.
A 1/32nd Merlin's Magic to start.
Not to mention the 1/72nds I've started..... 6 of em!

Good gosh man, I don't want to have stashes of kits like everyone else!!! LOL
 

Users who are viewing this thread

Back