Airframes
Benevolens Magister
22+5= XIV - a cross-kiting exercise
A recent post by Evan (A4K) has inspired me to embark on a second attempt at building a 1/32nd scale model of one of the best looking Spitfires ever to take to the skies.
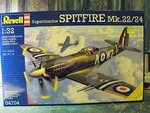
Evan suggested a 'theme build' centered around wrecked, abandoned or scrapped aircraft, and this gave me an idea to resurrect a cross-kitting exercise I almost completed some years ago, but this time without 'wasting' the bulk of the donor kit involved. Around about 1991, an almost finished Spitfire MkXIVc model I had built was wrecked when it 'spun in' off the top of a wardrobe whilst packing and preparing to move house. Ever since, I've often thought of starting over again, but didn't really want to waste about 75% of a relatively decent kit. So, when Evan suggested the wrecked or abandoned aircraft theme, it gave me an idea for an interesting diorama which could utilise the remains of an otherwise wasted, and therefore useless kit, in this case, the ex-Matchbox mid 70's vintage 1/32nd scale Spitfire Mk22/24, now reissued under the Revell lable. This 'donor' kit will be dealt with separately, and the build, and subsequent diorama display, posted in a separate thread.
But first, a little history.
The first Griffon engined Spitfire to see service with the R.A.F. during World War Two was the MkXII, something of a 'stop gap' fighter, employed in the medium to low level role, mainly to combat the hit and run raids, by FW190's, on British coastal towns and other targets. This aircraft was basically a MkV airframe, with clipped wings, and powered by the Rolls Royce Griffon III engine. Only two squadrons of Fighter Command used the type, numbers 41 and 91 Squadrons, from January and April 1943 respectively.
The first Griffon powered Spitfire to see large scale production, however, was the MkXIV, which equipped 37 squadrons of the R.A.F., commencing with 610 (County of Chester) Squadron, Aux.A.F., in January 1944.
The type was based on the airframe of the MkVIII, which itself had evolved from the MkV via the MkIX, and saw service well into the post-war years, making it the most widely used of the Griffon engined Spitfires.
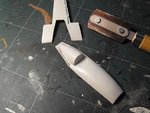
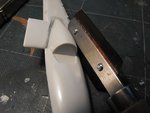
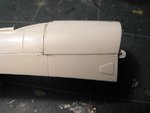
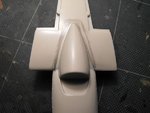
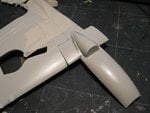
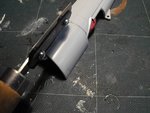
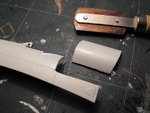
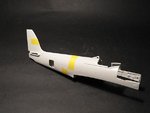
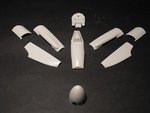
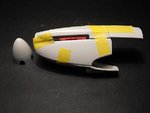
To build this model, I'll be canibalising the aforementioned Revell kit, using everything forward of the cockpitl, as well as some other parts, such as the radiators, supercharger intake, cannons, rear wheel assembly and other bits and pieces. There will also be a lot of scratch-building, filling, moulding and sanding, in order to blend the whole lot onto the main airframe and wings of the Hasegawa MkVB, which is still a good kit, and offers the best 'platform' for this realtively drastic conversion attempt.
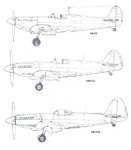
The attached drawings show the differences in shape between the three separate Marks already mentioned, and give some idea of how the early and late designs should combine to produce the MkXIV.
I'm still waiting for delivery of the Hasegawa kit, which I've used for three previous conversions to different Marks, so at the moment I'm busy measuring and marking out where various cuts and other butchery needs to be done to achieve the desired result. With a bit of luck, I should have the MkV kit in about a week, so I'll post some pics of the first stages of what, I hope, will be an interesting little exercise.
Meanwhile, I'll get back to the PTO build, and the huge decalling job on the Hunter!
Thanks for your interest,
Terry.
A recent post by Evan (A4K) has inspired me to embark on a second attempt at building a 1/32nd scale model of one of the best looking Spitfires ever to take to the skies.
Evan suggested a 'theme build' centered around wrecked, abandoned or scrapped aircraft, and this gave me an idea to resurrect a cross-kitting exercise I almost completed some years ago, but this time without 'wasting' the bulk of the donor kit involved. Around about 1991, an almost finished Spitfire MkXIVc model I had built was wrecked when it 'spun in' off the top of a wardrobe whilst packing and preparing to move house. Ever since, I've often thought of starting over again, but didn't really want to waste about 75% of a relatively decent kit. So, when Evan suggested the wrecked or abandoned aircraft theme, it gave me an idea for an interesting diorama which could utilise the remains of an otherwise wasted, and therefore useless kit, in this case, the ex-Matchbox mid 70's vintage 1/32nd scale Spitfire Mk22/24, now reissued under the Revell lable. This 'donor' kit will be dealt with separately, and the build, and subsequent diorama display, posted in a separate thread.
But first, a little history.
The first Griffon engined Spitfire to see service with the R.A.F. during World War Two was the MkXII, something of a 'stop gap' fighter, employed in the medium to low level role, mainly to combat the hit and run raids, by FW190's, on British coastal towns and other targets. This aircraft was basically a MkV airframe, with clipped wings, and powered by the Rolls Royce Griffon III engine. Only two squadrons of Fighter Command used the type, numbers 41 and 91 Squadrons, from January and April 1943 respectively.
The first Griffon powered Spitfire to see large scale production, however, was the MkXIV, which equipped 37 squadrons of the R.A.F., commencing with 610 (County of Chester) Squadron, Aux.A.F., in January 1944.
The type was based on the airframe of the MkVIII, which itself had evolved from the MkV via the MkIX, and saw service well into the post-war years, making it the most widely used of the Griffon engined Spitfires.
To build this model, I'll be canibalising the aforementioned Revell kit, using everything forward of the cockpitl, as well as some other parts, such as the radiators, supercharger intake, cannons, rear wheel assembly and other bits and pieces. There will also be a lot of scratch-building, filling, moulding and sanding, in order to blend the whole lot onto the main airframe and wings of the Hasegawa MkVB, which is still a good kit, and offers the best 'platform' for this realtively drastic conversion attempt.
The attached drawings show the differences in shape between the three separate Marks already mentioned, and give some idea of how the early and late designs should combine to produce the MkXIV.
I'm still waiting for delivery of the Hasegawa kit, which I've used for three previous conversions to different Marks, so at the moment I'm busy measuring and marking out where various cuts and other butchery needs to be done to achieve the desired result. With a bit of luck, I should have the MkV kit in about a week, so I'll post some pics of the first stages of what, I hope, will be an interesting little exercise.
Meanwhile, I'll get back to the PTO build, and the huge decalling job on the Hunter!
Thanks for your interest,
Terry.
")