BoB Group Build Q and A (2 Viewers)

Ad: This forum contains affiliate links to products on Amazon and eBay. More information in Terms and rules

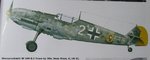
Further to the discussions In my BoB stuka thread

I've just recieved a copy of 'Luftwaffe Colours, Stuka Volume 1' by Peter C Smith

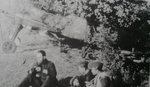
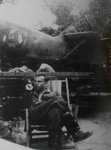
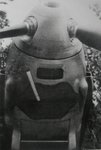
In relation to the markings on the plane of my thread, where I'd pretty much decided to go with the green colour, I read in relation to II./StG 1 that some of the planes did indeed have 'dark grey' markings as was comon of III./StG 51 the unit from which II was redesignated.
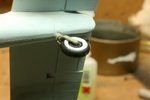
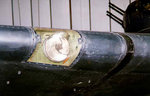
The question I have now, looking at the photograph do I go All grey as the skin I have or possibly a green A ??? A or still as originally planned all green??
 
Here ya go Harrison...

Source : Jagdwaffe Vol.2 Section 2 Battle of Britain Phase 2
 

Attachments

  • White 2_1435.JPG
    White 2_1435.JPG
    41.2 KB · Views: 143
  • White 2_1437.JPG
    White 2_1437.JPG
    43.7 KB · Views: 130
  • White 2_1438.JPG
    White 2_1438.JPG
    37.1 KB · Views: 135
  • White 2_1439.JPG
    White 2_1439.JPG
    57.9 KB · Views: 139
  • White 2_1440.JPG
    White 2_1440.JPG
    22 KB · Views: 116
Pete, if you've got strong evidence of the codes being grey, I'd go with that. The individual identifying letter I think would possibly use the required colour, so if you made that green, then it could be right, and also covers both options !
 
Probably get pre-cut masks - if available. Or take a deep breath and do it freehand - it's not as difficult as it sounds, although it might take more than one attempt. I normally paint the whole of the tyre wall very light grey (for the white wall), then edge the inside around the wheel rim, and the outer edge near the tread, in the tyre colour, using a fine brush and paint thinned just enough to allow an even, free flow.
 
You could try using a paint pen, if you don't fancy brush painting. You should be able to get a white one from an artists shop or stationers. I'd never thought of that myself until now - just spotted the silver one I use for landing gear oleos and zap! Idea sprang into the ageing grey matter ! Heck, sometimes I amaze myself !!!
 
If you can't find masks just take your time and don't get frustrated if you have to touch it up 3 of 4 times. I usually have to my self. I think painting wheels is my least favorite part to the model building process!!
 
Probably get pre-cut masks - if available. Or take a deep breath and do it freehand - it's not as difficult as it sounds, although it might take more than one attempt. I normally paint the whole of the tyre wall very light grey (for the white wall), then edge the inside around the wheel rim, and the outer edge near the tread, in the tyre colour, using a fine brush and paint thinned just enough to allow an even, free flow.

BINGO! That's the way I was thinking of doing it. :idea:
 
If you can't find masks just take your time and don't get frustrated if you have to touch it up 3 of 4 times. I usually have to my self. I think painting wheels is my least favorite part to the model building process!!

You can say that again sir....

It used to be sanding and filling but with nail polish you don't need to sand anymore....soooooooooooo...


and Terry will look for a paint pen
 

Attachments

  • 100425%20Tail%20Wheel.jpg
    100425%20Tail%20Wheel.jpg
    58.5 KB · Views: 125
Hmmm I do not but, looking at the tire its pretty small so I think it'll be a bit easier than I think to just freehand and use microbrushes for black so I can touch up the white paint.
 
Need another hand with my Defiant.
The kit has a defined raised fairing on the wing joint. It is very rounded, or crowned.
I found a link to a museum night version and it shows a "strap" at the leading edge, see attached photo.
Can someone tell me if this is the Mounting Strap for the crowned fairing.
If I recall, the join on a T-6, or Harvard has a rounded or crowned fairing over this join.
My defiant kit has a rather flat badly defined fairing at the leading edge of the wing, and I want to correct this.

Bill
 

Attachments

  • wing joint dtl.jpg
    wing joint dtl.jpg
    10.9 KB · Views: 122
Not totally clear which part (on the kit) you mean Bill. However, as the photo you posted is of the one and only Defiant still in existence (apart from another full scale replica), details are not easy to come by. What is shown in the photo appears to be the strip over the wing joint, similar to that on the Hurricane.
 
Okay here's a question.

The resin seat from Ultracast for the Hasegawa Hurricane has a molded convoluted tube hanging over the back. See first pic. I thought this was for the oxygen supply to the mask, however, to be correct for the BoB period it's the wrong style, as only the 'D' type cloth masks were used, which had a thin rubber tube as the supply. See second pic from BoB movie.

Would I be correct in removing the said convoluted tube?


Cheers

Peter
 

Attachments

  • bob face mask oxy tube 2.jpg
    bob face mask oxy tube 2.jpg
    105.7 KB · Views: 109
  • bob face mask.jpg
    bob face mask.jpg
    37 KB · Views: 114
Last edited:
I wouldn't trust the picture from the movie....
 
Last edited:

Users who are viewing this thread

Back